With over 1.5 billion users worldwide, Gmail is one of the most prominently used emailing services. Well, with dimensional services like free-up drive space up to 15 GB, and video call feature with Google Meets, why wouldn’t it be a prominent service? But somehow the Gmail SMTP server not working is also one of its prominent issues that users have been facing for quite a long time now. It’s when Gmail fails to send or receive the emails.
SMTP stands for Simple Mail Transfer Protocol, it is an internet protocol of communication for mail transmission. The SMTP server might stop working due to the incorrect configuration. Thus, if you encounter any issue related to the Gmail SMTP server, all you have to do is configure the Gmail SMTP settings in the right way. Here’s what you should know.
How Can I Fix Gmail SMTP Not Working Issue?
Not being able to send or receive emails might lead to a blunder, especially when 90 percent of your work depends on the emails. This issue may sound quite technical but it is actually a piece of cake when it comes to resolving it. All you need to do is know the right steps and methods and you will have your problem resolved just like that. So let’s get started with learning how to do so by disabling the two-step authentication:
Disabling Two-Step Authentication
The two-step authentication method is for high security which eventually doesn’t allow the less secure apps to enter your provision. This is why it is mandatory to start with disabling the two-step authentication:
- Sign in to your Gmail account.
- Click on the Manage Account Settings.
- From the top left panel, click on the Security option.
- There, in the Signing into Gmail option, click on the 2-step verification option.
- Enter your Gmail account password and tap on the Turn-Off button.
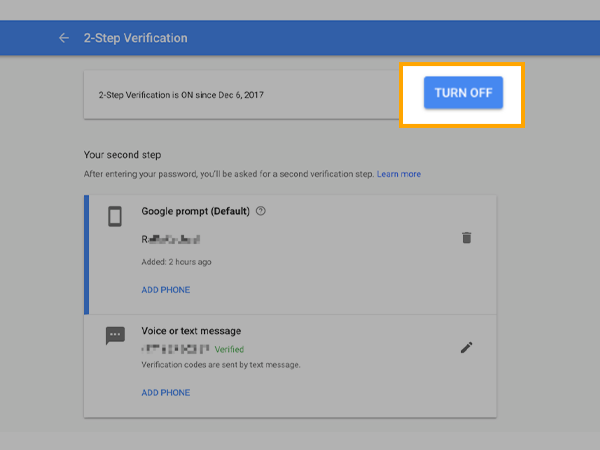
- Click on confirm to finish the process and you are all done.
Once done with disabling 2-step verification, next what you need to do is allow the less secure apps. Here’s how to do it.
Allowing Less Secure Apps
Here’s how to allow the less secure apps to fix Gmail smtp not working issue:
- Sign in to your Gmail account and visit the My Account option.
- Click on the Security tab from the left panel.
- Now, scroll down to select the Less secure apps option.
- Once done with that, click on the Turn on Access (Not Recommended) option.
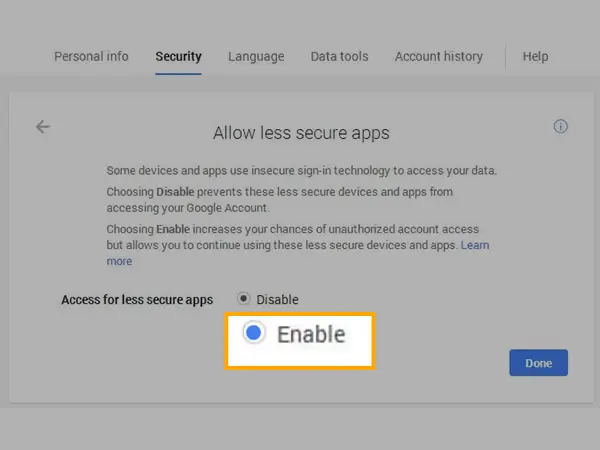
- And finally, enable the less secure apps by clicking on Done.
Another possibility is you may have enabled 2-step authentication by generating an app password. If that’s the case with you, there’s nothing to worry about, here’s what you can do.
Generating App Password When Two-Step Authentication is Enabled
Fixing the Gmail SMTP server not working issue with generating app password will mix most of your issues. But the prior issue that it is going to fix is sending emails to the third party. Here’s how to do it:
- Login to your Gmail account and visit the My Account section.
- There, click on Security, scroll down, and select the Signing into Google option.
- Then, click on App Password.
Notes
You will only see this option when two-step authentication is enabled.
- To enable two-step authentication-
- From the Signing into Google option, click on the Two-step Verification option and then enter the password.
- After that, turn on the two-step verification by filling in the OTP you received on your mobile.
- Then, you will see a list of applications, pick the one that suits you.
- Click on the Select Device option, then select the device that is being used for operating the Gmail account.
- Click on Generate and then fill in the password highlighted in the yellow bar.
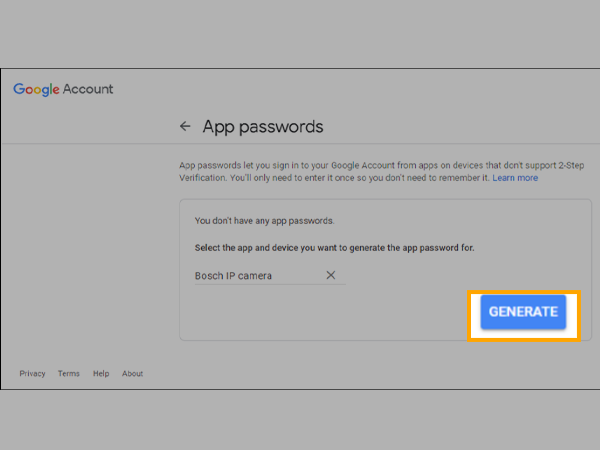
- Finally, click on Done.
Now that you have learned how to fix the Gmail SMTP settings, what’s next in the queue is learning how to configure the SMTP settings. Here’s how to do it.
How to Configure SMTP Settings?
Just like discussed earlier, the top reason Gmail is not able to send or receive emails is due to the incorrect SMTP configuration. Here’s how to do it:
- Gmail SMTP Server Address: smtp.gmail.com
- Gmail SMTP name: Your full name
- Gmail SMTP username: Your full Gmail address (for e.g.,- abc2gmail.com)
- Gmail SMTP password: Your Gmail ID password
- Gmail SMTP port (TLS): 587
- Gmail SMTP (SSL): 465
So this was the SMTP server settings. SMTP is an outgoing server setting, hence, it will only resolve the issue of outgoing emails and not the incoming ones. For that, you will have to enable the POP/IMAP settings to tackle the Gmail POP mail not working issue. Here’s how to do that.
Enabling Gmail POP Settings?
Here’s how to enable the Gmail POP settings:
- Login to your Gmail account and visit the Settings section.
- There, click on See All Settings.
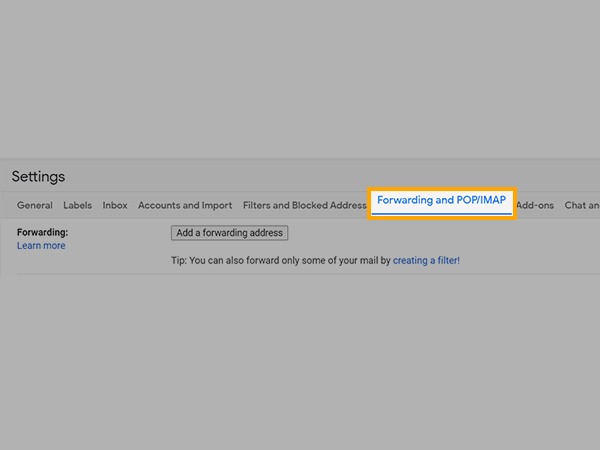
- Click on the Forwarding and POP/IMAP tab.
- Then, in the POP Download section, click on Enable POP for all mail.
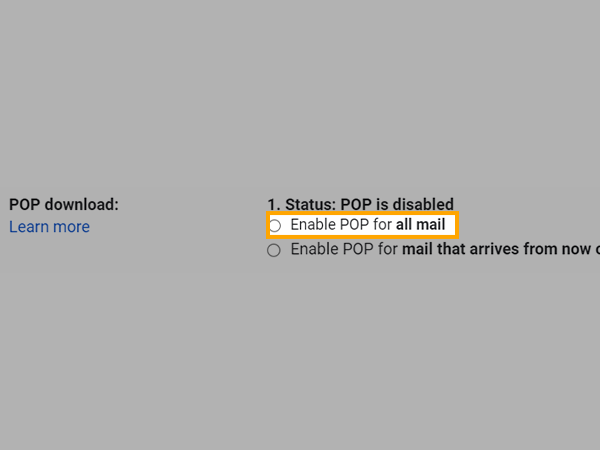
- And then, click on Save Changes.
- And then, you need to sign in to your third-party email app to enter the following settings for your incoming mail server-
- Incoming Mail Server (POP): pop.gmail.com
- Required SSL: Yes
- Port: 995
- Server timeout: More than 2 minutes (5 minutes is required)
- Display Name: Your name
- Username: Your Gmail email account ID
- Password: Your Gmail ID password
So these were the Gmail POP settings. What some people may not realize is that there’s one more setting for the incoming email server, the IMAP setting. Here’s how to do that.
Enabling Gmail IMAP Settings
Once you are done with the Gmail SMTP settings and the POP settings for the incoming emails, next what you should manage is the IMAP settings. Here’s how to do it:
- Login to your Gmail account and visit the Settings section.
- There, click on See all Settings.
- There, click on the Forwarding and POP/IMAP tab.
- In the IMAP enable section, you will see the Enable IMAP option, click on it to continue.
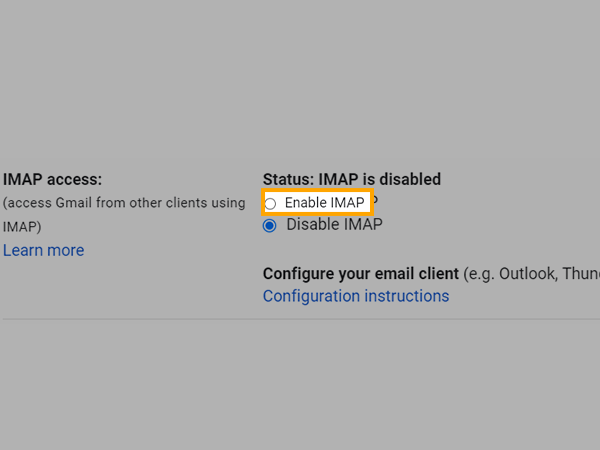
- Click on Save Changes. And now you need to sign in to a third-party email client and enter the following IMAP settings-
- Incoming Mail Server (IMAP): imap.gmail.com
- Required SSL: Yes
- Port: 993
- Display Name: Your full name
- Username: Your Gmail ID
- Password: Your Gmail ID password
Not being able to send or receive emails or even not being able to receive the verification code on Gmail can be a nightmare. So whenever you receive a Gmail SMTP server setting error, you need to configure it in the correct way with the correct details and credentials. Simply follow the above-given steps and you will be all good to go. All you need to do is to make sure that you follow the right methods.


