Is there any need to introduce ‘Gmail’ and Microsoft Outlook like why they’re popular among most of the world population? Of course not! So, let’s straightaway come to the point.
For many years, Microsoft and Gmail were seen as two independent entities putting themselves against each other but soon they realized that they must work in harmony to foster productivity and make life easier for all ‘especially employees’ who depend on both Outlook and Gmail for their daily work like managing emails, appointments, and meetings etc.
Thus, G Suite Sync was introduced. This feature allows Gmail users to add their respective accounts in Microsoft Outlook so that they can simply manage both their email accounts from one single platform without breaking a sweat!
Besides that, these are also the reasons why majority of Gmail and Outlook users decide to ‘Configure Gmail in MS Outlook’—
- Using MS Outlook you can check your emails in Offline mode and this you cannot do with Gmail’s webmail platform. Basically, you cannot work in Offline mode with Gmail but with MS Outlook, it is possible.
- Then, compared to Outlook, it’s a bit tricky to organize messages and emails in Gmail.
- Last but not least, managing multiple email accounts with Gmail is not at all easy but this you can do without any hassle with Outlook.
So, with that said, if you also decide the same and wondering how to setup Gmail in Outlook’s desktop email client then, let us tell you that these are the steps you need to follow to “Set up Gmail in Microsoft Outlook”—
Albeit, the process of configuring Gmail in Outlook is very simple but as you see, it’s lengthy enough. So, you have to follow the entire process systematically otherwise, you won’t be able to configure Gmail in Outlook.
Now, having that in mind, let’s begin—
Step 1: Prepare your Gmail Account for Microsoft Outlook
This step requires you to sign-in to your Gmail account to enable IMAP/POP protocol and allow access to less secure apps so that you allows Outlook to connect with your Gmail account to download as well as send messages!
Firstly, Sign-In to Your Gmail Account
Get into your Gmail account that you want to add or sync with Outlook and to do so—
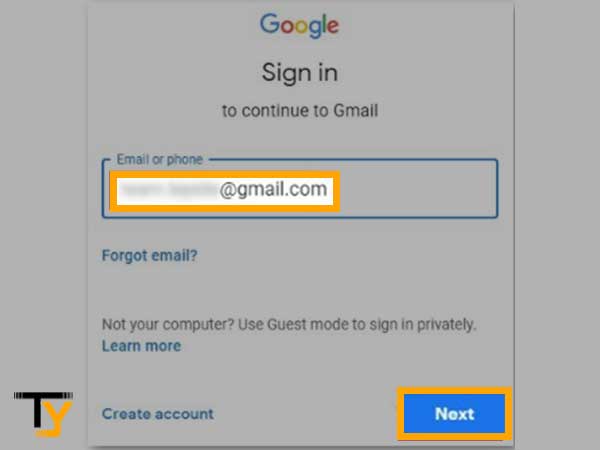
- Visit the Gmail Login Page using your web browser.
- On the same, enter your ‘Gmail account ID’ and click on the ‘Next’ button.
- Then, as asked, enter your ‘Gmail account Password’ and again, hit the ‘Next’ button.
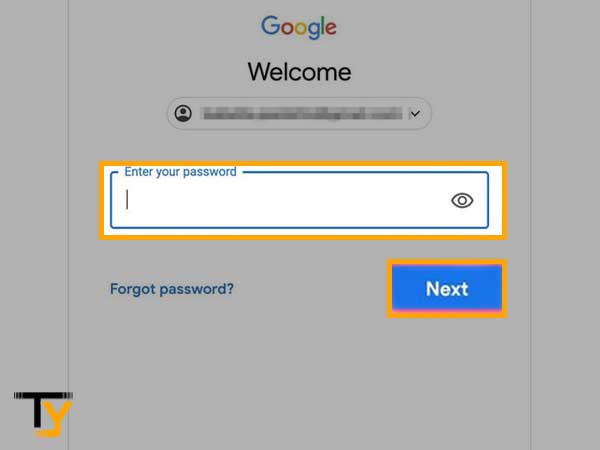
- Now, click on the ‘Sign-in’ button to login to your Gmail account.
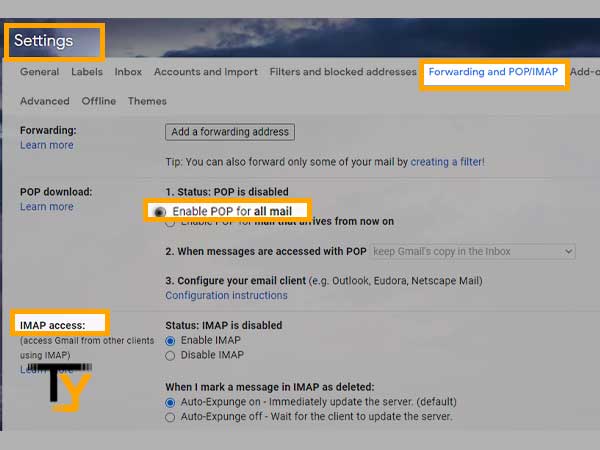
Secondly, Enable POP/IMAP Protocol for Your Gmail Account
Once you get access to your Gmail account, check whether the “Enable IMAP” or “Enable POP for all mail” option is enabled or not! If not then, you won’t be able to sync Gmail with Outlook until and unless you turn on POP/IMAP access in your Gmail account via these steps—
- Click on the ‘Gear-like icon’ from the top-right corner of your Gmail account.
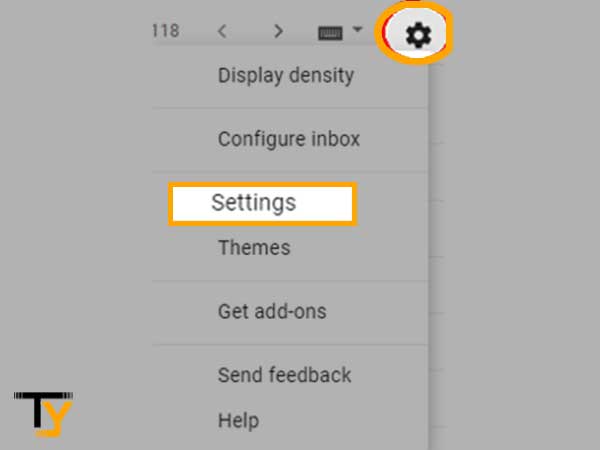
- Then, select its ‘Settings’ option from the menu that appears.
- On the settings page, click on ‘Forwarding and IMAP/POP’ tab to open the same.
- Under it, locate the ‘IMAP Access’ section and click on it to select the ‘Enable IMAP’ option.

- Once you’re done, just click on the ‘Save Changes’ button to apply the made changes.
Notes
You can also configure Gmail in Outlook by ‘Enabling POP Access for all mail’ option in the same above manner as all you have to do is select ‘POP Access’ instead of ‘IMAP Access.
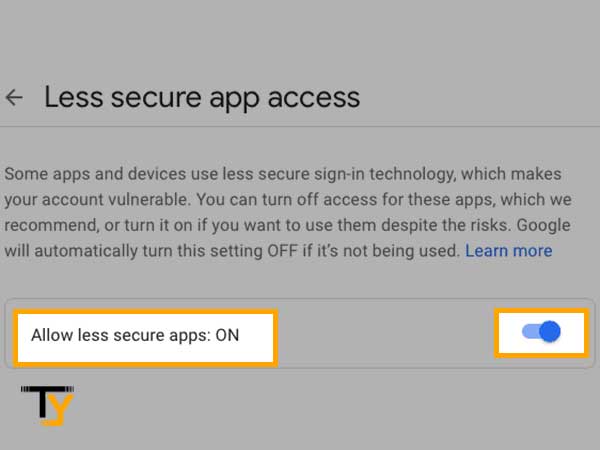
Thirdly, Allow Access to Less Secure Apps
As by default, the option of “Allow Less Secure Apps” is turned off by Google to secure your Gmail account from those apps and devices that use ‘less secure sign-in technology’ so, you’ve to turn it on to access Gmail easily from Outlook. Thus, to allow less secure app access—
- Head towards the ‘My Account’ option of your Gmail account.
- Inside the My Account section, you’ve to select the ‘Security’ option.
- Following that, you’ve to simply toggle the switch of ‘Allow less Secure Apps’ to turn it ‘ON.’
Notes
Alternatively, you can also click on this link “https://myaccount.google.com/lesssecureapps?pli=1&rapt=AEjHL4NUE5zizC9FuNouH5ZXpb8ZTy3eHTYF_lAShi5ugIDyTFvWvNA9AFlgH43cY_ej1KcmRMTxSRdQ9UoUsZ1uAgWimL9uJw” to ‘Allow Less Secure App Access.
Step 2: Get an App-Specific Password for Your Gmail Account
MFA i.e., Multi-Factor Authentication or 2FA i.e., 2-Factor Authentication, is nowadays essential to keep your email account data stored in SaaS applications like G suite and Microsoft secured. So, in case you’ve enabled 2FA for your Gmail account then, you’ll need to obtain an app-specific password to setup your Gmail account in Outlook application and therefore, to do so—
- Click on the ‘Profile Icon’ from the top-right corner of the inbox page of your Gmail account.
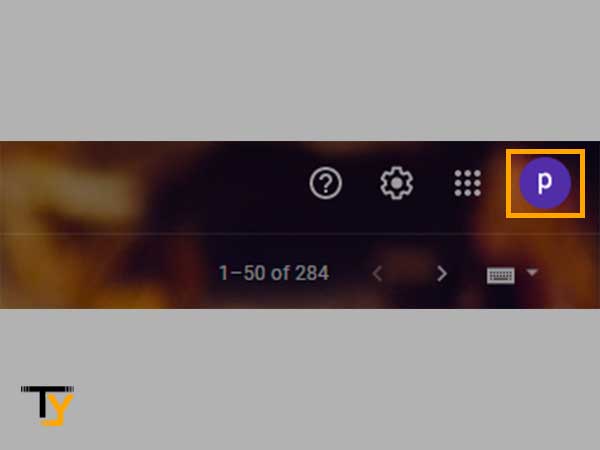
- Then, click the ‘Manage Your Google Account’ option from the menu that appears.

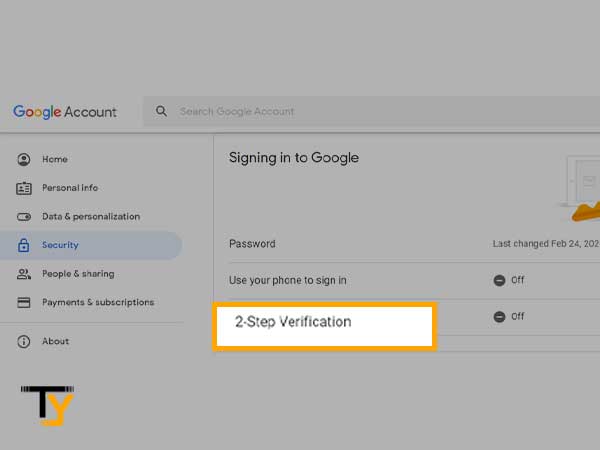
- Next, you’ve to locate the ‘Security Tab’ on the left side of the window and select the same.

- After this, turn on ‘2-Step Verification’ which is inside the ‘Signing in to Google’ section.
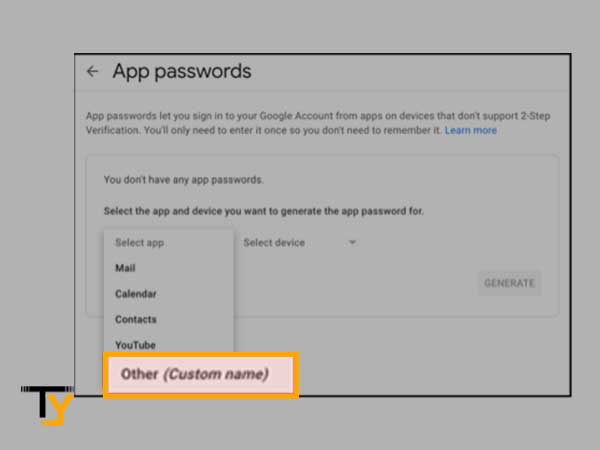
- In continuation, you’ve to click on ‘App Passwords’ and in the app password window, select the ‘Other’ option from the drop-down menu.
- Following that, type ‘Outlook’ and hit the ‘Generate’ button.
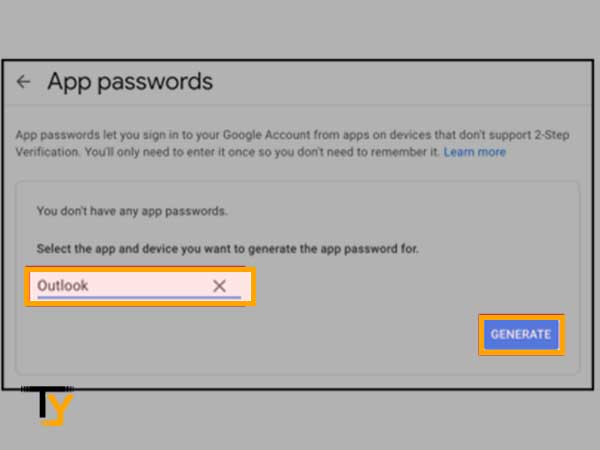
- In doing so, when Google generates an app password, click ‘Done’ and note this password somewhere as you need this while connecting your Gmail account to Outlook.
Step 3: Keep the Gmail Server Settings for Outlook Handy
To sync your Gmail account with Outlook desktop client, you need to use the following Gmail server settings—
‘IMAP | POP and SMTP’ Server Settings of Gmail for Outlook Email Client
| Incoming (IMAP) & Outgoing (SMTP) Mail Server Settings | Incoming (POP) & Outgoing (SMTP) Mail Server Settings |
| Incoming Server: imap.gmail.com Incoming Server Port: 993 Outgoing Server: smtp.gmail.com Outgoing Server Ports: 465 with SSL or 587 with TLS SSL Encryption: Yes Authentication: Yes, Email & Password Email Address: Your Gmail account address for instance; username@gmail.com Password: Your Gmail account password that you currently used to log in/ app-specific password you’ve generated using 2FA. | Incoming Server: pop.gmail.com Incoming Server Port: 995 Outgoing Server: smtp.gmail.com Outgoing Server Ports: 465 with SSL or 587 with TLS SSL Encryption: Yes Authentication: Yes, Email & Password Email Address: Your Gmail account address for instance; username@gmail.com Password: Your Gmail account password that you currently used to log in/ app-specific password you’ve generated using 2FA. |
Step 4: Connect/Add Your Gmail Account to Microsoft Outlook
Now, as you have completed the above-mentioned 3 necessary steps, it’s time to finally add your Gmail Account in Microsoft Outlook. However, for that, you need to ensure which Outlook version you’ve on your computer and then, accordingly you’ve to execute the below-mentioned steps—
Setup and Configure Gmail Account in Outlook Email Client Versions 2019, 2016 and Microsoft 365!
Step 1: To begin, launch the MS Outlook Program on your desktop.
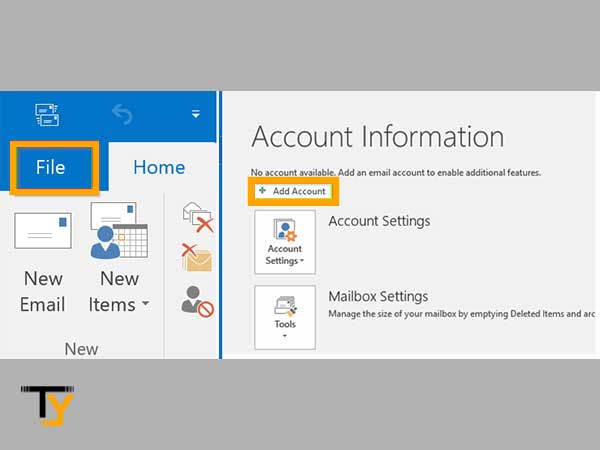
Step 2: Then, in Outlook, navigate to the ‘File Tab’ which is in the top-left corner of the screen and click on the same to expand it.
Step 3: From the menu that appears, you’ve to click on the ‘Add Account’ option.
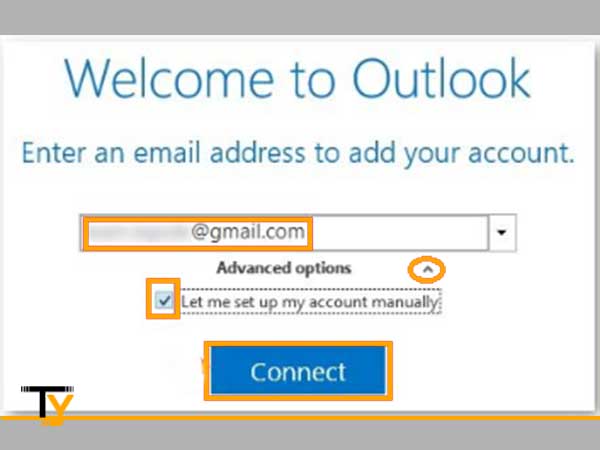
Step 4: In doing so, a wizard box pops-up on the screen and inside the same, you’re prompted to enter your ‘Gmail ID.’
Step 5: Once you enter your Gmail ID, click on the drop-down menu of ‘Advanced’ option and simply select ‘Let me set up my account manually’ followed by clicking the ‘Connect’ button.
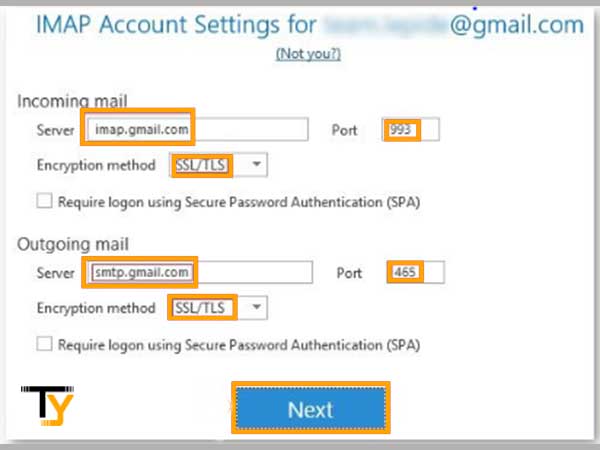
Step 6: As you do so, you’ll be taken to the new page where you’ve to enter the following IMAP server settings of Gmail and hit the ‘Next’ button—
- In Incoming Mail Section, enter—
- Server Name-imap.gmail.com
- Server Port-993
- Encryption Method- SSL
- In Outgoing Mail Section, enter—
- Server Name-smtp.gamil.com
- Server Port-465
- Encryption Method-SSL/TLS
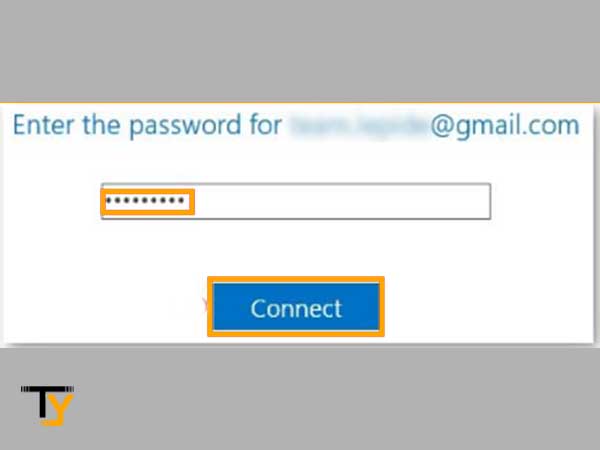
Step 7: On the next page, enter your Gmail account ‘Password’ that you currently used to log in to your Gmail account or the app-specific password that you’ve generated.
Step 8: Upon entering the same, click on the ‘Connect’ button.
Step 9: Now, you’ve to just wait until the configuration of Gmail to Outlook completes and then, click on the ‘OK’ button to make sure that you’ve successfully added your Gmail account in Outlook.

Setup and Configure Gmail Account in Outlook Email Client Version 2014, 2010 or 2007!
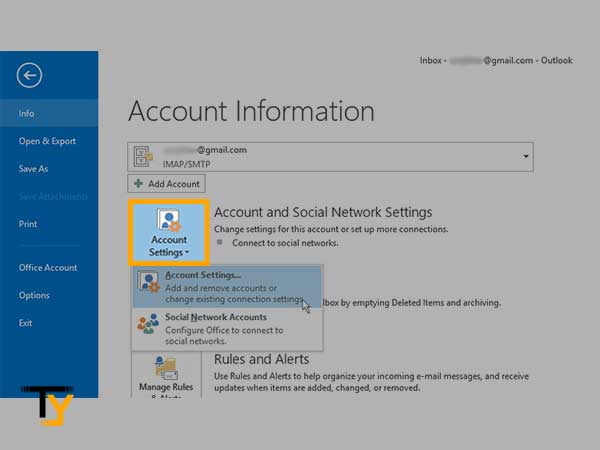
Step 1: Launch Outlook, go to the ‘File Tab’ and click on it to select the ‘Account Settings’ option.
Notes
In Outlook 2010 and previous versions, one needs to click on the Tools option instead of File Tab.
Step 2: Then, in the Account Settings window, you’ve to click ‘New’ from the ‘Email’ tab.
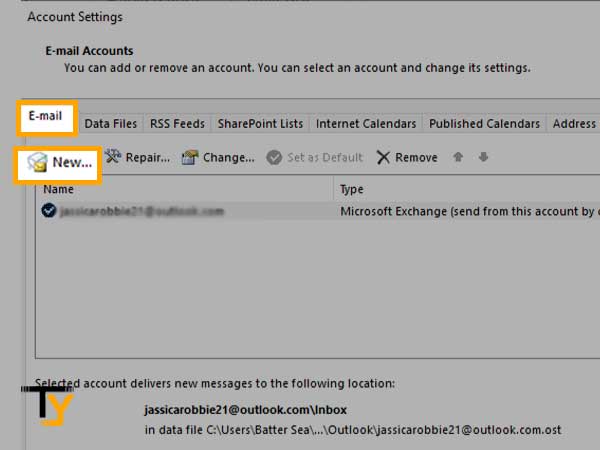
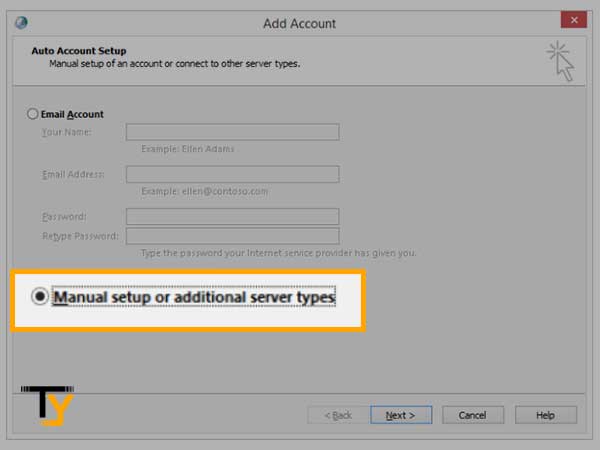
Step 3: In doing so, you’ll be directed onto the new window and there, all you need to do is select the ‘Manual setup or additional server types’ option and click on the ‘Next’ button.
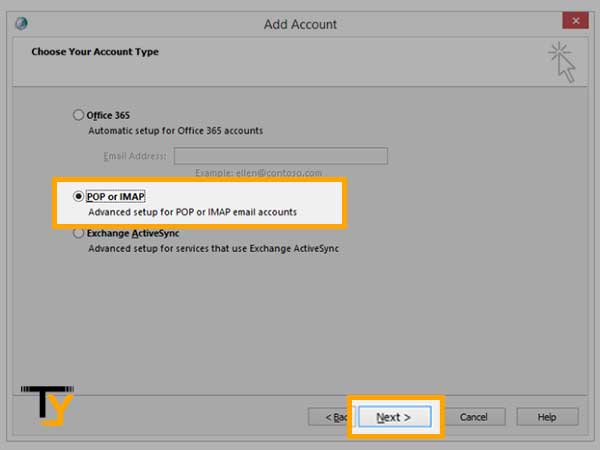
Step 4: On the next window, simply select the ‘POP or IMAP —Connect to a POP or IMAP Email Account’ option and again, hit the ‘Next’ button to move further with the process.
Notes
In Outlook 2010 and previous versions, one is required to choose ‘Internet-Email’ in place of this ‘POP or IMAP’ option.
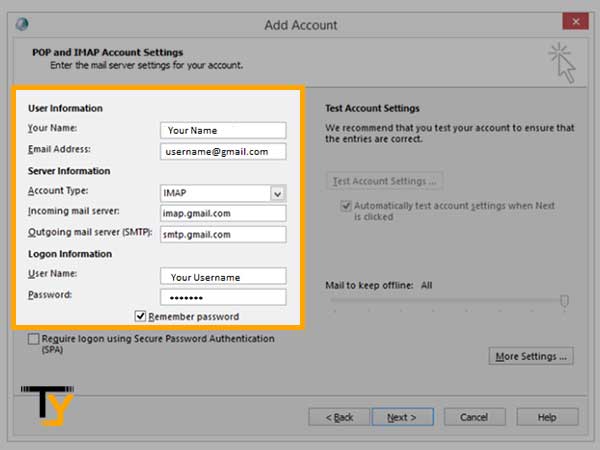
Step 5: Now, you’ll have to add mail server settings of your Gmail’s ‘IMAP/ POP’ account in the following sections of ‘Internet Email Settings Page’—
- In User Information Section:
- Your Name– Enter your Name that appears in your Gmail’s outgoing messages &
- E-mail Address– Enter your Gmail account’s Email Address in the format such as ‘username@gmail.com.’
- In Server Information Section:
- Account Type– Select either IMAP or POP as your Gmail account-type.
- Incoming Mail Server: Enter imap.gmail.com if selected IMAP or pop.gmail.com if selected POP
- Outgoing Mail Server: Enter smtp.gmail.com.
- In Logon Information Section:
- Username- Enter your Gmail account’s username/ID
- Password- Enter your current Gmail account’s password or the app-specific password that you’ve generated.
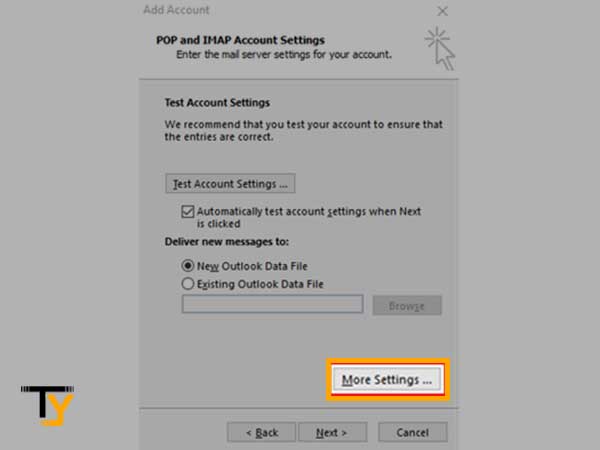
Step 6: Upon entering these details, click on the ‘More Settings’ option from the bottom-right corner of the screen. By doing so, you’ll reach onto the ‘More Settings Window’ to enter the more configuration settings of your Gmail account.
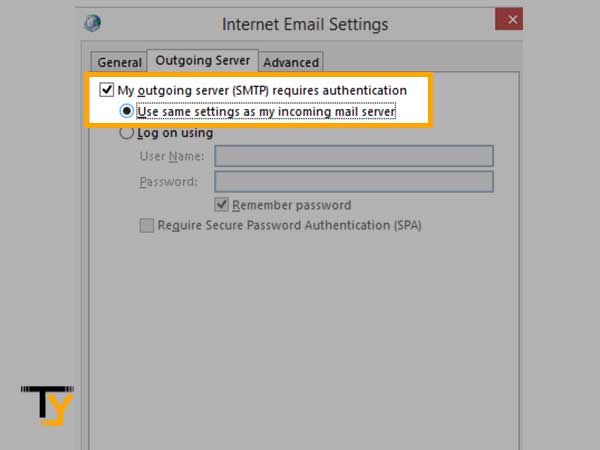
Step 7: On the same, what you’ve to do is select the ‘Outgoing Server Tab’ and make sure to select these following two options—
- My outgoing server (SMTP) requires authentication.
- Use Same Settings as my incoming mail server.
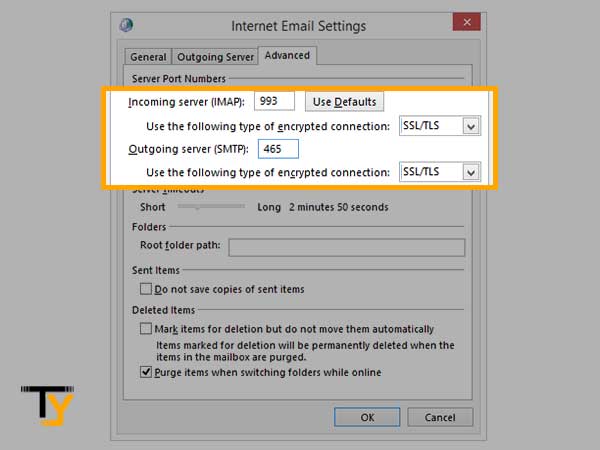
Step 8: Following that, click the ‘Advanced Tab’ and simply enter the following details—
- Incoming Server– 993 for IMAP or 995 for POP
- Incoming Server Encrypted Connection – SSL
- Outgoing Server (SMTP) – 465 or 587
- Outgoing Server Encrypted Connection – SSL/TLS (in case, available)
Step 9: After you finish entering these details, click on the ‘OK’ button to return onto the previous window.
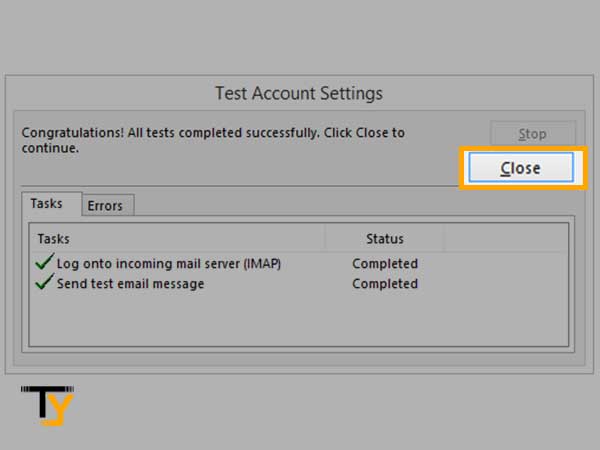
Step 10: There, you’ve to click on the ‘Next’ button to ‘Test Account Settings’ of your Gmail account that you’ve added in Outlook.
Notes
While the same is happening, be patient because it depends on your Gmail’s mailbox. If you’ve a large mailbox then, the process of testing your Gmail account settings will take more time. However, if you don’t have a large mailbox then, it will finish in seconds.
Step 11: Once the test finishes and the report indicates that everything is fine then, just click on the ‘Close’ button to complete the configuration process.
Finally, Congratulations! You’ve successfully added your Gmail email in Outlook and now click on ‘Finish’ to use your Gmail account right inside ‘Microsoft Outlook – the desktop email client program.’
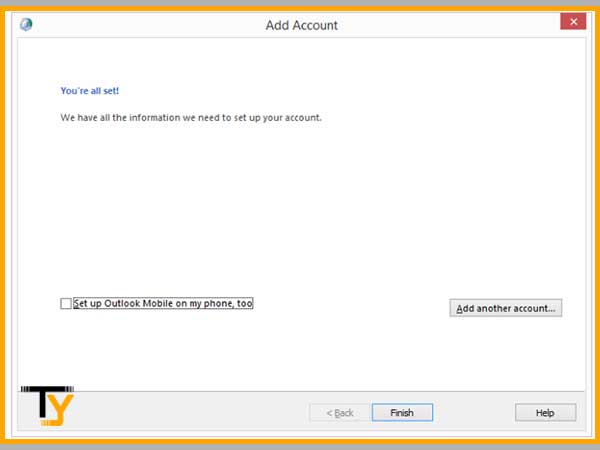
That’s all. This is how you’ll be able to successfully add or sync your Gmail Account with your Outlook’s respective version be it Microsoft 365, 2019, 2016 or 2014 and previous versions. Upon configuring Gmail in Outlook, you can continue using both your accounts on the desktop for as long as you want to!
However, if you face any difficulty and cannot sync/add your Gmail account within Outlook using this guide then, instead of wondering why Gmail is not syncing, you can get assistance from this next blog of ours.
Otherwise, there’s this below-given method using which you can transport your Outlook messages to your Gmail account. You can use this method as a handy solution when you cannot add Gmail to Outlook but want to use Gmail and at the same time, need to keep a track of your Outlook data also.
Migrate Messages and Other Data from Outlook to Gmail
To do so, first it is suggested that you keep your ‘Junk and Deleted Email folder’ clear and then, you’re good to go to execute the steps that we’ve listed underneath—
- Initiate the process by signing in to your Gmail account.
- Upon getting access to your account, click on the ‘Gear-like icon’ from the top-right corner of the screen.
- In doing so, your account ‘Settings’ will open and from its menu, click on the ‘Accounts and Import Tab’ to open.
- Inside the same, you’ve to locate the ‘Import Mail and Contacts’ option.
Notes
In case you have used this account to import contacts in the past also then, you’ll get another option namely ‘Import from another address.’ So, you’ve to select accordingly.
- Upon doing so, you’ll be prompted to follow the on-screen instructions where you need to type your Outlook email address in the box that reads— ‘What Account do you want to import from?’
- After this, click on the ‘Continue’ button and as you do so, you’ll be asked to sign-in to your Outlook account. So, do as per what is asked and then, click on the ‘Continue’ button to go through all the permissions. In that, you also need to allow Google to access your Outlook account.
- Once you finish doing so, read all the ‘Privacy Information and Instructions’ carefully to proceed with the process.
- Now, you’ve to select from the below-data of your Outlook data you want to import on your Gmail account—
- Import Contacts.
- Import Mail or,
- Import New Mail (for the next 30 days)
- In the end, just click on ‘Start Import’ followed by clicking on the ‘OK’ button.
Notes
Generally, the migration process is time-consuming especially if you’ve large mailbox. So, it is suggested that you stay calm, have patience and not interrupt the process till it gets completed.
That’s it! This is how you can complete the migration process of your Outlook data to Gmail if you are not able to configure your Gmail account to Outlook.

 Related Post