- Solution 1: Scan Windows 10 PC for Detecting Any Virus/Malware
- Solution 2: Find out the Culprit Who Won’t Let Windows 10 PC to Stay in Sleep Mode
- Solution 3: Disable Scheduled Tasks & Wake Timers
- Solution 4: Use Power Options to Allow Your Windows 10 Computer to Sleep
- Solution 5: Disable Fast Startup Option for Older Operating System
- Solution 6: Turn the Hybrid Mode OFF
- Solution 7: Disable Screensaver
- Solution 8: Check & Fix Sleep Settings of Your PC
- Solution 9: Perform a Clean Boot on Your Windows 10 PC
- Solution 10: Halt the Sensitive Mouse from Waking Your Windows O.S.
- Solution 11: Run Power Troubleshooter Tool
- Solution 12: Check & Update System Drivers of Your Windows 10 PC
- Solution 13: Check for Any Pending Update
- Solution 14: Do Not Connect Your Windows 10 PC with Any Peripheral Devices
- Bottom Line
Albeit, all Windows PC/ Laptop devices go to sleep mode automatically when not used for a certain amount of time or they can be manually put to sleep as well. But, that’s not always the case. Microsoft devices especially Windows 10 sometimes trouble its users with trivial issues like—
“Sleep Mode Not Working”
As a matter of fact, in the last one year, there are many Windows users who’ve reported that their Microsoft Windows 10 won’t stay asleep!
So, like others, if your Windows 10 PC also keeps waking up or goes to sleep automatically then, you’ve landed on the right tutorial. Here, we’ve mentioned all the possible solutions that show you how to fix sleep mode-related issues in Windows 10 PC/Laptop.
Thus, without wasting any second further, let’s get started—
Solution 1: Scan Windows 10 PC for Detecting Any Virus/Malware
On the very first note, you’ve to acknowledge the fact that Virus or Malware attacks can impact on the normal functioning of a Windows PC. And, you never know this might be a possible reason why you’re encountering this “Windows 10 Sleep Mode Not Working” at present.
So, that’s why we recommend you to detect any available virus/malware from your PC/Laptop through rigorous scanning. For that, you can use any of the antivirus software that you’ve installed on your system.
However, if you do not have an Antivirus installed to scan your Windows 10 system then, check-out this list of best Antivirus for Windows 10 and get one installed from the following—
- Webroot SecureAnywhere
- Avira Antivirus Pro
- Bitdefender Antivirus Plus
- Norton AntiVirus Plus
- Kaspersky Anti-Virus
- Avast Premium Security
- McAfee Total Protection
- BullGuard Antivirus
After scanning if a threat is detected then, immediately remove it with the help of your installed antivirus itself and then, check if your Windows 10 PC is now able to go into sleep mode or not!
Solution 2: Find out the Culprit Who Won’t Let Windows 10 PC to Stay in Sleep Mode
Your second step would be to figure out about the culprit i.e., application (s) in your PC which hinder the right working of your Windows 10 sleep mode.
For that, you need to just perform these four simple steps—
- Step 1: Press ‘Windows 10 Logo’ key to open ‘Windows Search Bar.’
- Step 2: Inside it, type “CMD” and select the ‘Command Prompt App’ from the search result options.
- Step 3: Then, perform a right-click action on the ‘Command Prompt App’ icon and select ‘Run as administrator’ from the contextual menu that appears.
- Step 4: Following that, you’ve to run this “powercfg -requests” command in the Command Prompt app to check out what all applications other than basic needed applications, hinders sleep mode feature of your respective Windows 10 PC.
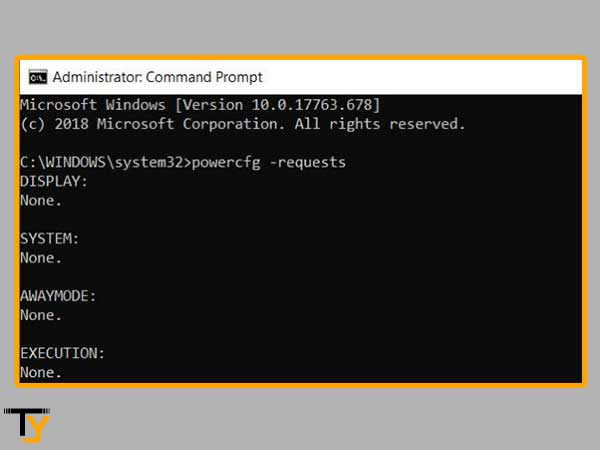
Now, from the result that appears, select that application to either uninstall or disable it by running this “powercfg –requestsoverride <CALLER_TYPE>“<NAME>”<REQUEST>” command in the command prompt app only.
For example, if Process yc.exe is the one that is causing the issue then, the command you need to run, will more or less look like this—“powercfg -requestsoverride PROCESS “yc.exe” SYSTEM.”
However, if the cause of the issue comes out to be a software program that you’ve installed on your Windows 10 PC then, it is worth noting that you need to uninstall it from the ‘Control Panel.’
Similarly, if you want to know who actually wakes up your Windows 10 PC/Laptop from sleep mode, you can run this “powercfg –lastwake” command.
Above all, if you need to know about all the devices that wake up your system from sleep then, this “powercfg -devicequery wake_armed” command is what you need to run!
And, right when you get to know about the applications, software or devices that wake up your computer from sleep by running these above commands— you can just turn off/uninstall/disable the same (culprit) to get rid of the encountered issue.
Well, most probably you figure out that your Windows 10 PC/Laptop wake up from sleep due to a ‘Network Adapter’ and therefore, we’ve already below-mentioned the steps to turn it off—
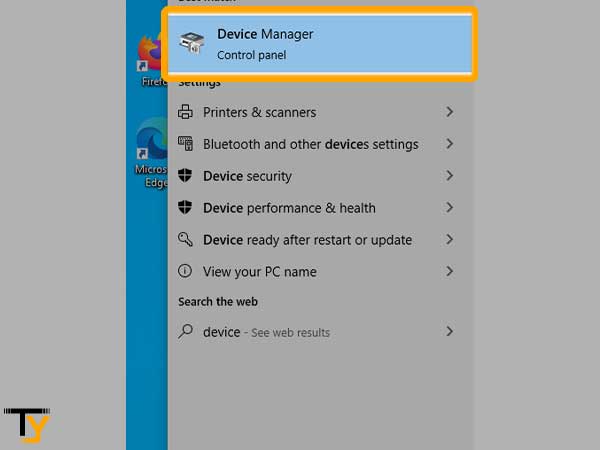
- Step 1: In the Windows Search bar, type ‘Device’ and click on ‘Device Manager’ option from the available search result.
- Step 2: Once the device manager window opens, you’ve to expand its ‘Network adapters’ section.
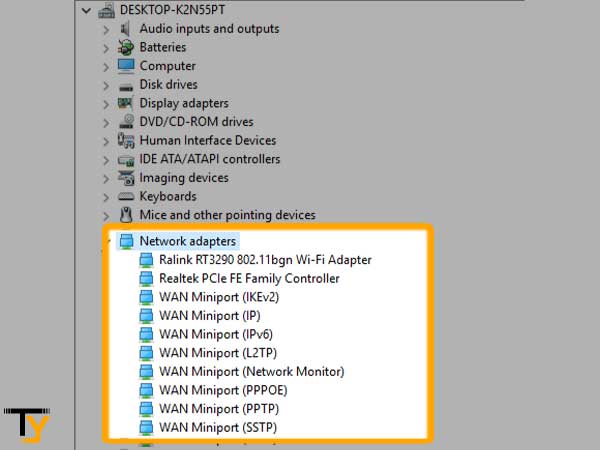
- Step 3: Following that, what you need to do is to check under each and every option of the ‘Network Adapter’ options to find out the one that is actually the culprit behind the issue.
- Step 4: Once you’re able to find the same, perform a right-click on that particular ‘Network adapter’ option.
- Step 5: In doing so, a contextual menu will appear on the screen and from the same, you’ve to simply select the ‘Properties’ option.

- Step 6: When the properties window opens, click on the ‘Power Management’ tab and deselect the checkbox that reads— “Allow the computer to turn off this device to save power.”
- Step 7: And, once you finish doing so, select the ‘OK’ button for each of the network cards so that the encountered “Windows 10 Sleep Mode Not Working” error gets resolved.

However, if this doesn’t help you to fix the encountered issue then, continue with the other solutions that are waiting ahead for you to try them!
Solution 3: Disable Scheduled Tasks & Wake Timers
There are times when both Scheduled tasks and wake timers are held responsible for waking your Windows 10 PC from sleep. Wondering when? Well, it’s when an antivirus app of your system schedules a scan and it automatically sets a wake timer so that your computer wakes up at the scheduled time for completing the scanning process.
So, considering this as a possible cause, you can disable both Scheduled tasks and wake timers to check whether this would help your Windows 10 PC from waking up unnecessarily.
- Step 1: Press ‘Windows +R’ hotkeys together. In doing so ‘Windows Run Dialogue Box.’
- Step 2: In that box, type or paste this “control.exe powercfg.cpl,,3” path and hit the ‘Enter’ button.

- Step 3: This way, ‘Power Options’ window will open in front of you and inside the same; you’ve to locate as well as double-click on the ‘Sleep’ option to expand it.
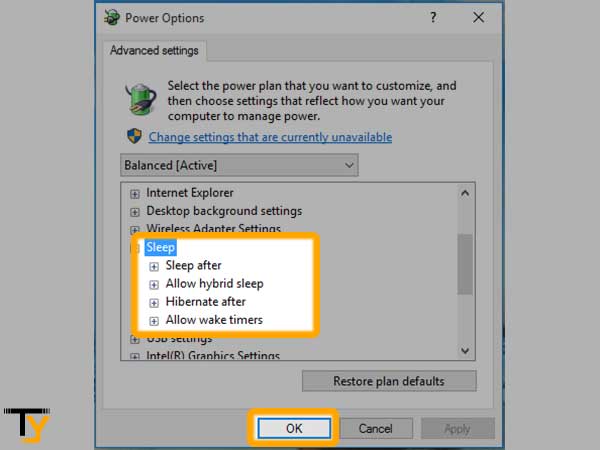
- Step 4: From the expanded sleep options, what next you’ve to do is double-click on the ‘Allow Wake Timers’ option and need to select the ‘Disable’ option for the same.

Notes
If you’re using a laptop then, it is worth noting that you must disable ‘Allow Wake Timers’ for both “On Battery” and “Plugged in” options.
Solution 4: Use Power Options to Allow Your Windows 10 Computer to Sleep
Next, you can check if your computer’s “Basic Power Settings” are set to –“Default” or not. It is necessary because if it’s not set to default then, you’re likely to continue experiencing “Sleep mode is not working in Windows 10” issue.
So, in case the Basic Power Settings are not set to “Default” then, consider these steps to check and (if required) set the same to default again—
- Step 1: Press Windows Logo key to open the Windows 10 Search Box.
- Step 2: In the search box, type ‘Edit Power Plan’ and simply click on ‘Edit Power Plan Icon’ that appears in the search result.

- Step 3: As you do so, a window will open in front of you and from the same, you need to click on the ‘Change Advanced Power Settings’ option for further opening of the new ‘Power Options’ window.

- Step 4: Following that, click on the ‘Restore Plan Defaults’ option to simply toggle all items to where sleeping is allowed in Windows 10.

Other than this, you can consider this alternate way as well—
- Step 1: Inside Power Options window, expand the ‘Multimedia Settings’ option.

- Step 2: Similarly, expand the ‘When Sharing Media’ option also and from the expanded options; you need to select “Allow the computer to sleep” in case it was set for “Prevent idling to sleep” option.
Notes
In case of using a laptop, you’ll get two options i.e., ‘On battery’ and ‘Plugged in’ and you’ve to select “Allow the computer to sleep from the drop-down” for both.
- Step 3: After you finish doing these changes, just click the ‘OK’ button in the end to apply the settings that you’ve just changed.
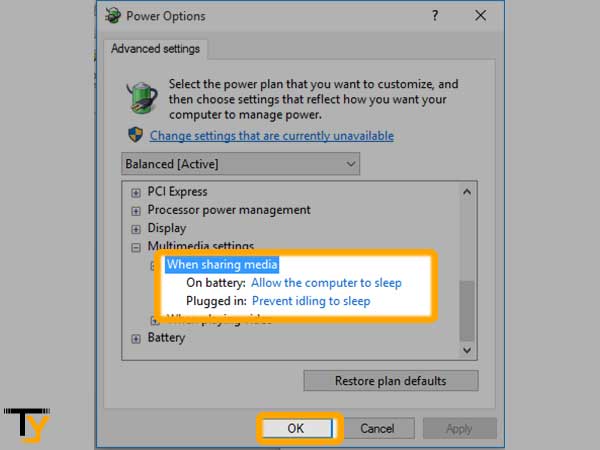
Highlight: When Sharing Media, on battery: Allow the computer to sleep & plugged in: Prevent idling to sleep & OK button
Now, check whether your respective ‘Windows 10 PC/ Laptop’ is able to sleep or not. However, if not, then try-out the next solution.
Solution 5: Disable Fast Startup Option for Older Operating System
Normally the “Fast Startup” option is considered as a useful feature for Windows 10 operating system. It’s because your computer, on fast startup, saves an image of loaded drivers and kernels in C:hiberfil.sys file so that when you restart your computer, it resumes the same directly from the hiberfil.sys file for helping your Windows 10 computer to restart faster.
But, unfortunately if you are using an older PC/Laptop then, this feature can mess things up for being not fully-compatible and in turn, cause the sleep issues that you’re experiencing right now!
So, considering this possibility, you should temporarily disable the Fast Startup feature to stop it from messing up with the shutdown/boot up process and for letting your computer wake up from sleep mode.
To do so, you can simply execute these steps—
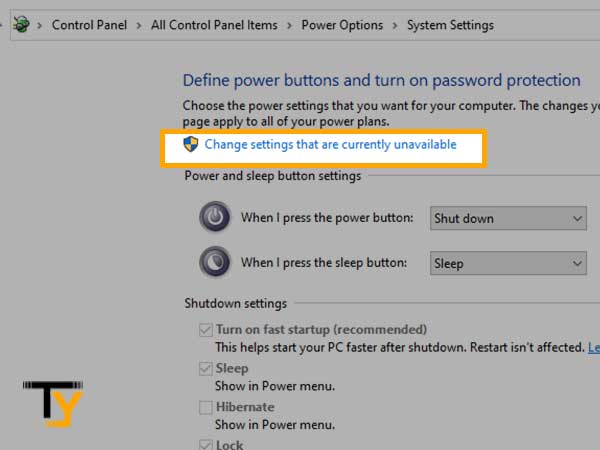
- Step 1: Open ‘Windows Run Dialog Box’ by pressing ‘Win + R’ keys together on your keyboard.
- Step 2: Then, inside the run utility box that opens, you need to type “powercfg.cpl” and hit the ‘Enter’ button. As you do so, the ‘Power Options’ window will open in front of you.

- Step 3: Inside it, you’ve to locate the ‘Choose what the power buttons do’ link and click on the same to open a new window.

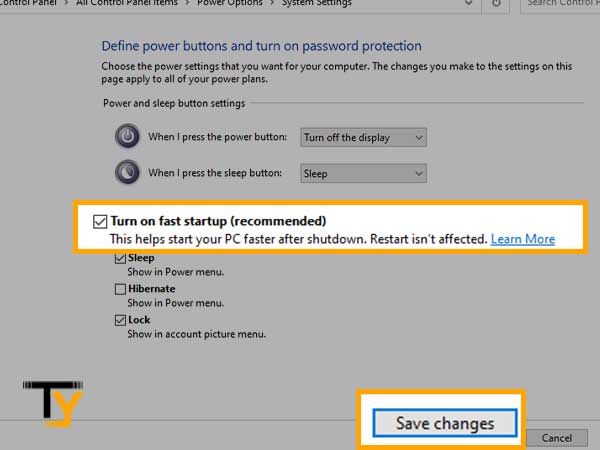
- Step 4: Similarly, on the new window that you’ve opened, locate and click on the ‘Change settings that are currently unavailable’ option.
- Step 5: After that, you can simply verify whether the “Turn on fast startup (Recommended)” checkbox is selected or not. Well, in case, if it’s selected then, you need to deselect the same checkbox and click on ‘Save changes’ button.
Now, once you disable the Fast Startup feature, you can check if your Windows 10 computer wakes up issue has been resolved or not yet!
Solution 6: Turn the Hybrid Mode OFF
Those who don’t know, “Hybrid Mode” is a combination of ‘Sleep Modes and Hibernation’ and if mistakenly it’s left enabled/ON then, Windows 10 PC won’t be able to sleep until and unless you disable the same.
So, it is one of the recommended solutions that suggest you to check whether the Hybrid mode is ‘ON’ or ‘OFF’ and if it’s ‘ON’ then, you’ve to immediately turn the hybrid mode ‘OFF’ via following these given steps—
- Step 1: Open ‘Windows Run Dialog Box’ and for that, press ‘Win +R’ hotkeys together on your keyboard.
- Step 2: In the run utility box, type “powercfg.cpl” and hit the ‘OK’ button to simply let the ‘Power Options’ window appear in front of you.
- Step 3: On the same, you’ve to open the ‘Change Advanced Power Settings’ option by clicking on it.
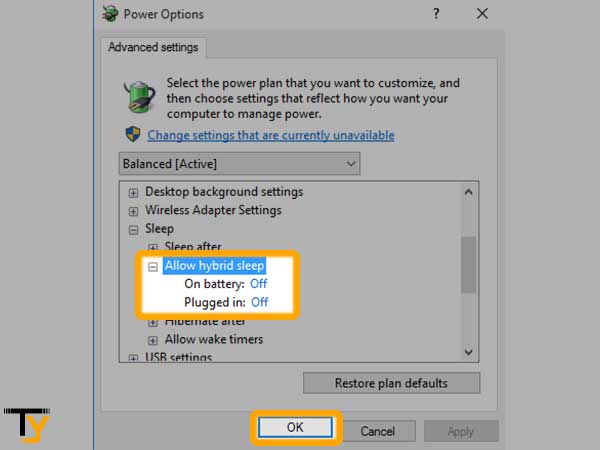
- Step 4: Following that, you’ve to locate and click on the expandable ‘Sleep’ option in Advanced Power’s menu.
- Step 5: In continuation, what you need to do is expand the ‘Allow hybrid sleep’ option from the already expanded Sleep menu.
- Step 6: After doing so, click on ‘OFF’ from the available options of the Allow hybrid sleep’s drop-down menu.
- Step 7: And, in the end, just hit the ‘OK’ button to save the changes that you’ve recently made in Hybrid Mode settings.
Now, you can check whether disabling the hybrid mode would help you fix the encountered “Computer won’t go to sleep” issue or it’s still prevailing.
Solution 7: Disable Screensaver
If you have enabled screensaver on your computer system then, similar to the above solution, you can also consider disabling the “Screensaver” with the help of these simple steps—
- Step 1: Open ‘Windows 10 Search Box’ by simply pressing ‘Windows Logo key’ from your keyboard.
- Step 2: Then, type ‘Change Screen Saver’ in the search bar and click on the ‘Change Screen Saver– Control Panel App’ from the available search result.

- Step 3: In doing so, the ‘Change Screen Saver App’ window will open in front of you and there, click on the Screensaver dropdown list to simply select ‘None’ from the options.
- Step 4: In the end, do not forget to hit the ‘OK’ button to apply the made changes.

Upon doing so, give a quick restart to your Windows 10 PC and check whether your Windows 10 PC is now able to go in sleep mode or not!
Solution 8: Check & Fix Sleep Settings of Your PC
Sometimes, your computer doesn’t go to sleep because the installed ‘Drivers and Software’ starts interfering with the sleep mode settings of your Windows 10 PC and keeps the system awake by sending power requests.
Therefore, it is suggested that you should check and (if needed) fix the sleep settings of your Windows 10 PC via following these steps—
- Step 1: Press ‘Win + R’ hotkeys together to open ‘Windows Run Dialog Box’ and once it’s open, type “powercfg.pl” in it and hit the ‘OK’ button.
fi
- Step 2: In doing so, the ‘Power Options’ window will appear in front of you and from its left-hand side menu; you’ve to click on ‘Choose when to turn off the display’ option.

- Step 3: Following that, what you’ve to do is check the ‘Power Settings’ to know whether they are correct or not. Well, in case if not then, you’re suggested to correct them immediately.
- Step 4: After doing the necessary correction in the power settings, do not forget to click on the ‘Save Changes’ button.

However, if the settings are already correct then, move ahead to try your hands on the other listed solutions.
Solution 9: Perform a Clean Boot on Your Windows 10 PC
Well, you never know, the interference of third-party software installed in your Windows 10 PC may also stop your machine from going into sleep mode.
So, considering that as a possible cause, we recommend you perform a clean boot on your Windows PC because in clean boot mode, your system works with the essential Windows services and programs only. To be precise, “Clean Booting” ensures that no third party software interference would hamper any feature of your computer.
With that said, boot your Windows 10 PC in a clean boot mode via following these steps—
- Step 1: To perform a clean boot, you need to first sign in to your Windows 10 PC as an ‘Administrator.’
- Step 2: Once you signed in, put the cursor in the ‘Windows Search Bar’ and type “msconfig.”
- Step 3: Then, you’ve to simply select the ‘System Configuration’ option from the search result that appears by typing msconfig.

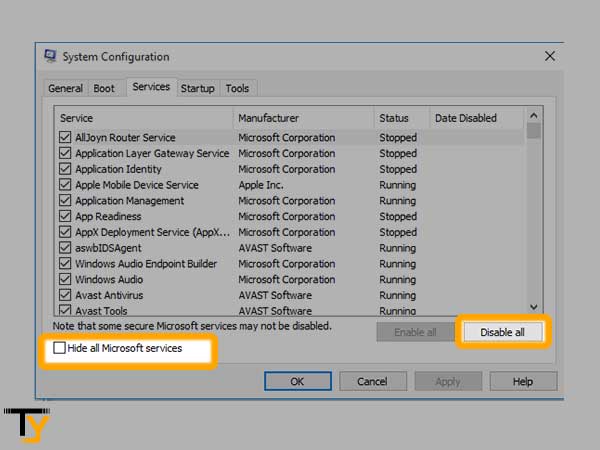
- Step 4: In doing so, the System Configuration window will open in front of you and from the same, you’ll have to click on the ‘Services’ tab.
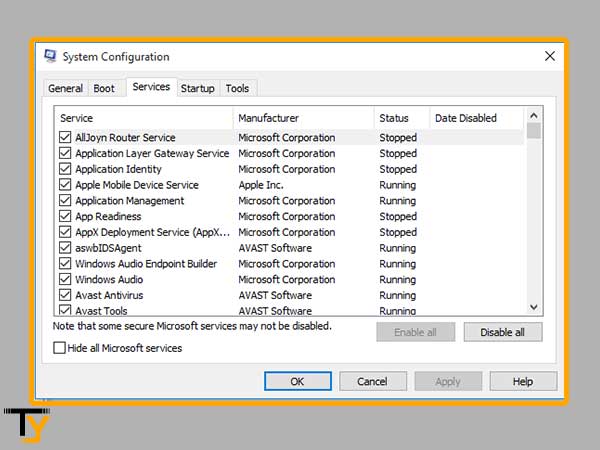
- Step 5: Inside Services tab, click on the ‘Hide all Microsoft services’ checkbox to simply select the ‘Disable all’ option.
- Step 6: Following that, what you need to do is navigate onto the ‘Startup’ tab of System Configuration and click on the ‘Task Manager’ section.

- Step 7: Now, select any of the listed ‘Startup program’ inside Startup in Task Manager that you strongly feel might be interfering with your Windows 10 PC’s Sleep mode.
- Step 8: Upon selecting the suspected startup program, what you need to do is click on the ‘Disable’ button.

Notes
If needed, you can repeat steps ‘7 and 8’ for all the Startup programs that you suspect are interfering with your PC’s sleep mode feature.
- Step 9: In the end, just ‘Close the Task Manager’ section followed by clicking the ‘OK’ button in the System Configuration window.
Now, don’t forget to give a quick restart to your Windows 10 system and thereafter check if the ‘sleep mode is not working’ issue has been fixed or not!
Solution 10: Halt the Sensitive Mouse from Waking Your Windows O.S.
At times, even a minimal vibration near your Windows 10 PC can keep the machine awake. Basically, your Windows 10 sleep mode is not likely to work until and unless you’re using a sensitive mouse.
So, having that in mind, you can apply the following steps to stop your sensitive mouse from waking your Windows 10 O.S.—
- Step 1: Hit the ‘Windows Start’ button to let the ‘Windows Search Box’ pops up in front of you.
- Step 2: In the search bar, type “Device” and select the ‘Device Manager’ option from the search result to simply open it.
- Step 3: Then, in the device manager window, you’ve to expand the ‘Mice and other pointing devices’ section.
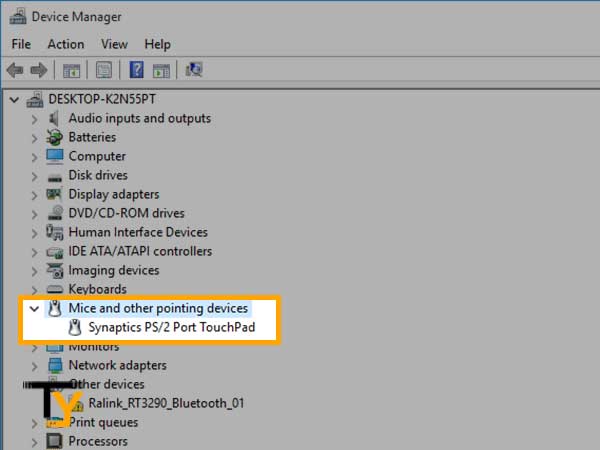
- Step 4: From the expanded options, perform a right-click action on the ‘Mouse’ option that you’re using at present!
- Step 5: In doing so, a contextual menu will appear and you’ve to simply choose the ‘Properties’ option from the same.
- Step 6: Now, select the ‘Power Management’ tab from the properties window that just opened in front of you.
- Step 7: In the end, you just have to uncheck ‘Allow this device to wake the computer’ box from the Power management tab, and hit the ‘OK’ button.

Once you finish doing so, check if the “Windows 10 sleep mode is not working” issue has been resolved or not. Well, if it’s resolved then congratulations otherwise, you can move on to try the next given solution.
Solution 11: Run Power Troubleshooter Tool
Being a Windows 10 user, you must be aware that Windows has an inbuilt “Troubleshooter.” It’s there to help users in resolving various types of issues including the one you’re currently facing!
So, if none of the aforementioned solutions able to help you then, consider executing these steps to run the Power Troubleshooter tool and fix the ‘not sleeping issue’ of your Windows 10 PC—
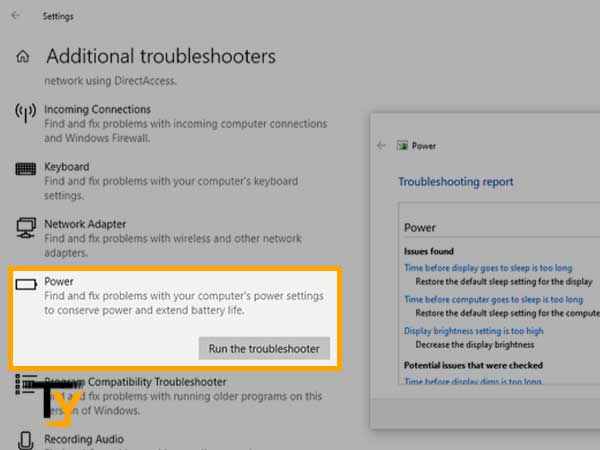
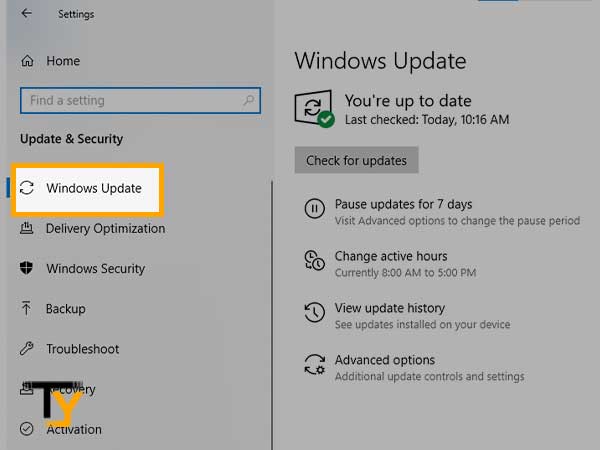
- Step 1: Open ‘Windows Settings’ on the screen by pressing ‘Win + I’ hotkeys together on your keyboard.
- Step 2: Then, click on the ‘Update and Security’ option from the Windows Settings page.

- Step 3: After that, you’ve to locate and click on the ‘Troubleshoot’ option from the menu which is available there on the left of the Windows Settings screen.

- Step 4: As you do so, scroll down the Troubleshoot option-page and click on the ‘Power’ option to expand the same.
- Step 5: Now, in the end, just hit ‘Run the Troubleshooter’ option from the expanded menu to let the Power Troubleshooter complete its operation of fixing the encountered issue.
Once done, you need to ensure whether the ‘Sleep’ feature of your Windows 10 PC starts working fine or not!
However, if the Windows Power Troubleshooter wasn’t able to detect any issue, then head towards the next solution.
Solution 12: Check & Update System Drivers of Your Windows 10 PC
If the “Windows 10 system can’t go to Sleep Mode” issue is still prevailing, it’s maybe because your hardware is running on an incompatible driver. So, to resolve this issue, you can definitely consider checking all your important [network, chipset, audio and BIOS] system drivers to ensure whether they’re running on their latest and correct versions or not!
However, if you’re wondering how you will be able to do it? Then, let’s tell you that you can download the “DriverView Utility” tool to help yourself check and update system drivers of your Windows 10 PC.
To be precise, with “DriverView Utility” you can ensure how recent each of your PC’s system drivers is by checking the following details—
- Version Number
- Installation Date
- The Digital Signature of the Drivers &
- Created or Modified Date, etc.
Once you finish checking and verifying these aforementioned details of each of your PC’s system drivers; if you need to update a driver then, you can do so via these two ways—
| Manually Update the Driver | Automatically Update the Driver |
| To manually update the driver, first visit the Manufacturer Website. | To automatically update the driver, first open the ‘Windows Settings’ by pressing ‘Win +I’ hotkeys on your keyboard. |
| Then, find the right version of the driver corresponding with your Windows 10 version. | Then, click on the ‘Update & Security’ section followed by ‘Windows Update.’ |
| After that, you can click the ‘Download’ button to finally update the driver manually on your system. | After that, click on ‘View Optional Updates’ to choose a ‘Driver’ to update it automatically on your system. |
Solution 13: Check for Any Pending Update
In addition to the aforementioned solution, let’s tell you that the Sleep Mode feature of your Windows 10 PC may also stop working when there’s an optional update pending to be installed on your system as Windows fails to automatically install the same.

In fact, right after the rollout of the September 2020 optional update, many Windows users continue reporting issues with their PC’s ‘Sleep Mode’ feature.
So, considering that as a definite reason, you must check and install any pending update to fix the “Sleep Mode stops working” issue that you’re experiencing. For that, what you need to do is—
- Step 1: Open Windows Setting Menu.
- Step 2: Click on the Update & Security option.
- Step 3: Then, expand the ‘Windows Update’ section.
- Step 4: There, check for any ‘Pending Update’ to download the same.
- Step 5: And, also, make sure that your PC is running on the latest Windows 10 version.
Solution 14: Do Not Connect Your Windows 10 PC with Any Peripheral Devices
Last but not the least, if you’re still not able to resolve the “Sleep Mode is not working” issue then, you definitely need to know that even some peripheral devices like “Printer, Webcam, External DVD, and Scanner” can stop Windows 10 from going to sleep mode.
So, you can try either removing or disconnecting the peripheral devices that are externally connected to your respective Windows 10 PC.
Notes
Do not remove/ disconnect your “Mouse and Keyboard” because they’re the essential peripheral devices and cannot cause this issue.
In doing so, you most probably can get rid of the Windows 10 not sleeping issue.
Bottom Line
That’s all! These are the 14 possible solutions for the “Windows 10Sleep Mode Not Working” issue. Trying them will hopefully help you to resolve the discussed issue with the ‘Sleep Mode’ feature in no time.