- List of Possible Causes Behind Why this Unknown USB Device Error Occurs in Windows 10!
- Method 1: Check to Find Out Any Hardware Issue
- Method 2: Plug-out the Power Supply from Your Device
- Method 3: Uninstall & Reinstall the USB Driver in Device Manager
- Method 4: Disable the Fast Startup Option to fix the USB Device Failure
- Method 5: Check and Repair Bad Sectors
- Method 6: Remove USB and Scan for Any Hardware Changes
- Method 7: Update the Generic USB Hub Drivers
- Method 8: Run the Hardware and Device Troubleshooter — the Windows Troubleshooting Tool
- Method 9: Disable Your USB Selective Suspend Setting
- Bottom Line
| Summary: In this Article, You’ll get to know about the following methods to fix Device Descriptor Request Failed (Unknown USB device) Issue in Windows 10 — |
Right when you connect a USB device to your Windows 10 PC, its ‘USB Device Descriptor’ (that is used to store information for USB drives) helps to recognize the connected device for simply determining which device driver to load.
However, if there’s such a scenario that – the USB device descriptor malfunctions and fails to work properly on Windows 10 then, your Windows 10 PC won’t be able to recognize your connected USB device, and instead you’ll get an error message that reads— “Unknown USB Device (Device Descriptor Request Failed).”
Alternatively, you can also get either of the following messages, depending on your Windows PC version;
- “USB DEVICE_DESCRIPTOR_FAILURE”
- “Unknown USB device (device descriptor request failed) error code: 43”
- “USB device not recognized. The last USB device which you have connected to this computer has malfunctioned, and Windows does not recognize it.”
- “A Request For The USB Device Descriptor Failed.”
- “Try reconnecting the USB device. If Windows still does not recognize it, your USB device may not be working properly” &
- “USB vid_0000&pid_0008 5&3a33fe6e&0&5”
Albeit, Windows users time and again have been reporting various issues when they try connecting and using a USB device on their PC. But, out of them, “Unknown USB Device (Device Descriptor Request Failed)” is the most common one that shows up in the Device Manager.
Of course, when the USB device is malfunctioned, not working and not recognized or reports device descriptor request failure error in Windows 10 then, it leads to a kind of frustration.
So, if you also have recently experienced this error and are wondering “What Causes Unknown USB Device Descriptor Request Failed?” then, read out this blog to not only find out why the unknown USB device error on Windows 10 occurs but also to learn the numerous solutions to fix this issue completely!
Let’s begin—
List of Possible Causes Behind Why this Unknown USB Device Error Occurs in Windows 10!
Most probably, the “Unknown USB Device (Device Descriptor Request Failed)” error occurs due to some hardware or system-specific issues. However, there are various other causes as well for this error. Have a look at them:
- Perhaps your latest software update had some issues that result in corrupting or damaging the USB drivers.
- The USB device cannot be able to communicate properly with your computer, as there might be a connection issue.
- Errors in some software or hardware components, for instance, the USB Port is broken.
- Maybe there was a fault when you’re doing replacement of some parts of your Windows 10 PC.
- The BIOS system may not be updated to the latest version, and it needs updating.
- Your USB device may be corrupted, damaged (contains bad sectors) or infected with virus and malware.
- Wrongly configured the settings of USB drivers of your Windows 10 PC &
- Corrupted or outdated USB drivers, etc.
Now, knowing enough about what could be the probable factors behind the occurrence of the “Unknown USB Device (Device Descriptor Request Failed)” error, let’s move ahead to try these below-mentioned 9 methods that help you troubleshoot this issue in no time.
Notes
Before you begin executing any of the below-given repairing actions, it is suggested that if the USB drive contains some of your important data then, you should first apply data recovery of the same for not losing any data.
Method 1: Check to Find Out Any Hardware Issue
At times, the problem lies within your computer and not with the operating system. It means there’s a possibility that you’re unable to use your USB device due to a hardware issue.
So, here are the two possible ways to check about the same and decide whether you need to try restoring your computer or you should proceed with the methods given below to fix system-originated issues (if there’s any).
Plug Into other USB Port:
First of all, considering that the USB port that you originally used is most likely broken, you are obliged to use the other rear USB ports. In doing so, if the device starts suddenly working then, you should mark this preferred USB port of yours as “not functioning” and straight away look for replacing it.
Plug Into a Different Computer:
Secondly, you stand in need to use the same hardware on a different computer to look for any issues within the device itself. So, by doing so, if the hardware works on a different computer then, of course, it indicates to you that you’re dealing with a system issue that needs to be fixed. However, if the USB device still doesn’t work then, most probably it is broken and needs to be repaired or replaced.
Upon you finish testing the issue via these two given ways, you can easily come to a conclusion whether to go ahead and try these given methods to fix software issues, or not! Having said that, those needs to try these methods can continue reading further—
Method 2: Plug-out the Power Supply from Your Device
Notes
It is recommended that you must attempt this method only in case you’re using a portable device, for instance, a laptop.
Well, you never know, maybe temporarily plugging out the power supply from your laptop or any portable device and re-connecting the problematic equipment (USB device) into your computer helps you to fix the Unknown USB device issue on Windows 10 error.
To be precise, you should consider disconnecting all the charging cable cords from your respective laptop until it is running on its integral battery only. And, then, you can plug in the USB device back to spot if your system recognizes it or not!
So, if this method works in your case to fix the USB device error then, make sure you replace your charger. However, in case if not, you can just rule out the power supply as a cause and move on to try the next method.
Method 3: Uninstall & Reinstall the USB Driver in Device Manager
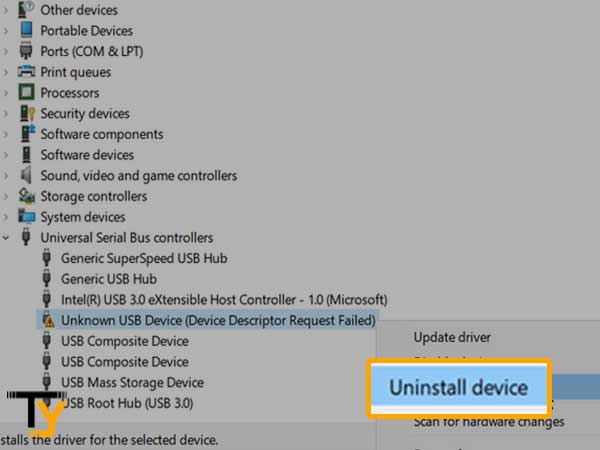
As listed above, Faulty USB drivers could also be one of the causes behind this error. That’s why to resolve this issue; you’ll require to first ‘uninstall the Unknown USB Device (Device Descriptor Failure) drivers’ in Device Manager and then, install them back via following these steps—
- Step 1: Open the ‘Run Dialog Box’ by pressing the ‘Windows + R’ hotkeys together on your keyboard.
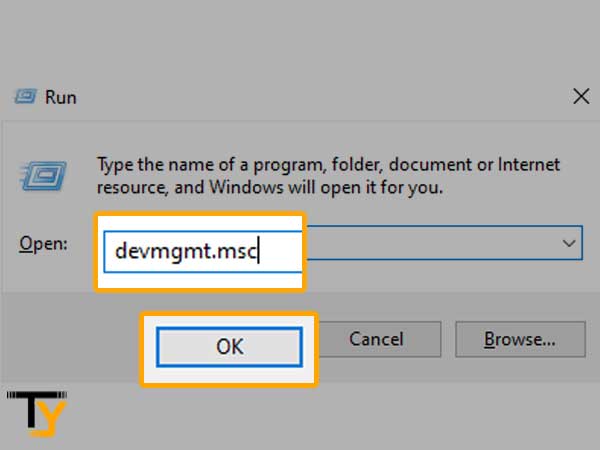
- Step 2: Inside the Run utility box, type in devmgmt.msc and just hit the ‘OK’ button to let the Device Manager open in a separate window.
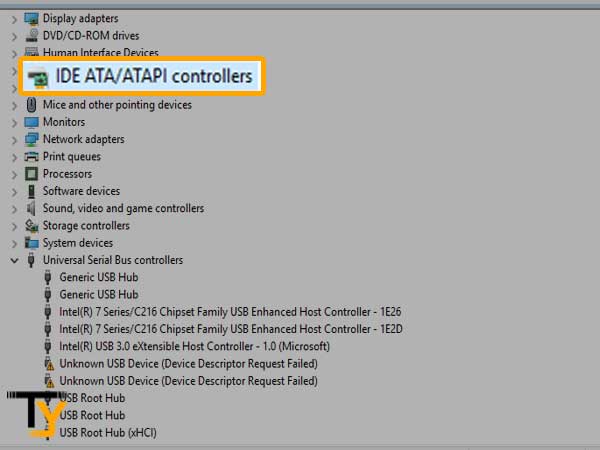
- Step 3: Once the Device Manager launches, you need to expand its ‘Universal Serial Bus Controllers’ section to select the ‘Unknown USB Device(Device Descriptor Request Failed)’ drivers from the list that appears.
- Step 4: After doing so, perform a right-click action on the malfunctioned USB device drivers (you’ve selected in the previous step) to simply choose the ‘Uninstall’ option from the contextual menu that pops up on the screen.
- Step 5: Now, you’ve to follow the on-screen prompt instructions to remove the selected (faulty) USB device drivers.
By executing these steps, you’ll be able to uninstall the USB device drivers in the Device Manager. However, that’s not it!
Once the uninstallation is complete, what you need to do is give a quick reboot to your system. Wondering why? Then, let us tell you that, rebooting your system will automatically reinstall the USB drive correctly and this way helps you to get rid of the discussed error you’ve been receiving.
Notes
In rare case scenario, if Windows can’t automatically install the drivers correctly then, you can consider the other way out i.e., go to your USB drive’s manufacturer site and download the latest drivers to install them manually on your system.
Method 4: Disable the Fast Startup Option to fix the USB Device Failure
You must know that the Fast Startup feature is related to computer shut-down and hibernate. To be precise, this feature is designed to usually make computer boot faster but, there are times when this feature works at such a fast speed that Windows 10 cannot detect the connected USB device and that’s why the USB device descriptor failure error shows up.
So, having that in mind a possible cause behind the occurrence of “Unknown USB Device (Device Descriptor Request Failed)” error, it is suggested that you should disable the Fast Startup feature to check whether this helps you to resolve the encountered error or not!
- Step 1: To begin the process of disabling the Fast Startup option, launch the ‘Run utility’ by pressing the ‘Windows logo +R’ keys together on your keyboard.
- Step 2: In the Windows Run Utility box, type in Control and hit the ‘OK’ button.
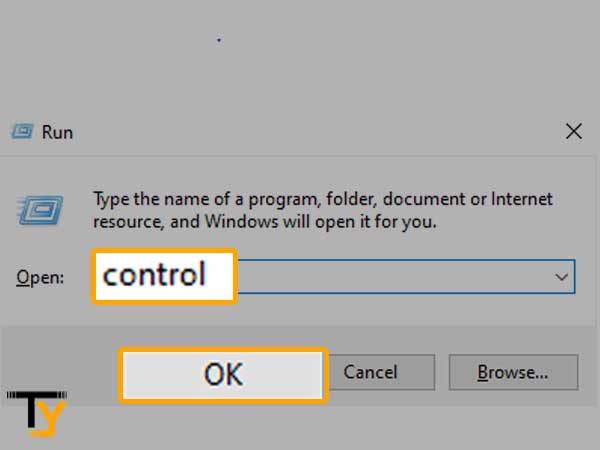
This helps you to launch the ‘Classic Control Panel’ application in a new window.
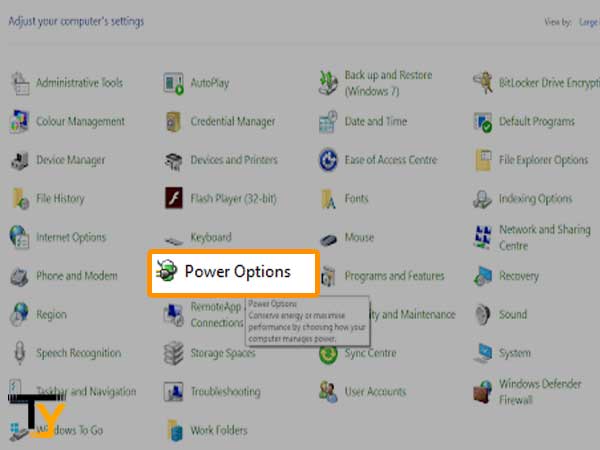
- Step 3: Inside the Classic Control Panel app, you need to set the ‘View Mode’ which is there in the right-hand corner of the Window to ‘Large Icons.’
- Step 4: Then, just select the ‘Power Options’ from the list of items that appear on the screen.
- Step 5: Next, what you have to do is locate the ‘Choose what the power buttons do’ link and once you find the same on the left-hand side of the window then, click on it.
- Step 6: In continuation, you also need to locate and click on the ‘Change settings that are currently unavailable’ link. It is necessary to give the administrative permission, i.e., entering your admin password.
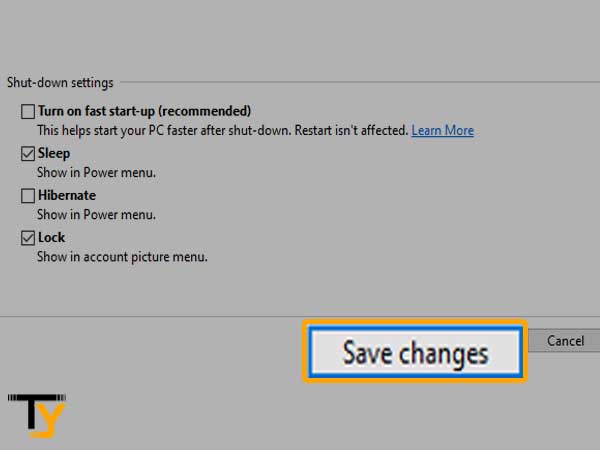
- Step 7: After that, look inside the ‘Shutdown Settings’ section to ensure that the ‘Turn on Fast Startup (Recommended)’ checkbox is not selected. However, if it is tick-marked then, simply remove the checkmark by clicking on the box.
- Step 8: In the end, click on the ‘Save Changes’ button to save the changes that you’ve made, followed by ‘Restarting’ your Windows 10 PC.
Now, check if the USB device issue is resolved or not! If not, here’s the next method to try.
Method 5: Check and Repair Bad Sectors
Those who don’t know, ‘Bad sectors’ are those areas that cannot be read or written. So, if a USB drive or disk contains excessive bad sectors then, it is suggested that you consider replacing it with a new one.
Or else, you can simply download software like ‘DiskGenius’ and execute the below-steps to check and repair the malfunctioned USB drive by clearing bad sectors available on the same.
Notes
It is worth noting that the repairing process of bad sectors may damage your data. Thus, if you want to try this method of repairing bad sectors on a USB drive then, you should perform a backup in advance to recover data.
- Step 1: Once you download the DiskGenius software on your Windows 10 PC; launch it to see the ‘USB Drive’ in its main interface.
- Step 2: Then, look at the left pane to select your respective ‘USB Drive’ followed by clicking the ‘Disk’ menu.
- Step 3: From the Disk menu, what you simply have to do is select the ‘Verify or Repair Bad Sectors’ option.
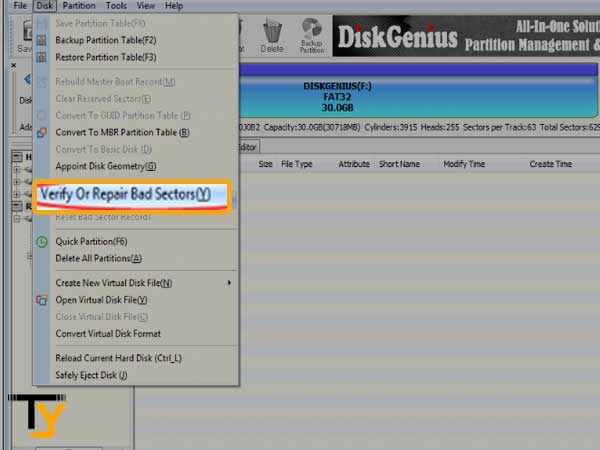
- Step 3: After selecting the same, click the ‘Start Verify’ button which is at the bottom of the page. In doing so, the software starts ‘Scanning the USB drive.’
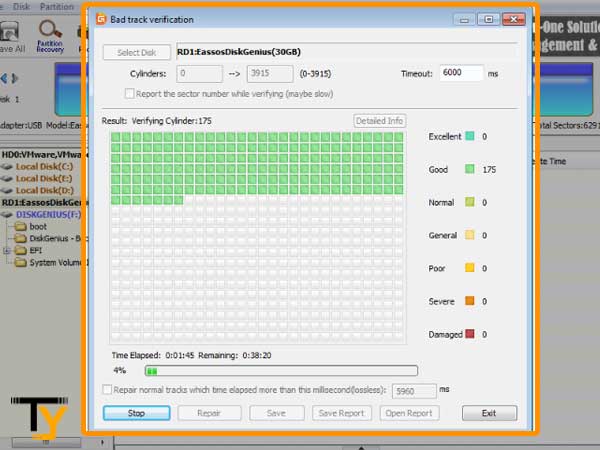
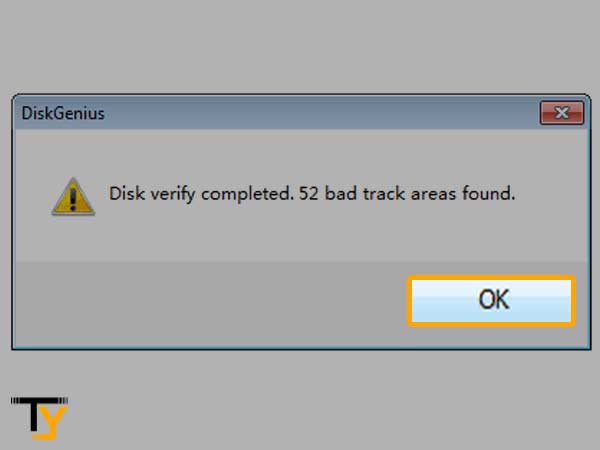
- Step 4: Once the scanning process completes, the software notifies you whether any bad sectors have been found or not. So, if your particular USB drive contains bad sectors then, just hit the ‘Repair’ button to make sure they get repaired.
- Step 5: As you click on the repair button, the DiskGenius software prompts about ‘repairing bad sectors damages data’ and right then, you should create a backup of your data.
- Step 6: After you finish creating a backup of your data, click the ‘OK’ button to finally let the software repair bad sectors.
In addition to that, let’s also acknowledge that not every user is able to back up their data successfully. Some lost their data in the process of repairing bad sectors from their USB drive. So, considering that, those who’ve lost their data can retrieve the same from damaged USB flash drive via these steps—
- Step 1: On the same DiskGenius software, view the malfunctioned USB device from which you want to recover lost data.
- Step 2: Then, perform the right-click action on the same and select ‘Recover Lost Files’ option.
- Step 3: Next, you’ve to select the ‘Complete Recovery Mode’ option and click the ‘Start’ button.
- Step 4: After that, you can double-click on files and ‘Preview’ them in order to check if the recovered data is correct.
- Step 5: Once confirmed, recover files from USB disk by simply copying them to a different location and to do so— “Select those files you want to recover > right-click on them > select Copy To” option to save recovered data in a specific location.
This is how you can retrieve lost data from a damaged drive. Now, coming back to the point, once the software is finished repairing all the bad sectors areas that your (damaged or malfunctioned) USB drive contains, check if the issue that you have been encountering, gets resolved! If not, then try out the method.
Method 6: Remove USB and Scan for Any Hardware Changes
According to this method, what you could try doing is ‘remove your USB from your Windows 10 PC’ and then, ‘scan’ it for any hardware changes via the following procedure—
- Step 1: As per the first step, you need to ‘Uninstall’ the malfunctioned/problematic USB device using the same steps given in Method 1.
- Step 2: Then, remain inside the ‘Device Manager.’ However, if you close it, you can again open the Device Manager by pressing ‘Windows Key + X’ keys together and selecting the ‘Device Manager’ option.
- Step 3: Now, inside the ‘Header Menu’ of the Device Manager, click on the ‘Action’ tab to select ‘Scan for Hardware Changes’ option from the list of menu that appears.

- Step 4: Once you do so, just wait until your system recognizes all the ‘Hardware Changes.’
Now, when the scan is complete, you can simply plug in your USB back to check if your PC could recognize the connected USB device or not.
Method 7: Update the Generic USB Hub Drivers
Not always, uninstalling and reinstalling works to fix the unknown USB Device request failure issue because you might be encountering it due to your outdated USB driver. So, that’s why in addition to uninstalling and reinstalling, you can also try updating the ‘Generic USB Hub Drivers.’
However, if you don’t know how to do so then, here are the steps to update the Generic USB Hub drivers. Have a look—
- Step 1: Press the ‘Windows Logo + X’ hotkeys together to select ‘Device Manager’ option from the list of menu that pops up on the screen.
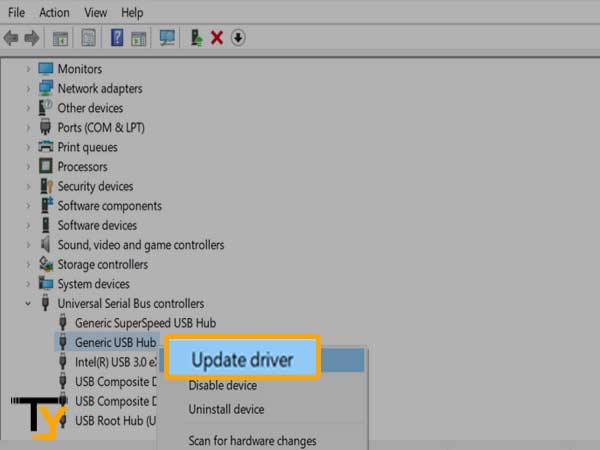
- Step 2: Once the Device Manager opens, what you’ve to do is expand the ‘Universal Serial Bus Controllers’ section of the same.
- Step 3: Then, perform a right-click action on the ‘Generic USB Hub’ option from the expanded ‘Universal Serial Bus Controllers’ section.
- Step 4: After doing so, simply click on the ‘Update Driver’ option.
- Step 5: In doing so, a new window will open and on the same, you’ve to select the ‘Search automatically for drivers’ option so that your Windows 10 PC will automatically search for you, the most compatible drivers online.
Once the update is complete, try plugging in your USB device to check whether the same works fine now as well as if you need to try the next method or not!
Method 8: Run the Hardware and Device Troubleshooter — the Windows Troubleshooting Tool
Well, luckily you can also resolve the encountered Unknown USB Device error using the ‘Windows Troubleshooter’ also.
Those who don’t know, Windows Troubleshooter is an in-built Windows 10 tool that’s designed to help you locate and fix various system-related issues.
So, let’s see how you can use this Windows 10 Troubleshooter tool to get rid of the Unknown USB Device error.
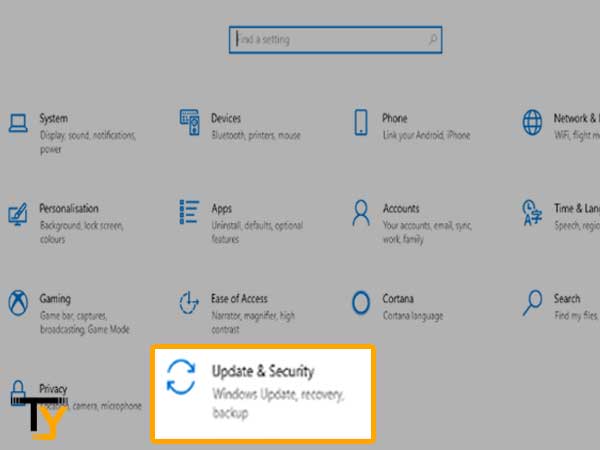
- Step 1: To begin, open the Windows ‘Settings’ application either via pressing the ‘Windows + I’ keyboard shortcut or via pressing the ‘Gear-Icon’ from the Windows Start menu.
- Step 2: Inside the Settings app, click on the ‘Update & Security’ tab.
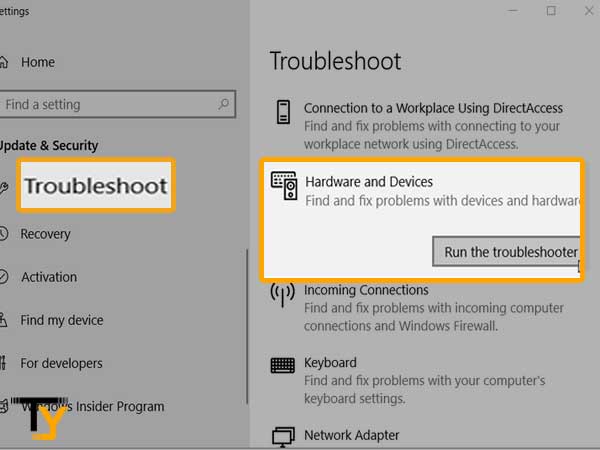
- Step 3: Then, simply scroll down the ‘Update & Security tab’ to choose the ‘Troubleshooter’ option from the menu which is there on the left-hand side pane of the same tab.
- Step 4: After doing so, move onto locate the ‘Hardware and Devices Troubleshooter’ option to click on the same for selecting ‘Run the Troubleshooter’ option when it appears.
- Step 5: Now, you’ve to just follow all the on-screen prompts to look out for issues either with your ‘USB Port’ or any other-related ‘Hardware.’ In doing so, if any issue is picked up then, what you need to do is select the most appropriate action with a motive to fix or get more information about the same.
- Step 6: In the end, when the process is complete, you need to close the ‘Troubleshooter’ and have to ‘Restart’ your Windows 10 PC to implement the fixes for resolving the “Unknown USB Device (Device Descriptor Request Failed) in Windows 10” error.
Method 9: Disable Your USB Selective Suspend Setting
Last but not the least; this ‘Disable the USB Selective Suspend Setting’ is one of the effective methods that could help you resolve the encountered error. Wondering how?
Well, let us tell you that if the USB selective suspend setting is enabled then, your Windows operating system will put the USB port in low-power mode. And, this is the reason why you encounter this ‘USB device_descriptor_failure problem’ when connecting the USB drive to this port.
So, considering that, let’s disable the USB Selective Suspend Setting in your Windows 10 PC to solve the encountered error.
- Step 1: To begin, open the ‘Windows Run Dialog Box’ with the help of pressing ‘Windows + R’ keyboard shortcut.
- Step 2: In the Run utility that you’ve opened, enter ‘Control’ and hit the ‘OK’ button to simply launch the ‘Classic Control Panel App’ window in front of you.
- Step 3: Inside this app window, change the ‘View Mode’ to ‘Large Icons.’ This option you’ll find in the right-hand corner of the window.
- Step 4: Then, you need to select the ‘Power Options’ from the list of all items that you see on the screen.
- Step 5: Following that, click on the option of ‘Show Additional Plans’ in order to reveal the hidden section simply.
- Step 6: After that, click on the link that reads—‘Change settings that are currently unavailable.’ In continuation, you’ll be required to give administrative permission by entering your admin password.
- Step 7: Upon doing so, select the ‘High-Performance Plan’ followed by clicking on the link that stated—‘Change Plan Settings.’
- Step 8: Similarly, click on the ‘Change Advanced Power Settings’ followed by clicking on the ‘Change settings that are currently unavailable’ link. Well, again, you’ll be prompted to give administrative permission and for that, you need to enter your ‘Admin Password’ in the desired place.
- Step 9: Now, what you’ve to do is locate the ‘USB Settings’ and expand the same, followed by selecting and expanding the ‘USB Selective Suspend Settings.’
- Step 10: In the second last step, make sure you disable both the options, i.e., ‘On Battery’ and ‘Plugged in.’
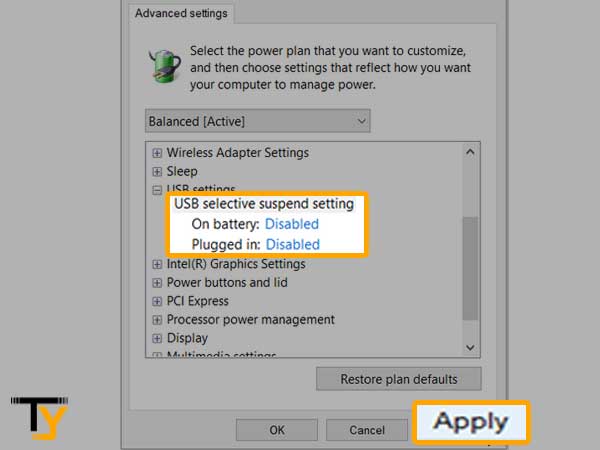
- Step 11: Once you ensure the same, click on the ‘Apply’ button and quickly ‘Restart’ your Windows 10 PC to check if the encountered issue has now been resolved by ‘Plugging in’ your USB devices.
Bottom Line
That’s all! These are the couple of methods that we’ve mentioned as solutions to help you fix the unknown USB device (Device Descriptor Request Failed) error. Hopefully, with these given methods, now you can repair this encountered error on your own.