- Check Network and Reset Its Settings
- Check If Snapchat Servers are Down
- Delete Snapchat App’s Cache
- Keep a Tab on App Network Permission
- Update the Snapchat App
- Reboot Your Phone
- Clear Your Chat History
- Force Stop the App and Restart it
- Delete and Again Install the Snapchat App
- Ensure that Your Account is Not Locked
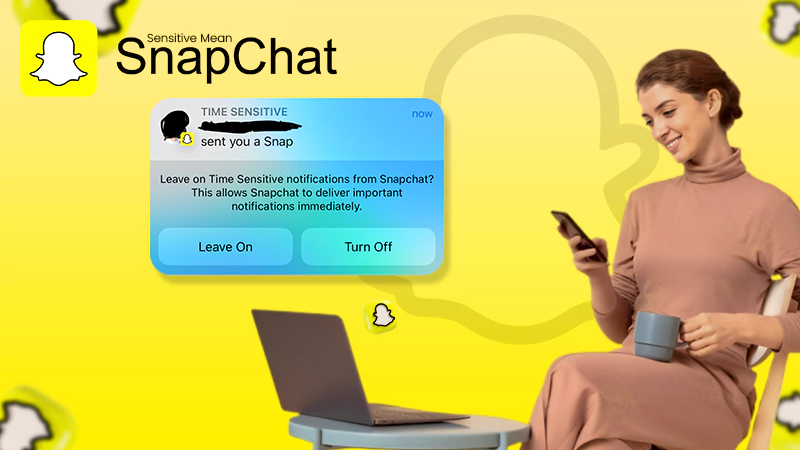
Are you worried because your Snapchat app is not working? Do not stress out, you have landed in the right spot.
If you think that you are the only one for whom Snapchat is not working, then it is not the case. It was yesterday, when I was scrolling through the news and the internet was flooded with issues related to the Snapchat app. This is when I took it upon myself to solve this problem and provide you guys with the solutions that can help you resolve the issue.
Additionally, there is no particular reason and specific solution that can fix your Snapchat issue; you may have to try a number of methods. Stated further in this article are methods that have helped a number of people, and get their Snapchat to the normal working by solving its issues.
Check Network and Reset Its Settings
Since we don’t know the reason why Snapchat is not working, we will start our troubleshooting journey with very basic try-outs.
Though checking network connectivity might be the first thing that you have done when you couldn’t get the Snapchat app working, still it is suggested to check if you are connected to the internet and also, if it’s working fine with appropriate speed.
In order to check the speed of your internet, you can either visit any website and see if it is loading in minimum time, or you can visit the websites that show the internet speed your device is currently receiving.
Also, make sure that airplane mode on your phone is turned off. If your device is on airplane mode, then you no longer remain connected to the internet and thus, the Snapchat app simply won’t work.
However, if your internet speed is fine and airplane mode is also not enabled on your phone, then there’s one thing you can do. You can reset the network settings of your phone, and connect back to your Wi-Fi, which will help eliminate any technical glitch that might have happened while establishing the connection, previously.
Here are the steps to reset network settings:
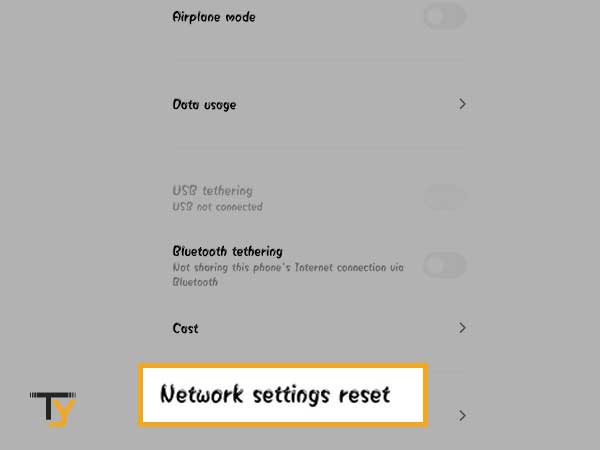
For Android
- To begin with, you have to go to your phone Settings.
- Inside the Settings app, look for your phone’s network settings option.
- Within network settings, locate the Network Settings Reset option and tap on it.
- At last, tap on the Reset Settings option.
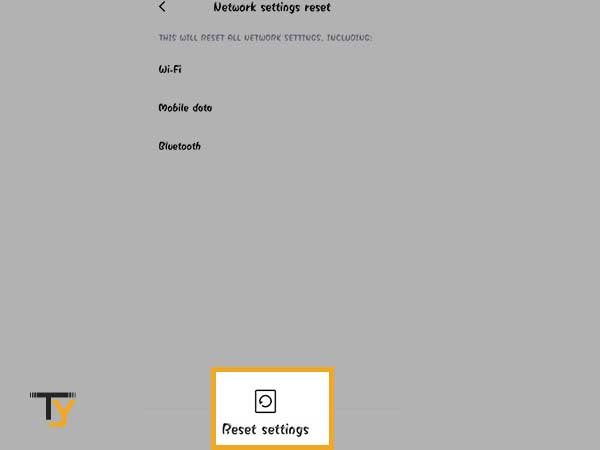
- Once it is done, you have to again connect your device to the mobile data or Wi-Fi by entering its password. Additionally, your Bluetooth settings will also reset, so you again have to connect to all your Bluetooth devices.
For iPhone
- First, open your phone Settings app.
- Then, tap on General.
- Thereafter, scroll through the page, locate Reset and tap on it.
- Inside Reset, tap on the Reset Network Settings option.
- Next, you may have to enter the passcode of your device
- At last, select the option to confirm the action.
- After the network reset is complete, your iPhone will restart. Your device will be disconnected from the internet as well as all your Bluetooth devices. You can again connect to the network by turning your mobile data On and filling in your Wi-Fi password.
Check If Snapchat Servers are Down
If your network is fine, and you have resetted its settings, but still your Snapchat is not working, then the second highly recommended thing to do is to check if the servers of Snapchat are down.
To use any website or app, it is important that their servers are in working condition. If those are down or are temporarily not working, then the services of get halted for the time being their normal functioning is restored. If the same is the case with Snapchat, then it is obvious that it won’t work.
But, the question that arises here is, how to know that the Snapchat servers are down?
Well, to get the server status of any app or website you are using, there are many websites present on the internet, one of the most popular of them is downdetector.com. The website gives you the live status of not only Snapchat but also of other well-known websites and apps. By visiting the provided link, you will directly land on the Snapchat server status page, and you will get to know if the servers are out of service. And if you find that the servers are down, then it is the reason the Snapchat app is not working, and you cannot do anything about it but wait till the servers are operating again.
Delete Snapchat App’s Cache
The third thing that I normally suggest to readers when they are seeking a solution for their app not working, is to clear their app’s cache.
The cache stores the app data, which is used to retrieve the information when a request of the app is provoked. It helps in the fast accessibility of the app and its features. However, if the cache got corrupted, then be ready to face various difficulties with the app.
Therefore, if your Snapchat app is not working properly, or it is not loading, then damaged cache files can be the most probable cause for the same. The solution for such a problem is getting rid of the Snapchat app’s cache. Don’t worry, if you are concerned about your app’s data, it won’t get deleted with the cache.
Stated below are the steps for clearing Snapchat cache from your phone:
For Android
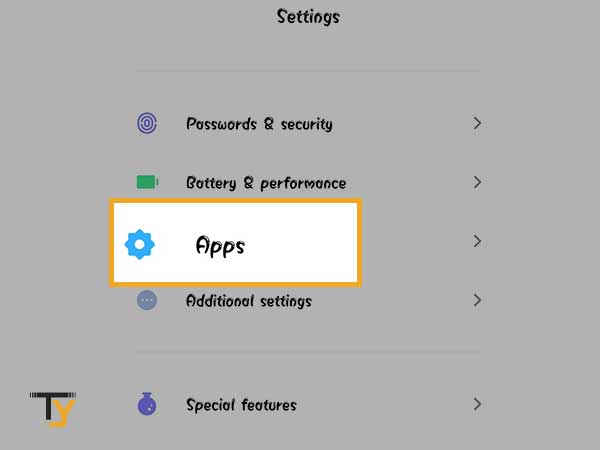
- First, open your phone Settings.
- Scroll through it, and tap on the Apps tab.
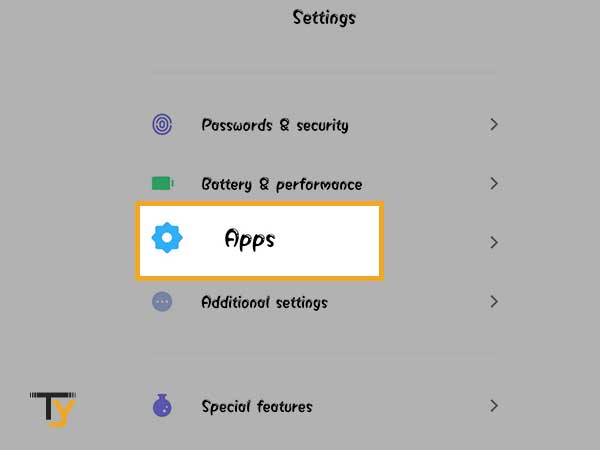
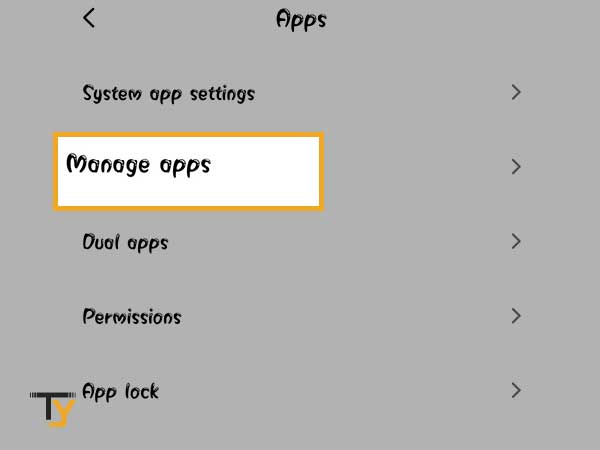
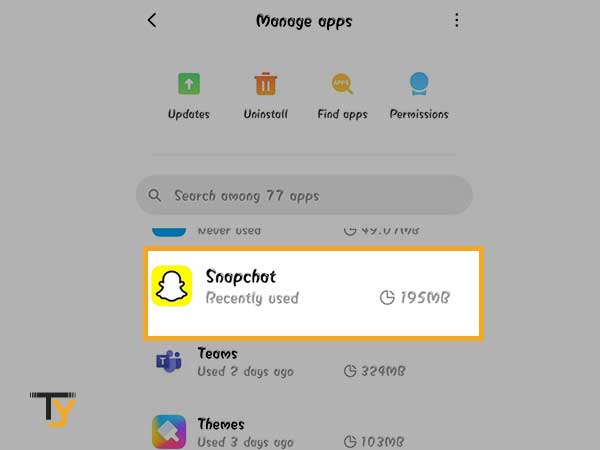
- Then, you have to tap on the Manage Apps option.
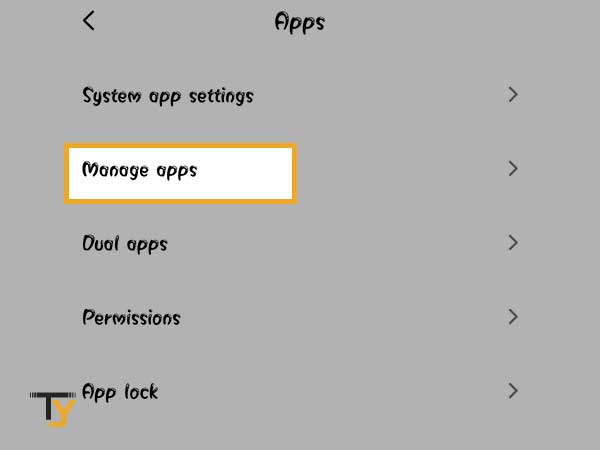
- Thereafter, the page will open where the apps installed on your phone are listed. Scroll down on the page, find the Snapchat app, and tap on it.
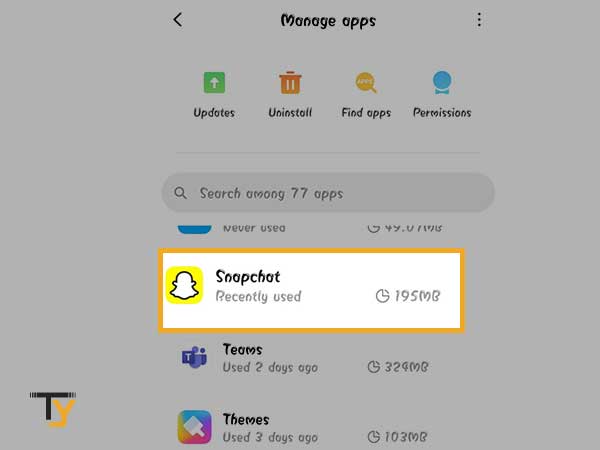
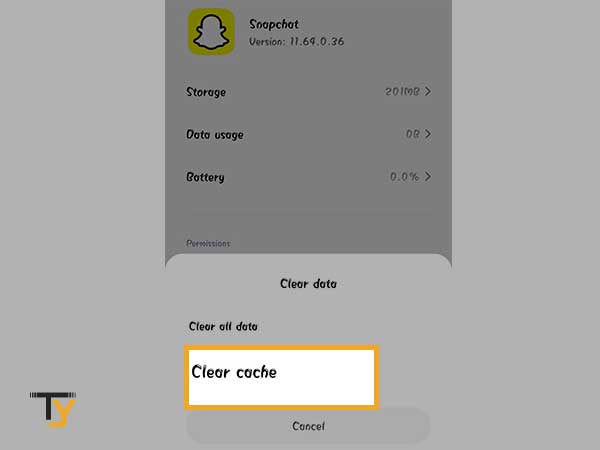
- Next, the Snapchat Info page will open, where you have to locate the Clear data option and tap on it.
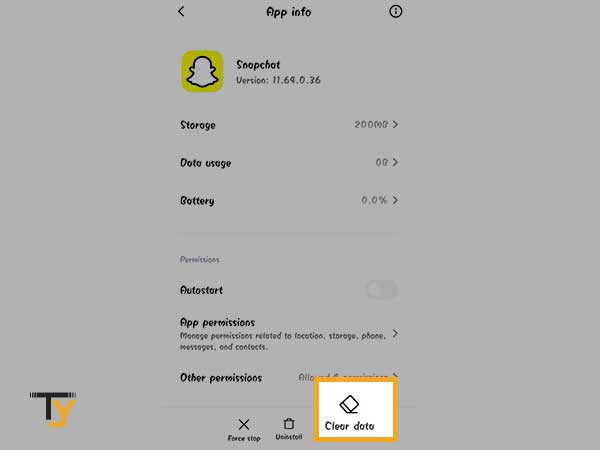
- Next, select Clear cache and tap OK to confirm the cache deletion.
For iPhone
- From the home screen of your iPhone, tap on the Settings app icon.
- Inside Settings, select General.
- Thereafter, tap on the iPhone Storage section.
- On the next screen, you will see the list of all the apps that you have downloaded on your device. From there, tap on the Snapchat app.
- The Snapchat app page will open, where you have to tap on the Offload App option.
- You will get a warning message that the app will be deleted. Even if the app is deleted, your data of the app remains intact. So, again, tap on the Offload App option to ensure the action.
- The Snapchat app will be deleted, you have to download it again. However, you need not worry about its data, it will not be deleted; as soon as you download the app and open it, you will see that all your data is there and not a bit of it is lost.
Keep a Tab on App Network Permission
Your internet is working fine, servers of Snapchat are also not down, and you have even cleared the app cache, but still, your Snapchat is causing issues and not loading. Wondering the same? Don’t worry, there is yet another method to deal with the situation.
It seldom happens that you mistakenly deny the app from permissions that are necessary for its proper working. To exemplify, if you have denied the Snapchat app permission to access the camera of your phone, then you will see a black screen when you open the camera in the app. Similarly, if you have disabled the network permission of the app, then it won’t be able to connect to the internet, and therefore, the Snapchat app won’t work.
To edit network permission of the Snapchat app, the following steps can be followed:
- First, tap on the Snapchat icon to open it.
- From Snapchat’s home page, tap on the profile icon (your account’s avatar image).
- Now, you will be directed to your profile, where you have to tap on the Settings icon present in the top-right corner of the screen.
- Within settings, tap on the Permissions option.
- Now, you can see the permissions you have allowed and denied. Tap on the Network permission to enable it.
- Thereafter, your phone settings will open, where you can edit the permissions for the app.
Update the Snapchat App
Running an outdated version of an app is normally fine, but it might cause problems in some circumstances, especially when major changes are made to the application which are necessary for the users’ security. Furthermore, if the support for older features in the newer version is halted, then also your Snapchat will not load or won’t work properly.
Thus, it’s worth monitoring for updates. Listed below are the general steps (can be followed by both iPhone or Android users) by which you can update your Snapchat app:
- Open the Google Play Store (for Android users) or the App Store (for iPhone users).
- In the search bar of it, type Snapchat and search.
- The Snapchat page will open. If its update is available, then you will see the Update option. Tap on it to start the update process.
Once the Snapchat app is updated, open it and see if it’s still not working.
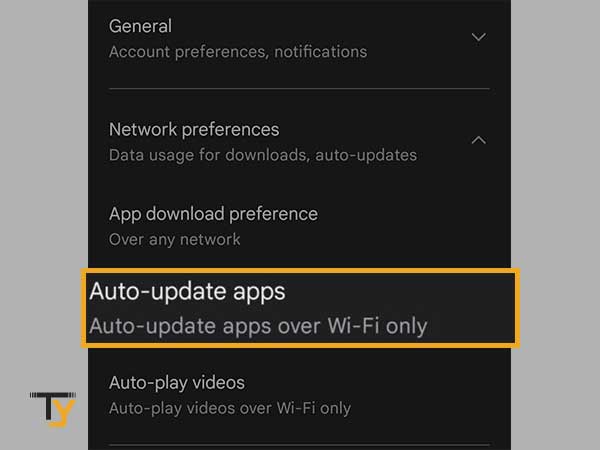
Additionally, if you couldn’t keep a tab on the latest release of the apps, then you can enable the apps auto-update option on your phone, and all the apps installed on your phone will be automatically updated whenever the new version is released. Jotted down are the steps for enabling such option:
For Android
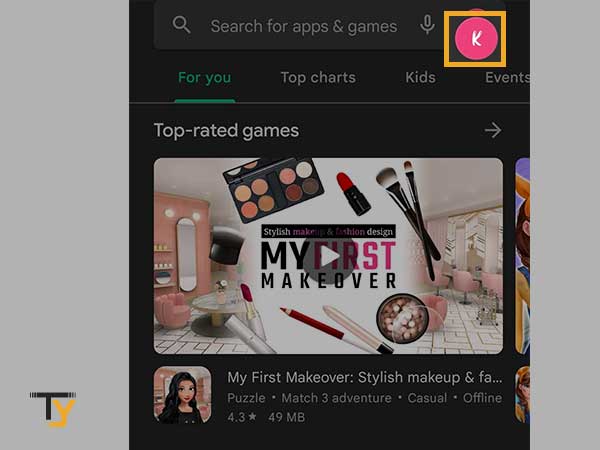
- From your phone’s home screen, tap on the Google Play Store icon to open it up.
- On the app’s home screen, tap on the profile icon in the top right corner.
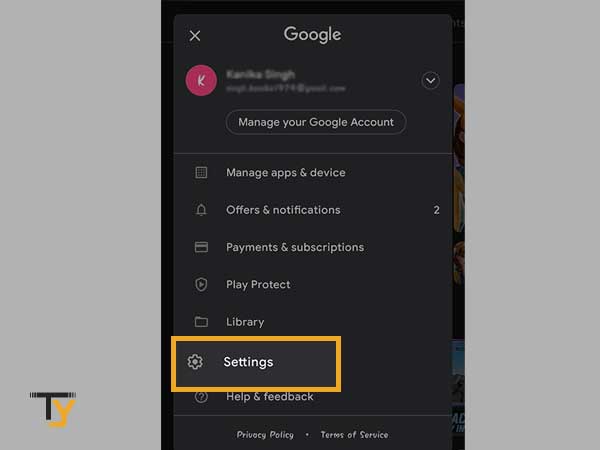
- From the options visible, select Settings.
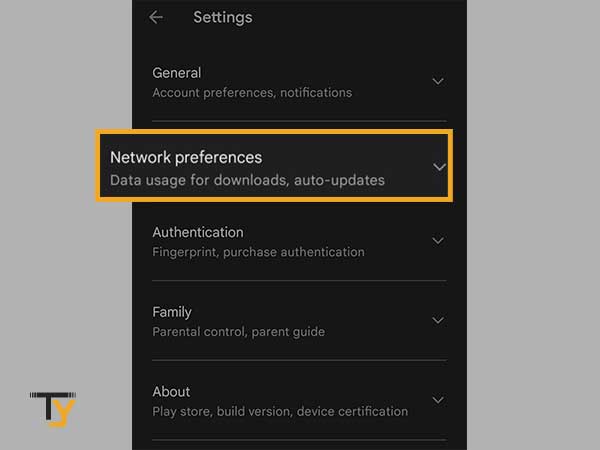
- Next, tap on the Network Preferences section.
- From the expanded options, select the Auto-update apps option.
- Next, choose one of the following options:
- Over any network: Your apps will be updated automatically whether connected to mobile data or Wi-Fi.
- Over Wi-Fi only: Apps will be automatically updated only when your phone is connected to Wi-Fi.
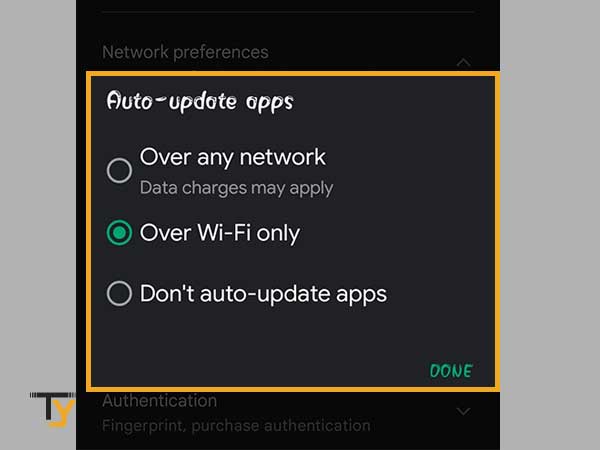
- At last, tap Done, and from next time all your apps on your phone will be updated by themselves.
For iPhone
- From the home screen of your phone, tap on the Settings app.
- Inside Settings, tap on the App Store tab.
- Within the App Store page, locate the App Updates option, and tap on its toggle button to turn it on. After enabling it, all your apps will be updated automatically.
Reboot Your Phone
Even after trying a number of methods stated, if your Snapchat is still not working, then the apps running in the background might be causing the problem. Furthermore, it can also be the case that your RAM is overloaded, and therefore, the app is taking time to load or is not loading at all. But, do not worry, there is a way to solve this issue as well. Yes, you guessed it right, restarting the phone.
When you restart your phone, all the apps or programs running in the background are terminated, because of which the occupied RAM also gets freed up from unnecessary apps, and all the functions are loaded afresh. Thus, give this a shot, restart your phone, again try to access the Snapchat app, and see if it is still not working.
Clear Your Chat History
If you have refreshed the app a hundred times, updated it, and even cleared the cache, but still it is not working; specifically, you are not able to send snaps to your contacts on the Snapchat app, then you may have encountered a rather unusual problem with chat cache.
However, the issue might be unusual, but the solution is simple: delete your chat. Yes, you can fix this Snapchat issue by clearing your chat history. Following are the steps to take:
- Open your Snapchat app, and on its home screen, tap on your avatar icon present in the top left corner of the screen.
- Then, you will land on your profile page. From there, tap on the Settings icon.
- Thereafter, select the Clear Conversations option.
- Now, you will see a list of chats saved on your app. Tap on the X icon, next to each chat you want to delete.
Force Stop the App and Restart it
Force stopping the app terminates all the foreground and background functions of the app. The problem in the execution of these functions might cause the Snapchat app to crash or not load at all. Therefore, if you terminate them by force stopping, and again load them by restarting the app, all the functions are loaded anew and the issue may get eliminated.
In order to force stop the Snapchat app, follow the steps listed below:
- First, open your phone Settings app.
- Scroll through the Settings, and tap on the Apps section.
- Then, select the Manage apps option.
- From the next page, where the apps you have downloaded are listed, locate the Snapchat app, and tap on it.
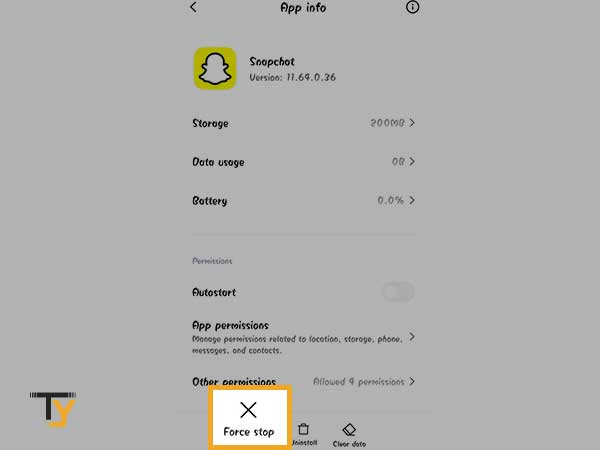
- Within the Snapchat Info page, find the Force Stop option and tap on it.
- Now, to restart the app, remove it from the background, and open it by tapping on its icon from the home screen.
Delete and Again Install the Snapchat App
If force stopping the app didn’t help, then you can try uninstalling and installing the Snapchat app. This will help reconfigure the app’s setting on your phone and delete all potentially corrupted files of the app because of which the Snapchat app might not be working properly.
You may already know, to delete or uninstall the app, you have to long-press the icon of the app on your phone’s home screen, and then select the Delete/Uninstall option to get rid of it. The method is the same for both Android and iPhones.
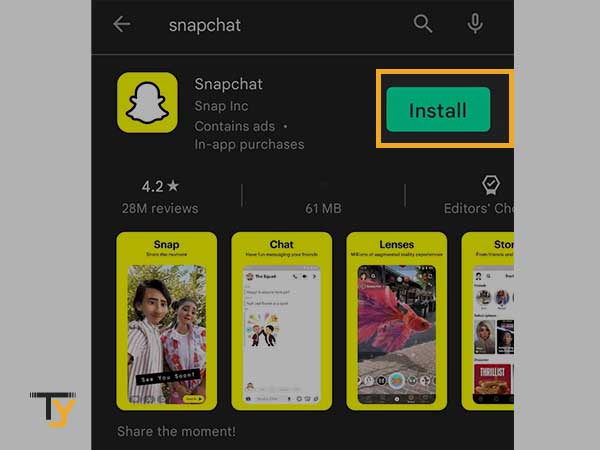
To again install the app, visit the Google Play Store (for Android users) or App Store (for iPhone users), type Snapchat in the search bar and search. The Snapchat page will open, tap on the Install button, to start the installation.
Ensure that Your Account is Not Locked
If your account is locked, you may be unable to use the Snapchat app. Your account may be restricted for a variety of reasons, including the use of a third-party mobile app, modification, or plugin to access your Snapchat account. Snapchat may also lock your account if you send unsolicited messages or snaps (usually spam) or interact rudely or aggressively with other members on the app.
If your account is compromised, the messaging platform may also limit access to your account as a precautionary step. If you discover that your Snapchat account has been locked, then you have to contact Snapchat support to get into the depth of the matter and get it resolved.