Considering the Cambridge Analytica Data scandal (in which the personal data of millions of Facebook users’ in early 2018 was leaked), it is available on multiple platforms that Facebook resulting to its privacy concerns has finally decided to introduce a comprehensive feature to its users for knowing who viewed their Facebook profile.
If this is to be believed then, it would not be wrong to say that this recent data-breach incident has weakened the company’s position in such a way that Facebook being in full crisis management mode is planning to come out with this feature to stop users from fleeing, that it earlier explicitly doesn’t allow for users because of its own privacy rules.
However, it is not clear if this new feature is just a test or it will be rolled out in the coming days. But, whatever the scenario is, the fact is that, as of now, there’s no such feature available on the Facebook application that claims to tell you about the visitors who view your Facebook profile.
Though, you’ve most likely noticed many apps and Web services on the Internet for claiming “see who views your profile” but, unfortunately not a single one of them is able to do so. Even Facebook denies such claims and asks you all to report if any of you stumbles into these sorts of apps.
Therefore, in the same context, we’ve decided to dedicate a blog on this particular topic that’ll clear all the queries and doubts of users who’re wondering about is there any way to see who views your Facebook!
So, whoever is reading, if you also belong to the category of users who are unclear about whether they can see who views their Facebook profile or not then, you’re at the exact right place. We’ve written this blog not only with the motive to clear your doubts regarding the aforementioned question but at the same time, with a focused mind to bring in front of you, the comprehensive and ethical methods about how you can see who looks at your Facebook profile. Therefore, without wasting any further minutes, continue reading this blog until the end!
Steps to Check Who Visited your Facebook Profile
Facebook doesn’t offer you a direct way to check how many visitors you had on your profile or who from your friend list visits your Facebook profile. There is no way to know if your ex or someone whom you don’t know is stalking you on Facebook but still, there is a method that is quite popular these days and claiming to be working to check who visits or views your Facebook account or profile. This method is only for iPhone users and here are the steps:
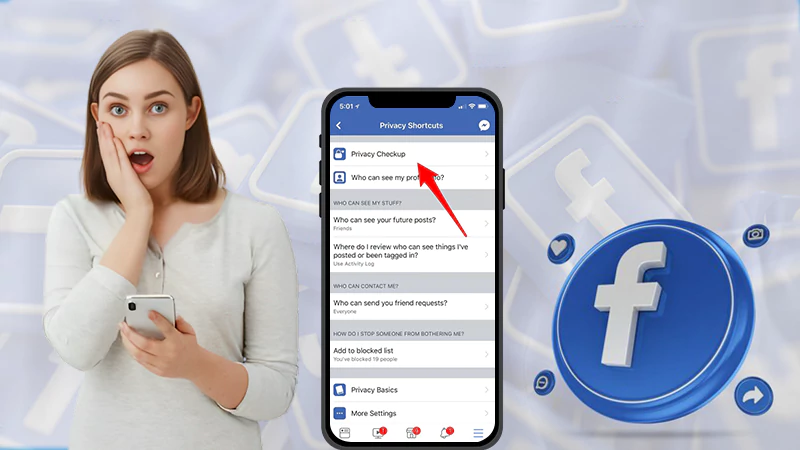
1. Using the menu icon, go to the ‘Privacy Shortcuts’ option
2. Below the Privacy Checkup option, you will see the ‘Who viewed my profile’ icon.

These were the steps and as claimed by some Facebook users, this feature was earlier there on iPhone devices but is no longer available.
You Might Be Interested In: Create a Facebook Account
As of now, you might be pretty much clear in your mind that neither Facebook nor other apps offer you the legitimate ways to tell who views your Facebook profile including your posts and videos; therefore, not to let you down, we’ve mentioned such ‘safe and ethical’ (indirect) ways that you can use to have enough idea about who visited your Facebook profile. So, without wasting any more minutes, let’s begin with the steps of two comprehensive methods for knowing who views your Facebook account profile. So, have all your attention here:
Method 1: Use Your Facebook Friend’s List
- First and foremost, open the Facebook Sign-in Page:
| Desktop: Open your preferred web browser and use this link “https://www.facebook.com/” to open the Facebook website on your computer’s desktop. | Mobile: Locate ‘Facebook Icon’ from all the apps available on your mobile to open the Facebook application on your Mobile. |
| Desktop: In case you’re not logged in then, enter your Facebook email ID as well as password in the required text field which is there at the upper-right side of the ‘Facebook Sign-in page’ and then, click on the ‘Sign-in’ option. | Mobile: Similarly, login to your Facebook account from the Facebook mobile app by entering your Facebook account email ID as well as password and then, tapping on the ‘Login’ option when prompted. |
| Desktop: To reach on to your Facebook profile page, click on your ‘Name’ tab that is there in the upper-right corner of the ‘Facebook’s News Feed’ page. | Mobile: Tap on the ‘Three-parallel horizontal lines icon’ from the bottom-right corner of the screen (if you’re using the iPhone) and from the top-right corner of the screen (if using Android) to reach your Facebook profile page. |
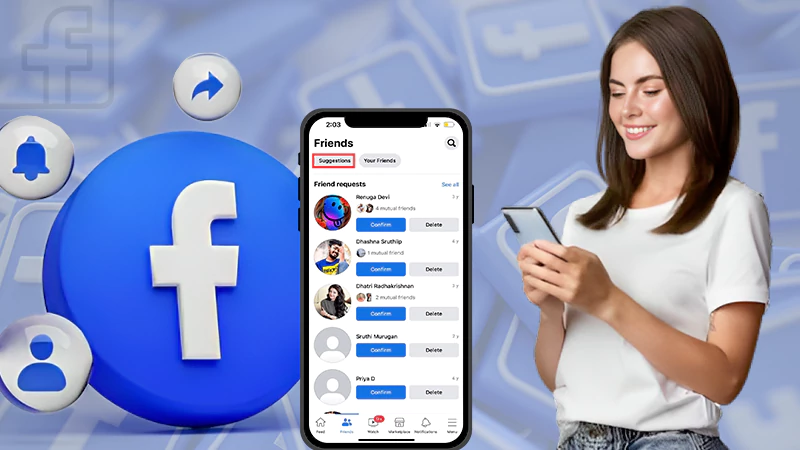
| Desktop: Click on the option of ‘Friends’ from the top of your Facebook profile page. | Mobile: Tap on the option of ‘Friends’ which is there on the menu of your Facebook profile page. |
The first 10 or 20 friends of your friend’s list are likely those users who might be viewing your profile more often than other users as they are those with whom you interact on a frequent basis.
From the available list of top 10 or 20 friends of your friend’s list, try looking for their exact number of Facebook friends because those who’ve just a few hundred friends on Facebook are more likely to be viewing your Facebook page in a fair amount than those who have Facebook friends in a thousand.
If Facebook sends you a notification urging you to add some certain Facebook users then, they’re most likely friends of those who frequently visit your Facebook profile.
Method 2: Use Your Facebook Status
- Similar to the first 2 steps of the above-mentioned ‘Method 1’ you’re first required to open your Facebook account in order to reach its ‘News Feed’ page.
- On the ‘News Feed’ page, select the ‘Status Text Box’ that reads—”What’s on your mind?”
- In the same, type a status (that can either be a fact, general statement, or a joke) to post on your Facebook profile page without tagging anyone in your status.
- Once you’re finished typing your status, post your Facebook status:
- After posting your status on your Facebook profile, wait for a few hours to let the fair amount of people see your status.
- Then, review the status that you’ve posted to check who liked it and who doesn’t! At the same time, who commented on it and who doesn’t!
- This is all about the test that you’ve to repeat at least 4 or 5 times to compare the result with each other.
- Once you’ve completed the ‘Test repetition’ process now, compare the mutual people who like all your posted statuses as they’re likely to be the ones who’re probably visiting your Facebook page more often than your other Facebook friends.
- Like in the above-mentioned steps, open your Facebook News Feed page and there, from the left menu, click on this icon ‘Pages.’
- This will navigate you to the ‘Pages’ tab.
- Once you reach there, click on ‘Insights’ which is there on the left menu.
- First and foremost, sign in to your Google account and then, click on ‘Access Google Analytics.’
- Once you have accessed it, click on the ‘Sign Up’ option that is available there.
- Then, fill up all the following information—
- Account Name
- Website Name
- Website URL
- After doing so, select an ‘Industry Category’ along with ‘Reporting Time Zone.’
- In continuation, under the ‘Data Sharing Options’ check the boxes of options that you want.
- In the end, click on the ‘Get Tracking ID’ and click on ‘I Accept’ From the Google Analytics Terms of Service Agreement that opens!
| Desktop: If you’re posting from the desktop then, click on the ‘Post’ button from the bottom right corner of the Facebook status window. | Mobile: If you’re posting from mobile then, tap on the ‘Share’ button from the upper-right corner of Facebook’s news feed. |
However, there’s no way to confirm that these numbers and accounts actually represent people who looked at your profile but, definitely with these two methods, you’ll get a fair idea of the same.
In addition to this, if you also want to know about the fair-ways of how to see who looks at your Facebook page then, to help you out further we’ve mentioned the 3 possible ways of knowing so. Have a look at these 3 given ‘Traffic Tracking Applications:’
How to See Who Looks at Your Facebook Page
1. Facebook Insights:
It is one of the easiest ways to get an insight into the traffic of your Facebook business and fan pages that have more than 30 likes. Already available in the Facebook application directory, Insights aims to tell users the data containing exact numbers of people, who like their pages, see their page posts, and even click on them. But, in order to get access to it, use these steps—
2. Webtrends:
It is a more full-featured analytics application than Facebook Insights as it monitors data in detail and thus, provides you detailed analytics about the number of visitors and type of people who’re viewing your Facebook business or fan page. So, to use it, just set up an account on Webtrends by visiting its official link “https://www.webtrends.com/.”
3. Google Analytics:
Last but not least, to measure the traffic of your Facebook business or fan pages, you can also use Web-tracking services like Google Analytics. Google has been kind enough to come out with this tool to allow users to get definite data about visitors to their pages, for instance; date, time, and location, etc. However, like we above-said, to use this app also, you need to first set up a Google Analytics account, and then have to add a new profile for your Facebook fan or business page. Here’s how you can do so:
That’s all! These above-mentioned are the methods and ways that you can use to get a fair understanding of the numbers, accounts, and demographics of those who have viewed your Facebook Profile as well as your Facebook business or fan pages. With this, we also assume that we’ve hopefully cleared all your doubts and queries regarding the same!
 Related Post


