Facebook groups have become a popular way for people with shared interests or hobbies to connect and engage with each other. However, as the dynamics and goals of the group change over time, it may become necessary to delete a Facebook group.
So, if you want to do the same, you will find that there is no simple ‘Delete Group’ button. Don’t worry though, there is still a way to delete a group if you’re a “Page admin.”
Well, if this has got you wondering ‘how do I delete a group created on Facebook,’ then you need to read this article till the end.
Here, we’ll also cover how to pause a Facebook group so that you can reactivate it at some point in the future.
Having said that, let us see in detail how to delete a FB group permanently and/or pause a FB group temporarily—
Why to Delete a Facebook Group?
There are many reasons why someone might choose to delete a Facebook group. For example—
The group may have outlived its purpose, or the group may have become inactive due to a lack of engagement from members.
Other than this, the group may have become toxic or harmful, with members engaging in negative behaviors such as bullying or harassment.
So, in such scenarios, removing the group may be a way to prevent further damage and protect the members of the group.
Prerequisite for Deleting a Facebook Group
With regards to deleting and/or pausing a Facebook group, first know that you must be an admin of the group to delete a Facebook group.
If you’re not an admin, you can’t delete a group, but you can leave it, and it’s important to note that deleting a Facebook group isn’t the same as leaving the group.
When you leave a group, you no longer have access to the group’s content or members, but the group still exists and can be accessed by other members. Deleting a group, on the other hand, permanently removes all content and members and cannot be undone.
Next, before deleting a Facebook group, it is important to communicate with the members and inform them of the decision. This can be done through a post in the group or by sending a message to individual members.
By communicating with members and explaining the reason for deleting the group, you can minimize any confusion or frustration that may arise.
Last but not least, it’s important to note that deleting a group is permanent, and all content in the group will be deleted, so if you want to save any group content, such as photos or posts, be sure to download them before deleting the group.
Now, you are all set to learn ‘how to delete group on Facebook as admin’—
How to Delete a Facebook Group?
To delete a Facebook group, the admin/creator must delete all members and then leave the Facebook group itself. However, if the admin/creator has already left the group, another admin can remove members and leave the Facebook group to delete it.
Deleting a Facebook group can be a difficult decision, as it involves permanently deleting all the content, members, and information associated with the group.
But, if you have your own reasons for not wanting to keep it forever and you’ve made up your mind, then it is better to delete a Facebook group deleting a Facebook group is as easy as following these steps—
Notes
You can delete a Facebook group in a web browser as well as in the Facebook mobile app. Therefore, the instructions below apply to (both) Facebook on the web browser and the Facebook mobile app.

How to Delete a Facebook Group on Desktop Browser?
- Step 1: To begin, go to ‘Facebook website’ on your respective desktop web browser.
- Step 2: There, if you haven’t, you need to first ‘Log in’ to your account.
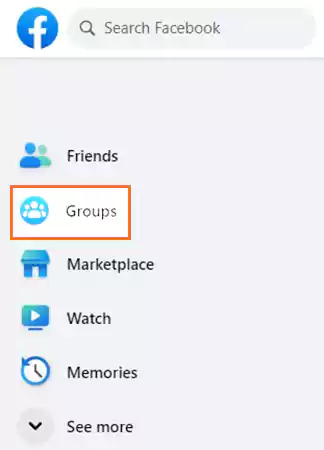
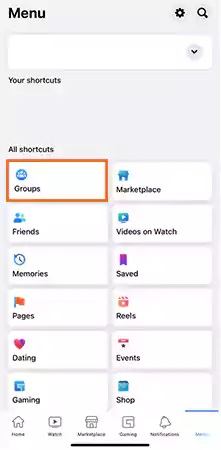
- Step 3: Once you’re logged in to your Facebook account, look at the left menu on your Facebook page and click on ‘Groups.’
- Step 4: Then, what you’ve to do is find the ‘Groups You Manage’ section and select the ‘Facebook Group’ that you want to delete.
- Step 5: After doing so, click the ‘Members’ section, which is right below the group’s name on the left side of the page.

- Step 6: Inside the member’s section, click on the ‘Three-dot button’ next to each member’s name and select the ‘Remove from Group’ option to remove all members from the group.
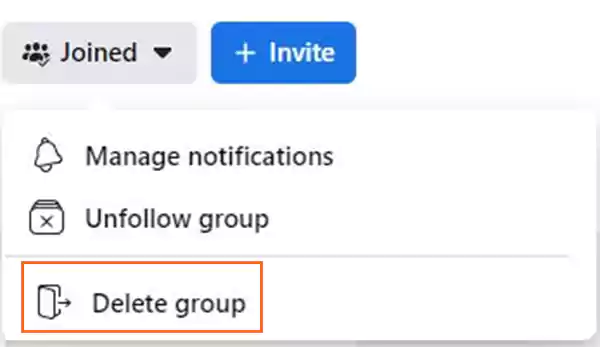
- Step 7: Once you’re done removing everyone out of the group, click the ‘Three-dot button’ next to your name and simply select ‘Delete/Leave Group’ for the group to be deleted.
- Step 8: Finally, you have confirmed your action by selecting the ‘Delete/Leave Group’ option in the pop-up window.
In this way, you will be able to delete your Facebook group on the desktop browser, according to Facebook.
How to Delete a Facebook Group on the Mobile App?
- Step 1: To delete a Facebook group on Android or to delete a Facebook group on iPhone, open the ‘Facebook App.’
- Step 2: On the same, (If you are not already logged in, please log in to your account first) go to the ‘Menu’ tab at the top right (Android) or bottom right (iPhone) corner of the screen.
- Step 3: Inside the menu, tap on the ‘Groups’ tab.
- Step 4: Then, you’ve to select the ‘Your Groups’ option.

- Step 5: After that, open the ‘Facebook Group’ that you want to delete.
- Step 6: Next, you’ve to tap on the ‘Group Page’s title’ to pull up options.
- Step 7: Under the options, go to the ‘Members’ section and hit ‘See All.’
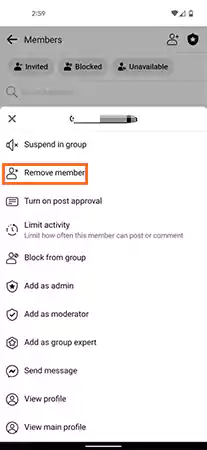
- Step 8: Now, what you’ve to do is tap the ‘Gear-like’ icon next to a member and select ‘Remove Member’ to simply remove the selected member from the Facebook group.
- Step 9: Now, you’ve to ‘Repeat Step 8’ for every member in the group.
- Step 10: Once all members have been removed, go back to the group page and tap on the ‘Shield icon.’
- Step 11: Following that, scroll to the bottom and hit the ‘Delete Group’ option from the drop-down menu.
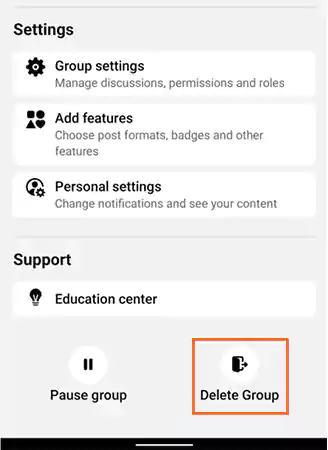
- Step 12: In the end, confirm that you want to delete the group by tapping on ‘Delete Group’ again in the pop-up.

This is the process to delete a Facebook group on the mobile app, according to Facebook.
Pausing vs. Deleting a Facebook Group
Deleting a Facebook group entirely can be an extreme solution. So, if you don’t want to permanently delete a Facebook group, consider pausing it instead.
What’s the difference between pausing and deleting a Facebook group? If you are thinking this, then let us know that—
Deleting a Facebook group on one hand, is a permanent solution. Everything will be permanently erased, and only the group creator can do that.
On the other hand, pausing a Facebook group (formerly ‘archive’) is a more temporary option to prevent activity on a specific group. Once paused, the Facebook group will not be fully functional, but will still appear in searches.
So, if you have decided to go with the latter, here is how you can pause a Facebook group—
Notes
You can pause a Facebook group in a web browser as well as in the Facebook mobile app thus, the instructions below apply to (both) Facebook on the web browser and the Facebook mobile app.
Pause a Facebook Group on a Desktop Browser
- Step 1: To pause a group, first navigate to the Facebook website.
- Step 2: Then, (if you haven’t, log into your account) click on the ‘Groups’ option location on the left menu.
- Step 3: There, you’ve to find the ‘Groups You Manage’ section to select the ‘Group’ you want to pause.
- Step 4: After doing that, click the ‘Three-dot’ button located above the About section.
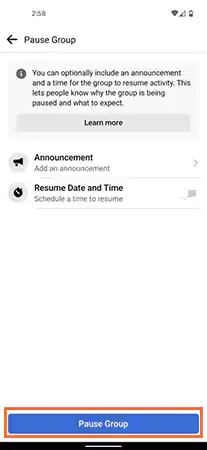
- Step 5: Next, you need to select ‘Pause Group’ from the menu that appears on the screen.
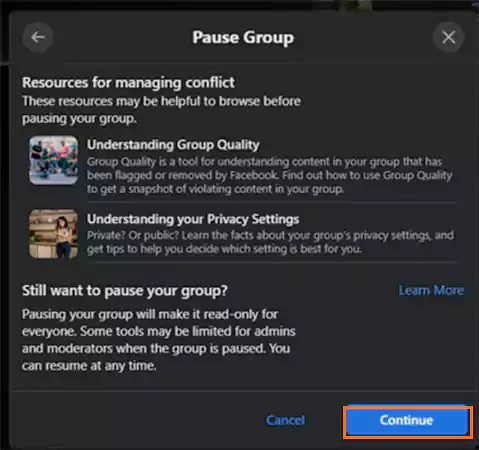
- Step 6: Now, what you’ve to do is simply select the ‘Reason’ for pausing your group and once you’re done selecting the reasons, hit ‘Continue.’
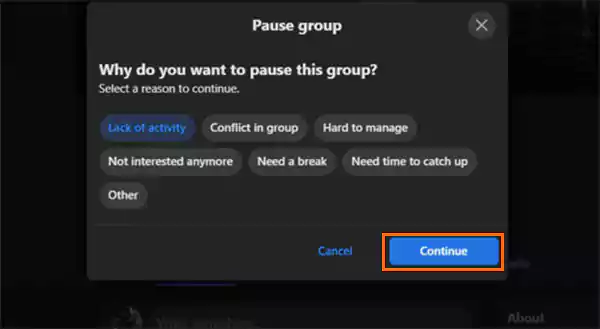
- Step 7: Finally, when you’re done, confirm your decision by clicking on ‘Continue’ again.
Pause a Facebook Group on the Mobile App
- Step 1: In order to pause a Facebook group on your respective Android or iPhone, open the ‘Facebook mobile app’ first.
- Step 2: Then, navigate to the ‘Menu’ tab at the top right (Android) or bottom right (iPhone) corner of the screen.
- Step 3: After that, you’ve to tap on the ‘Groups’ button.
- Step 4: Now, what you need to do is simply select ‘Your Groups.’
- Step 5: Under this, find that particular ‘Group’ you want to pause.
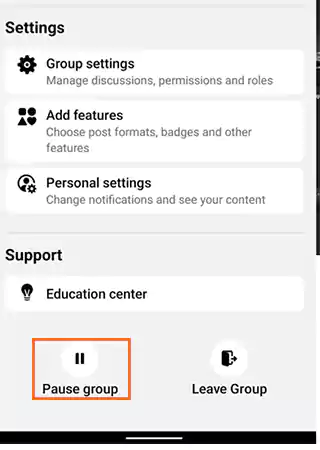
- Step 6: Next, you’ve to tap on the ‘Shield’ button to pull up options.
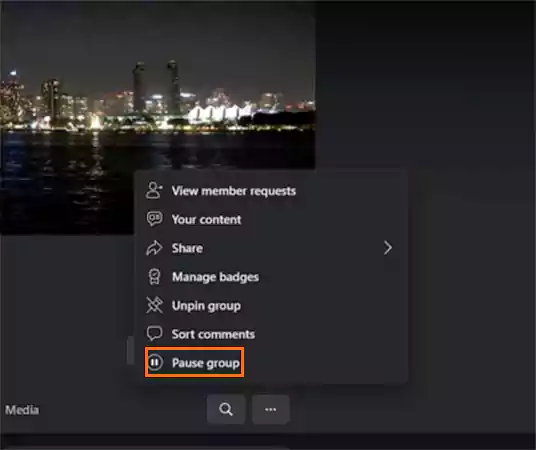
- Step 7: From the options appeared, scroll down and select ‘Pause Group.’
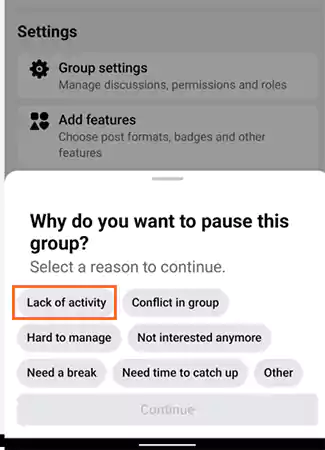
- Step 8: Now, simply select the ‘Reason’ for pausing the group and hit ‘Continue.’
- Step 9: Finally, to confirm your action, again tap on the ‘Pause Group’ option on the next screen.
Bottom Line
That is all. Now you must have known how to delete a Facebook group permanently and also that by doing so, the group gets removed and there is no option to reactivate it.
Therefore, it is suggested that as admin— you should undertake this action only if you’re sure that you do not want to continue with the group in any form. Otherwise, pausing a group is a viable option if you want a break from maintaining it!
FAQs
Ans: To delete a Facebook group, go to the group and click on ‘Members’ in the left sidebar. Then, click on the ‘Three dots’ next to each member’s name and select the ‘Remove from Group’ option. Once all members have been removed, go to the ‘Settings’ section of the group and select ‘Leave Group.’ Now, you’ll have the option to delete the group.
Ans: No. After you delete a Facebook group, it cannot be recovered anyway. In fact, along with that, all group content and member information will be permanently deleted.
Ans: When you delete the group, all content in the group, including posts, photos, videos, and files, will be permanently deleted.
Ans: Yes, you can transfer ownership of a Facebook group to another member before deleting the group. To do so, go to the ‘Members’ section of the group and select the ‘Member’ you want to transfer ownership to. After that, click on the ‘Three dots’ next to their name and select ‘Make Admin.’ Now, you can remove yourself from the group.
Ans: Yes, members of the group will be notified when the group is deleted. However, they will no longer have access to the group content or be able to post in the group.