For many people in today’s hectic environment, gaming is an escape from reality and a way to relieve stress. In the case of issues with that too, people lose their temper and take drastic measures to tackle the matter at hand. These outraged actions, on the other hand, might do much more damage to your computer.
Moreover, people often complain about their computers restarting while they are playing games that need a lot of computing power.
Therefore, to help fix this problem with the least amount of effort and time invested, there are ten troubleshooting strategies, jotted in this article.
Reasons why Computer restarts while playing games
Before directly going to troubleshooting methods, it is necessary to know what can be the problem that is causing your computer to restart while gaming, and you can gain the knowledge to solve the problem beforehand, at its earliest.
1. System configuration
These days, graphics of games are very much enhanced due to the advancement in technology and to give the realistic feel of gaming. These games require a lot of memory and also significantly high RAM in order to work properly. Therefore, your system needs to have that much RAM and other configurations to run the game smoothly, otherwise, it may happen that your computer keeps on restarting while gaming.
2. Update Windows
If you have a pending Windows update that requires to be installed on your system, then there are chances that your system is restarting due to the same reason. Furthermore, your system will keep on rebooting while playing games when the windows get corrupted while installing new updates.
3. Power Settings
If your computer is set to power-saving mode, then all the functions in your system do not work to their full efficiency in order to save the power and this can be the reason for it restraining itself while you are playing games. This is so because gaming requires the use of a lot of resources which become inaccessible in Power saving mode.
4. Bad GPU
The chances of restarting windows due to bad GPU are rare but never zero, this is so because, these days, many Chinese third-party GPUs are becoming popular due to their cheap prices. However, these have low build quality and also do not have up-to-the-mark configurations, which tends to generate several problems while gaming.
5. Overheating
As also mentioned before, nowadays, games of big sizes are produced which tends to acquire a lot of space in your system. When these games start to consume a lot of resources in loading even minor functions, then the system begins to heat and therefore, restarts to cool down the environment.
6. Overclocking
Overclocking allows you to do the system resource-intensive task more smoothly by increasing its efficiency. In this process, the CPU is set to a higher clock speed than the original; when the clock speed is set too high, the system may restart or go blue screen while gaming.
7. System Failure
If the system fails at any time, the computer is configured to restart automatically. Even if there is a minor system problem, it is possible that your computer will restart again.
8. Heatsink not cooling
The heatsink is used to cool down the CPU, GPU, and other components of the system. It has become very necessary these days, with the introduction of heavy software and games that require a lot of computing. If the heatsink is not working as it should, then your PC will experience problems, like lagging and loading, and it may restart at any time while gaming or during any resource-intensive work.
9. PSU not working properly
The power to the components of the CPU is provided by the Power Supply Unit (PSU), which makes PSU a very important component. If it gets damaged or not working properly, then there are high chances that your system will restart while performing heavy functions like gaming.
10. BIOS Settings
Your BIOS settings may be configured to favour high-performance gaming. Many games, however, prefer that you run them at their normal settings, so this may not always be acceptable when you change those settings.
Troubleshooting Methods for the Underlying problems
Method-1: Update Windows
Microsoft keeps on releasing new updates in order to introduce the latest features and fix bugs in the previous version. If you haven’t updated your Windows for a long time and updates are pending, then you should first update them before further jumping to advance troubleshooting methods.
Notes
Before moving further with the steps, make sure that you are logged in as an administrator and not as a user.
Listed here are the steps for updating windows:
- First, press Windows and S keys from the keyboard at the same time.
- Type update in the search bar and click on Check for Update option.
- Now, you will be directed to Windows Update settings. There, click on the Check for updates option.
- Now, your system will check for any latest updates pending. If so, install them on your computer.
For the installation of updates, it is required that your computer is connected to a steady internet connection.
Method-2: Check power settings
When a computer’s power settings are changed, the amount of power delivered to modules on the motherboard will change. It’s possible that these settings will remain in place even if the need is much over the maximum limit of power supplied. If these two things (power supplied and power needed) are out of sync, you may face a variety of problems.
In this method, you are required to use the control panel to browse the power settings and manually modify them by following the below-mentioned steps:
- From the keyboard, press the Windows and R keys at the same time.
- Type ‘Control Panel’ in the small dialog box that appears and press Enter.
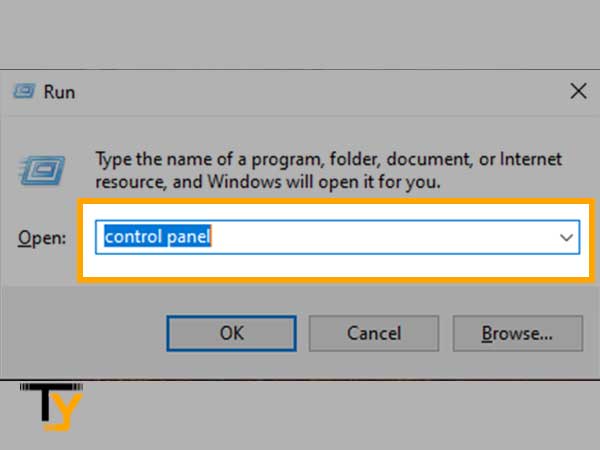
- This will open the Control Panel of your computer.

- Now, change the ‘View by:’ setting to Small Icons.
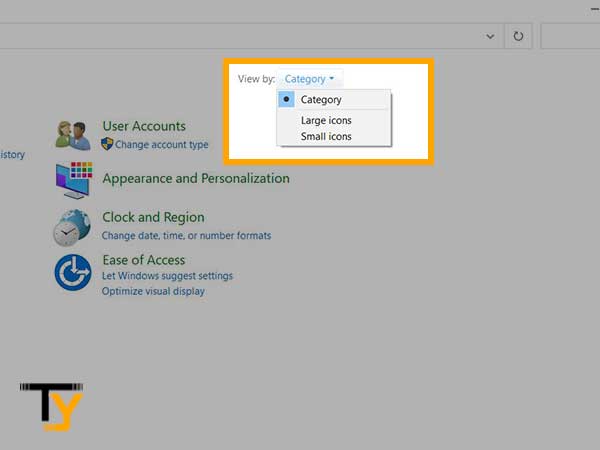
- Then, you have to click on the ‘Power Options’ option.

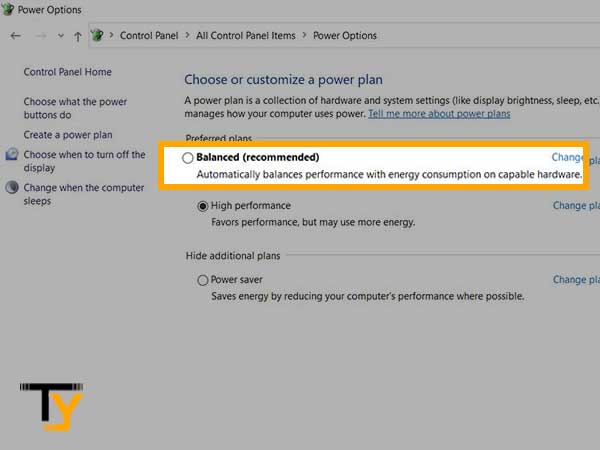
- Now, you will be able to see the Power mode to which your computer is currently set. If it is set to Power Saving mode, select the Balanced (recommended) mode.
Method-3: Go through GPU configuration
For gaming purposes, you need to have a GPU with high-end configurations. If the system already does not contain the GPU that is compatible to handle high graphics of the games, many gamers tend to install a third-party GPU, but it is not the same as a built-in one.
There are instances when you install an external GPU without having complete knowledge of its compatibility with your system, many complications are faced later on, like PC randomly restarts while gaming.
Moreover, having said of compatibility, if you are upgrading to a GPU with high performance, then you need to check whether your system can match its performance or not, beforehand. Otherwise, you will be facing several problems and lags in functionality in future.
Mentioned here are the steps by which you can go to Device Manager and disable the third-party GPU temporarily, to see if the problem gets solved after that:
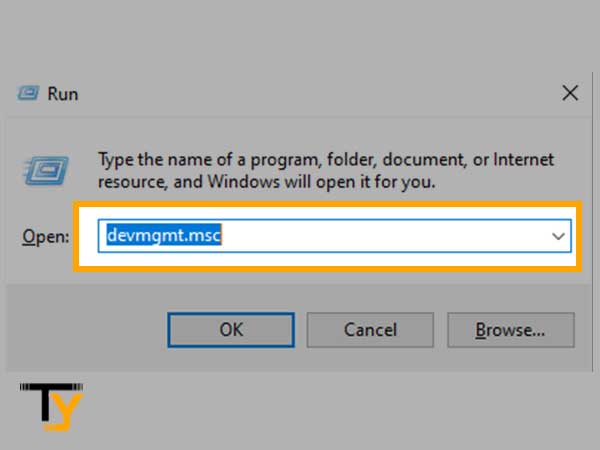
- From the keyboard, press the Windows and R keys at the same time.
- Type ‘devmgmt.msc’ in the text field of the dialog box that appears.
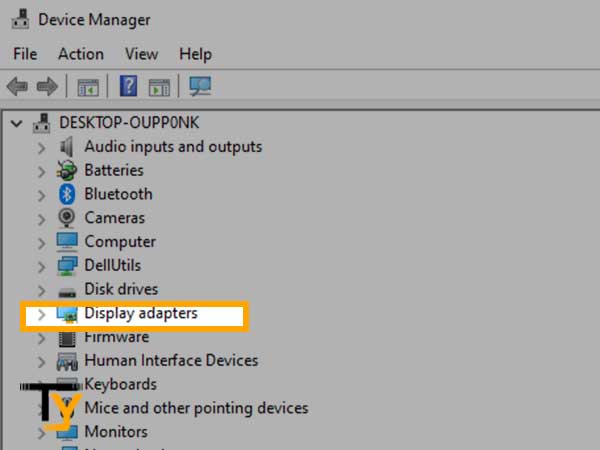
- Now, on the Device Manager window, find the Display Adapter option and click on it.
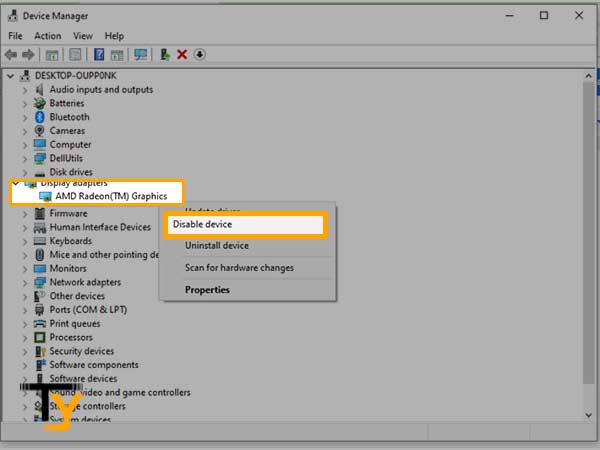
- Under it, you will see Graphics that are installed on your computer. Right-click on the externally installed GPU and select the Disable Device option from the context menu.
- After disabling, restart your PC and see if the problem is gone.
Method-4: Ensure the proper functioning of Heatsink
If you are facing the overheating problem of your desktop due to which it restarts while you are playing a game, then one reason is the excessive stress caused by heavy functions of the game on incompatible system configuration and the other reason being the improper working of Heatsink.
The heatsink is a hardware install in the system which ensures the proper cooling of CPU, GPU and other heating components.
If it is having any problems working then, the system will heat up to an extent that it will force an emergency restart to cool down the heating environment.
Therefore, before moving onto more troubleshooting methods, check your Heatsink and ensure its proper working.
Furthermore, if you are using a laptop, clean your laptop cooling fans from outside and make use of the cooling pad.
Proceed to further steps of troubleshooting, only when you are sure that your computer’s cooling mechanism is up-to-date.
Method-5: Disable Overclocking
It’s possible to increase your core clock if you need additional performance, be it for gaming, rendering and scripting, or just for everyday chores. Saving money on CPU upgrades, or even replacing the entire computer, is a huge benefit, which can be achieved by Overclocking.
When you use overclocking, you may operate your CPU at a higher clock speed than it was designed to function at. So you can execute resource-intensive programs and software, like games, faster and more smoothly.
However, for gaming or any other purposes, when you use overclocking, it extends the performance of the CPU till it reaches its threshold. After reaching the threshold, it may happen that the CPU begins to heat up and therefore, the computer restarts itself to prevent any damages from overheating and exceeding stress on the CPU.
In most cases, overclocking is the main reason for PC rebooting while gaming. Thereby, it is advised that you disable any type of overclocking you have enabled and put your CPU to the normal speed.
Furthermore, you should also disable any externally installed computer performance enhancement programs currently functional in your system.
Method-6: Check if Automatic Restart is Enabled
If any of the above-mentioned methods are not working for you, then you need to make sure that you haven’t enabled the Automatic Restart option, which is causing your computer to randomly restart when playing games or doing other activities.
Here are the steps that will take you to the desired setting, which you can change:
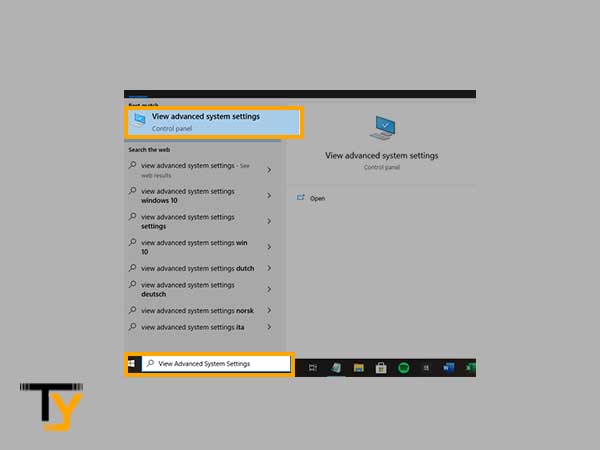
- Click the Start button on your desktop and type View Advanced System Settings in the search bar.
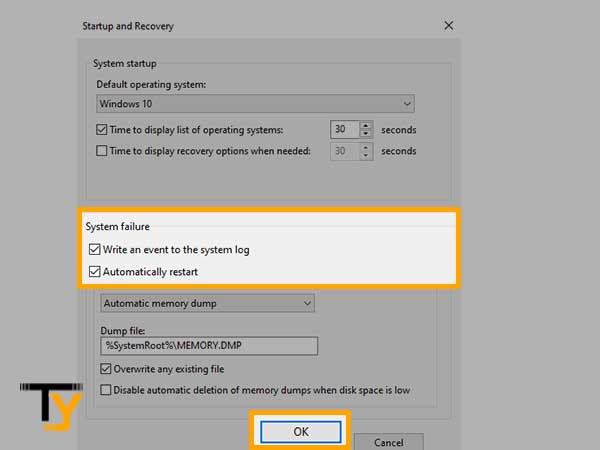
- In the small window that appears, switch to the Advanced tab and click on the Settings button under the Startup and Recovery section.

- Now, under the System Failure section, uncheck the ‘Automatically Restart‘ option and click OK to confirm the changes.
- Thereafter, restart your computer and see if the problem is still there.
Method-7: Inspect your Power Supply Unit (PSU)
If you want to play games, you’ll need a power supply unit (PSU) because it’ll give your computer enough power for each component. Some connections may need more energy than the motherboard itself. Therefore, if your PSU is damaged, you will suffer a wide range of issues from system lagging frequently to restarting when your power supply is broken.
Now, to ensure the proper working of a PSU, you can temporarily use another PSU. Use this hardware for some time and observe if your computer still restarts while playing games. If the problem does not arise while using another PSU, then do get your originally installed PSU checked and restored to normal working.
Method-8: Reset BIOS Settings to Default
BIOS is the first element of your computer to load when you turn it on. Because of BOIS, input, and output devices are connected to the desktop and loaded. As soon as that’s done, it loads the operating system.
If you are a gamer and have enabled overclocking, then you must have gone through changing or resetting BIOS settings to increase the CPU throughput. It is evident that, after changing the BIOS settings, many people have faced problems with their PC, like rebooting of computer while gaming or performing other heavy tasks. Thereby, it is advised that you restore your computer’s BIOS settings to default. However, this is a technical task and the process of accessing these settings varies with systems from different manufacturers, therefore, you should get technical assistance while doing so.
Method-9: Update Graphics Card Driver
If your computer keeps going to the desktop or keeps restarting while playing games, then your system needs a Graphics Driver update. Following are the steps for doing so:
- Press Windows and R key from the keyboard at the same time and type ‘devmgmt.msc’ in the dialog box that appears and click on the OK button.
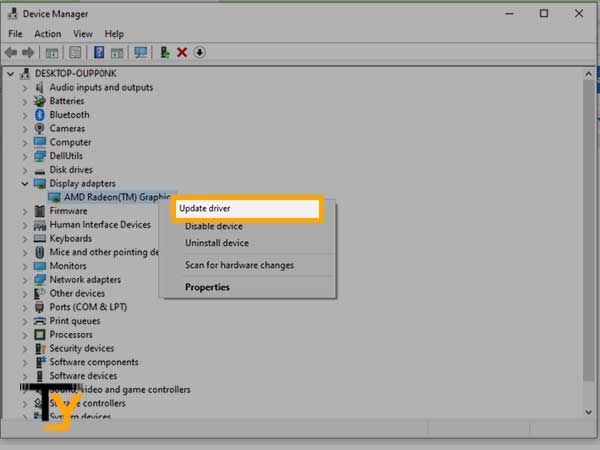
- This will open the Device Manager, where you have to locate the Display Adapter. Click on it to expand.
- Right-click on the Graphics specifications shown in the Display Adapter and select the Update Driver option from the context menu.
- Once the update is done, restart your system for the full application of updates of the driver.
If you do not want to install the updates manually, you can use an automated tool, like Driver Easy, to do that for you.
Method-10: Execute System Restore
If any of the above-mentioned methods do not work for you, then you have to run System Restore. This method is written in last, as it will restore your PC to the initial state when it was first unpacked and booted.
Therefore, after running System Restore, any changed system default settings, any program installed which was interrupting and causing the system to reboot while gaming or doing other tasks or any installed corrupted file will get restored to the original normal state.
Notes
After system restoration, all the downloaded software, changed settings and data will be lost.
These are the steps to restore Windows to its initial state:
- In the search bar of your system, type restore and click on the Create a Restore Point option.
- In the System Properties window, go to the System Protection tab and click the System Restore button under the System Restore section.
- Now a wizard will open to navigate you through steps. After which, you have to choose a point from where you want to restore your PC. You can select to restore from the last restore point or from any other point of time.
- Then, click on the Next button and confirm your action.
- Once the system is restored successfully, log in to your system and see if the computer restarting problem while playing games is gone.