Communication, particularly professional communication, has transformed as a result of technological advancements. Emails are the most common way of starting any formal conversation.
Due to the fact that you utilize various email service providers at the same time, it is recommended that you configure them all in one location for easier management. AT&T and Outlook are two of the most used email applications used by professionals. Because AT&T provides a free email account with abundant benefits, you might consider logging in and configuring the settings of your AT&T email on Outlook to manage all of your AT&T and other email accounts in one place. This way, you will not need to log in to your AT&T email account every time you want to check emails.
By going through this article you will get to know how you can set up your AT&T email account in Outlook 2007, 2010, 2013, and 2016 along with which you will be able to do the manual configuration of mail server settings.
Setting up AT&T email in Outlook 2016
From previously released versions of Outlook, the 2016 version has a whole new user interface design which makes it look more attractive, and also the configuration of email server settings become somewhat easier.
Listed below are the steps by following which you will be able to add and configure your AT&T email account on Outlook 2016:
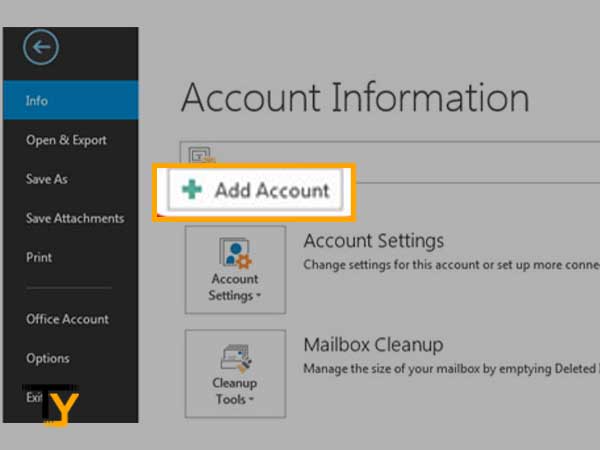
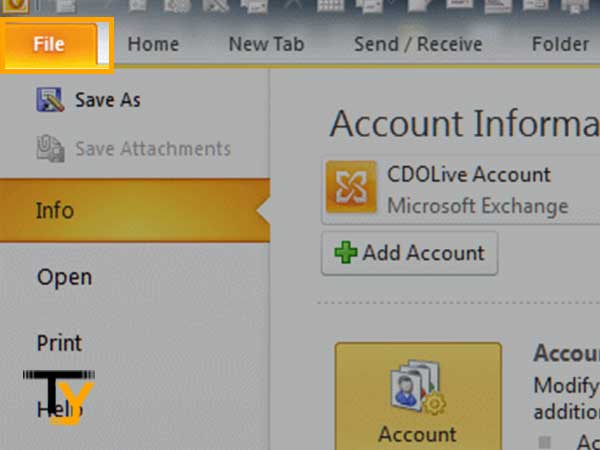
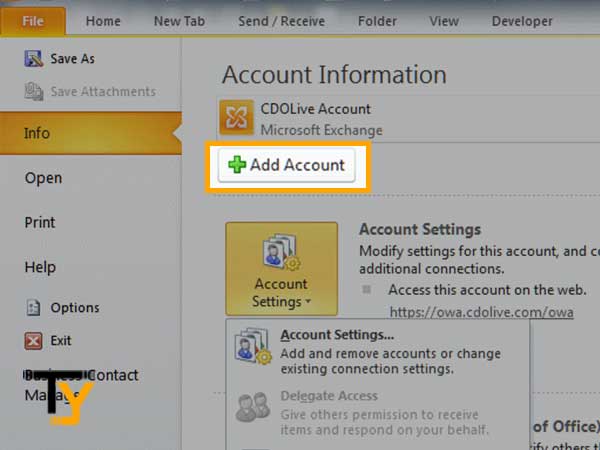
- First, launch Outlook and then click on the File tab.
- Select Add Account option from the visible screen.
- On the next screen, enter your AT&T email address in the text box.
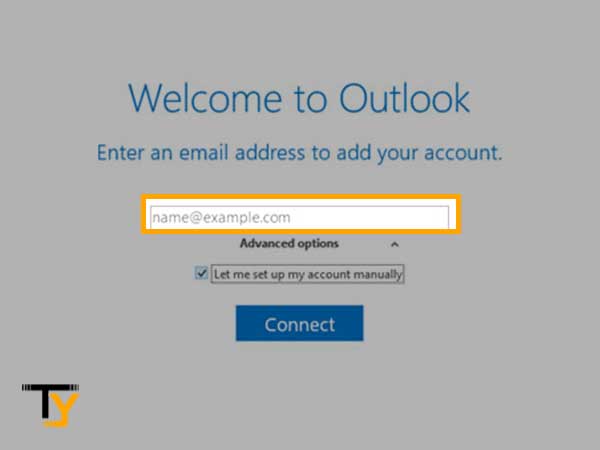
- Below the email address text box, the Advanced Setting option will be present, click on it and check the “Let me set up my account manually” for configuring your AT&T email in Outlook 2016 by yourself.
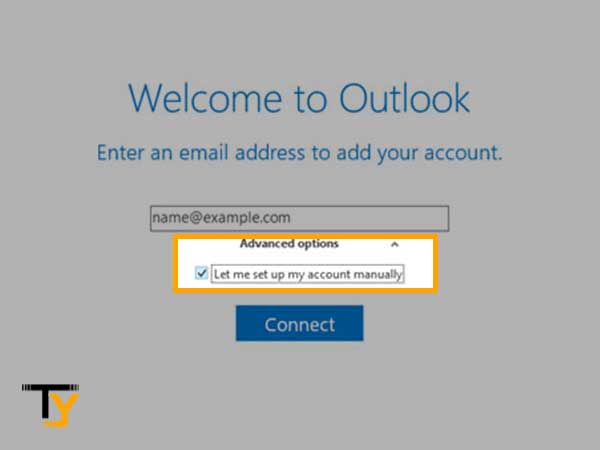
- Click on the Connect button.

- Now, you have to select the Account Type. It can either be POP or IMAP, however, IMAP is preferred over POP.
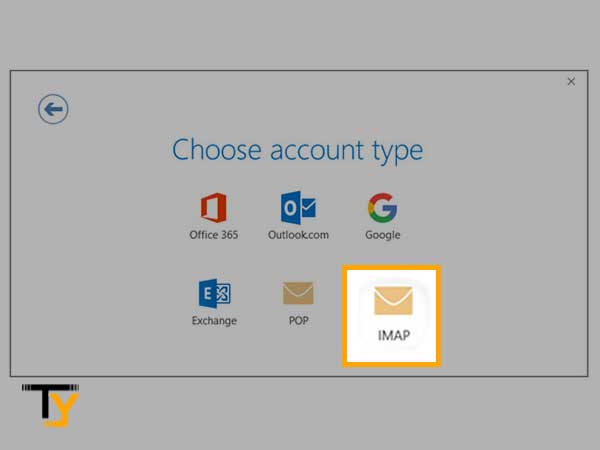
- Then, the Account settings page will appear, where most of the information will be already filled, nevertheless, you can cross-check that information from the mail server settings provided below according to the account type you have selected in the previous step:
- Account Type: POP
- Incoming Mail Server: inbound.att.net
- Port No.: 995
- Encryption Method: SSL
- Outgoing Mail Server: outbound.att.net
- Port No.: 465
- Encryption Method: SSL
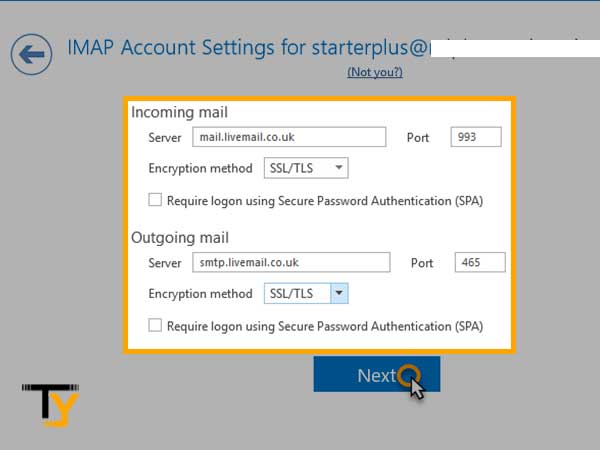
- Account Type: IMAP
- Incoming Mail Server: imap.mail.att.net
- Port No.: 993
- Encryption Method: SSL
- Outgoing Mail Server: smtp.mail.att.net
- Port No.: 465
- Encryption Method: SSL
- Account Type: POP
- After filling in the required settings, make sure to check the “Require logon using Secure Password Authentication (SPA)” option in both Incoming and Outgoing mail settings.
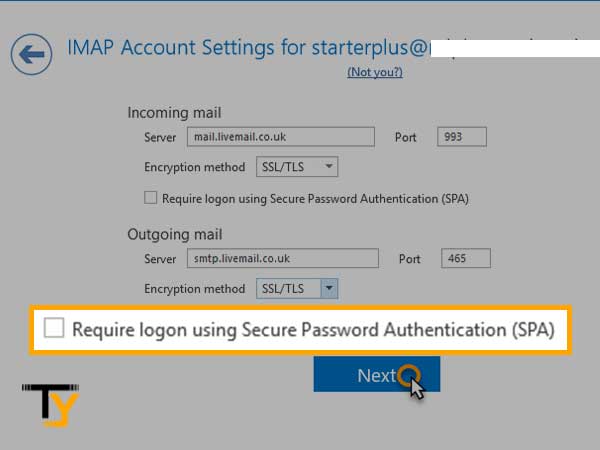
- After that, click on the Connect button.
- Now, a small screen will be prompted where you have to fill in your AT&T password and click Connect. After this, your AT&T account will be added to Outlook 2016.
Setting up AT&T email in Outlook 2013
Steps for setting up and configuring AT&T email accounts in Outlook 2013 are slightly different from those of the Outlook 2016 version.
Following are the steps for adding AT&T email to Outlook 2013 by entering mail server settings manually:
- Open the Outlook system software and select the File tab.
- Click on the Add Account option on the Account Information page that appears.

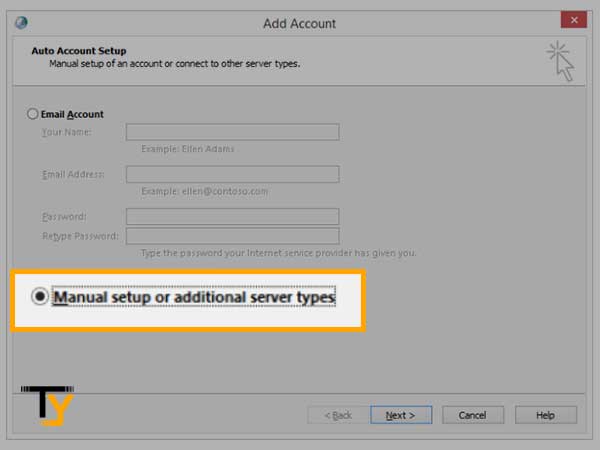
- Now, choose the “Manual set up or additional server types” option from the next screen and then click on the Next button.
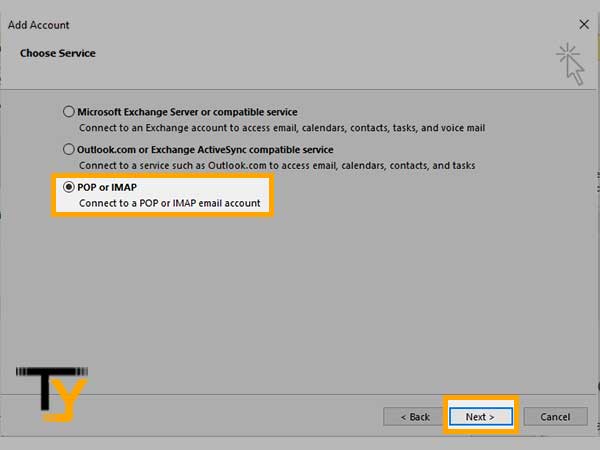
- Thereafter, from the next screen, select the POP3 and IMAP account settings option.
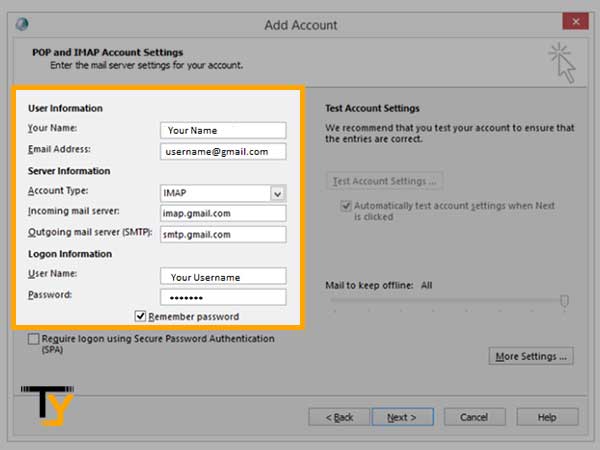
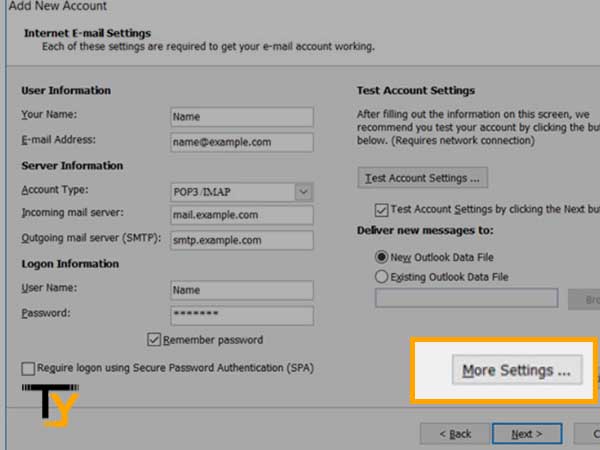
- The mail server settings window will appear, where the following information has to be filled:
- User Information:
- Name: Enter your full name; it will be displayed to others while you will send an email using Outlook.
- Email address: Enter your full AT&T email address
- Server Information:
- Account Type: Choose either POP or IMAP
- Incoming mail server: inbound.att.net (for POP) or imap.mail.att.net (for IMAP).
- Outgoing mail server: outbound.att.net (for POP) or smtp.mail.att.net (for IMAP).
- Logon Information:
- Username: Fill in your AT&T email address
- Password: Enter your AT&T account password.
- User Information:
- Now, check both of the ‘Remember Password’ and ‘Require logon using Secure Password Authentication’ options.
- Click on the More Settings button.
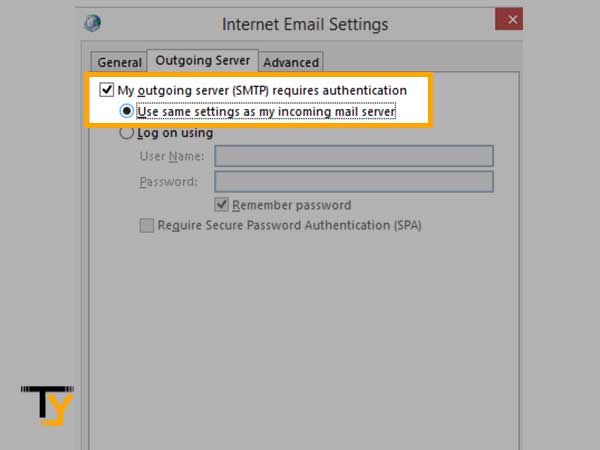
- Switch to the Outgoing Server tab. There, check the “My outgoing server (SMTP) required authentication” option and also select the “Use the same settings as my incoming mail server” option.
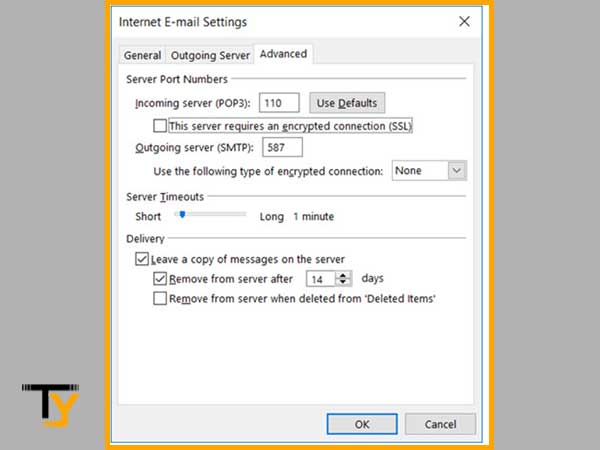
- Now, again, switch to the Advanced tab and fill in the following information:
- Server Port Numbers:
- Incoming server: 995 (for POP) or 993 (for IMAP)
- Check the “This server requires an encrypted connection (SSL)” option.
- Outgoing Server: 465 (for both POP or IMAP)
- Use the following type of encrypted connection: Select SSL from the drop-down list
- Server Port Numbers:
- At last, click on the OK button to save the changes, then Next and Finish and you are done with your AT&T email settings for Outlook 2013.
Setting up AT&T email in Outlook 2010
Adding an AT&T email and configuring it in Outlook 2010 is a separate procedure with entirely different steps and settings than the ones described in the previous two sections.
Without going deep into the topic, how they are different, let’s find this out by following through the below-listed steps:
- First, open the Outlook software and click on the File option from the menu of Outlook.
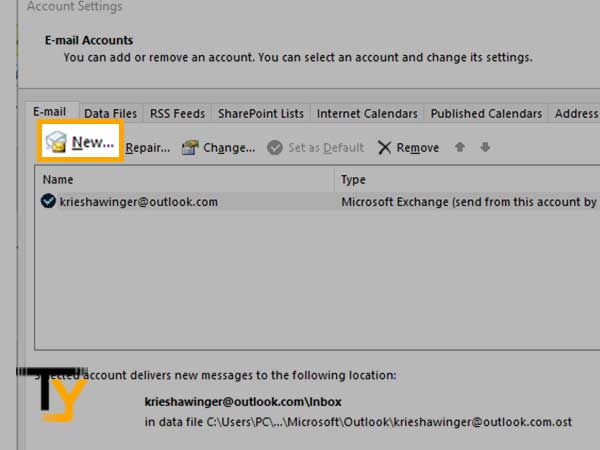
- An account Information screen will appear, where you have to select the Add Account option.
- From the next window that appears, click on the New option.
- Now, check the “Manual set up or additional server types” option and click on the Next button.
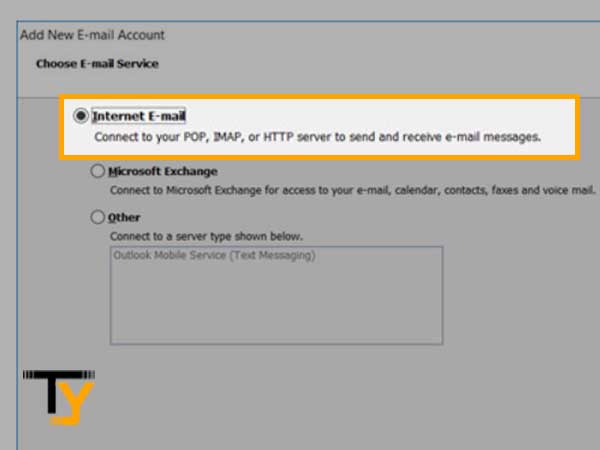
- Thereafter, select the Internet E-mail option from the next window and click Next.
- Then, the Account Settings screen will pop up where the following information is to be provided:
- User Information:
- Name: Enter your full name; it will be displayed to others while you will send an email using Outlook.
- Email address: Enter your full AT&T email address
- Server Information:
- Account Type: Choose either POP or IMAP
- Incoming mail server: inbound.att.net (for POP) or imap.mail.att.net (for IMAP).
- Outgoing mail server: outbound.att.net (for POP) or smtp.mail.att.net (for IMAP).
- Logon Information:
- User name: Fill in your AT&T email address
- Password: Enter your AT&T account password.
- User Information:
- On the same window, select ‘Remember Password’ and ‘Require logon using Secure Password Authentication’ options.
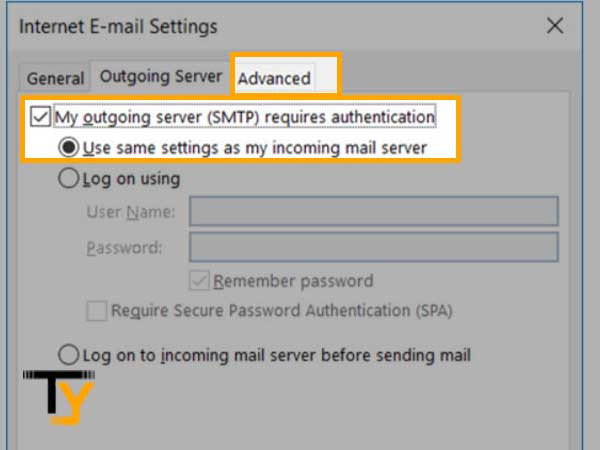
- Click on the More Settings button.
- Now, select the Outgoing Server tab, within which you have to select both of the “My outgoing server (SMTP) required authentication” and “Use the same settings as my incoming mail server” options.
- Now switch to the Advanced tab and fill in the below-mentioned information:
- Server Port Numbers:
- Incoming server: 995 (for POP) or 993 (for IMAP)
- Check the “This server requires an encrypted connection (SSL)” option.
- Outgoing Server: 465 (for both POP or IMAP)
- Use the following type of encrypted connection: Select SSL from the drop-down list
- Server Port Numbers:
- Leave the rest of the prefilled information as it is, and click on the OK button to save the changes.
- Lastly, click on the Next button and then Finish and your AT&T email account will be added to Outlook 2010 along with all the necessary and important mail server settings.
Setting up AT&T email in Outlook 2007
2007 is a very old version of Outlook, and configuring AT&T in it is completely different from the procedures outlined above. Moreover, this version is not so popular these days, therefore, it was a bit difficult to find the right process of entering AT&T manual settings for Outlook 2007. However, ServSettings website helped in writing down the right process in a precise form.
Now let’s see what we have got here:
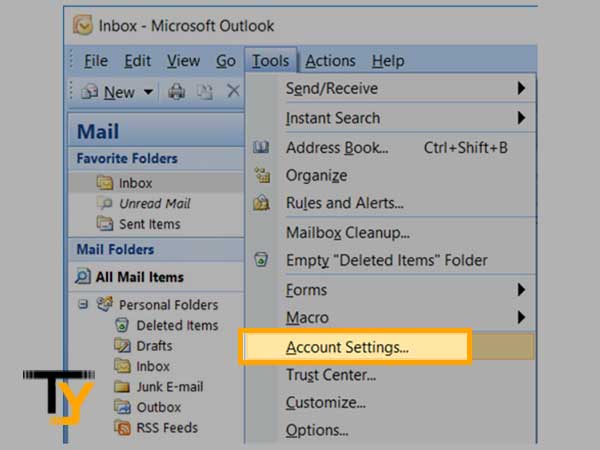
- The first and foremost thing you have to do is to launch the Outlook app on your system.
- From the top menu bar of Outlook, select Tools.
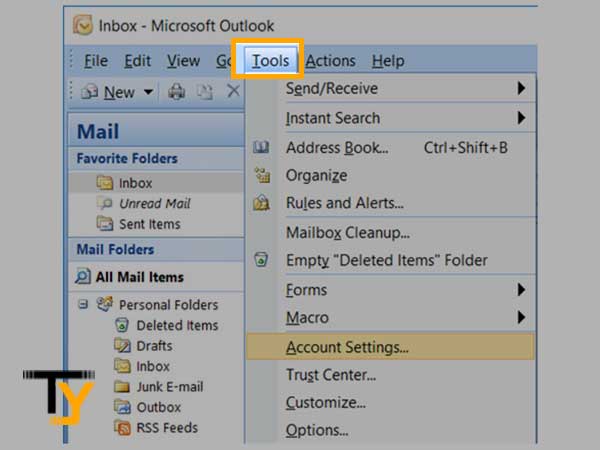
- From the menu that opens, click on the Account Settings option.
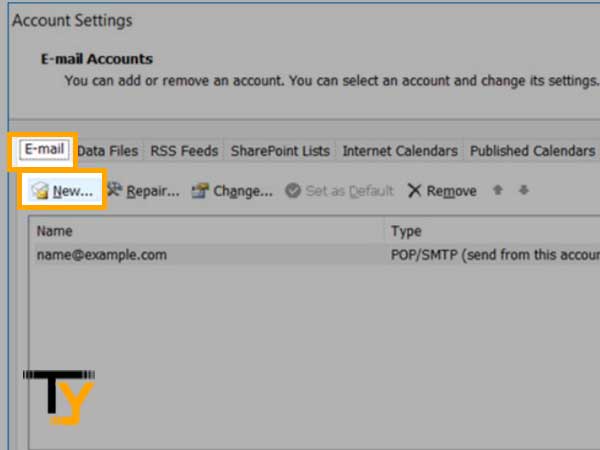
- Now, the Account Settings window will open up, click on the E-mail tab and select the New option.
- Thereafter, select the “Microsoft Exchange, POP3, IMAP or HTTP” option from the visible window and then click Next.
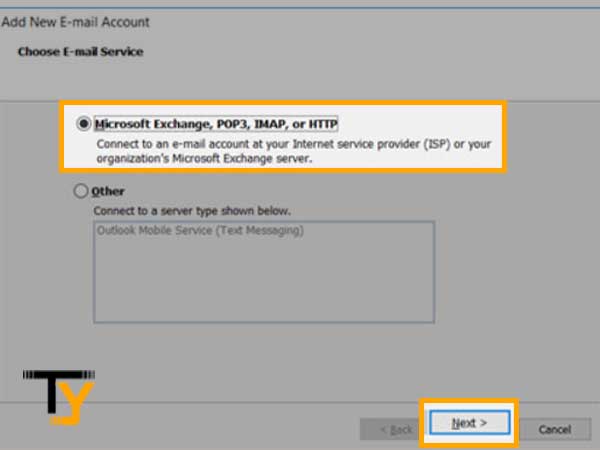
- Check the “Manually configure server settings or additional server types” option and again click on the Next button.
- Now, choose the Internet E-mail option from the list of options and click Next.
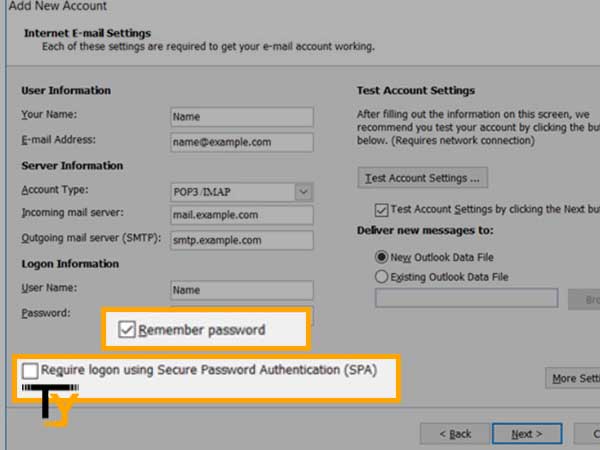
- An Internet E-mail Settings screen will appear where you have to fill in the following information:
- User Information:
- Name: Enter your full name; it will be displayed to others while you will send an email using Outlook.
- Email address: Enter your full AT&T email address
- Server Information:
- Account Type: Choose either POP or IMAP
- Incoming mail server: inbound.att.net (for POP) or imap.mail.att.net (for IMAP).
- Outgoing mail server: outbound.att.net (for POP) or smtp.mail.att.net (for IMAP).
- Logon Information:
- User name: Fill in your AT&T email address
- Password: Enter your AT&T account password.
- User Information:
- After filling in all the required information, check the ‘Remember Password’ and ‘Require logon using Secure Password Authentication’ options and click on the More Settings button.
- Click on the Outgoing Server tab and check the following options:
- My outgoing server (SMTP) requires authentication
- Use the same settings as my incoming mail server
- Then, go to the Advanced tab and fill in the information given below:
- Server Port Numbers:
- Incoming server: 995 (for POP) or 993 (for IMAP)
- Check the “This server requires an encrypted connection (SSL)” option.
- Outgoing Server: 465 (for both POP or IMAP)
- Use the following type of encrypted connection: Select SSL from the drop-down list
- Server Port Numbers:
- To save the changes, click on the OK button.
At last, click Next and Finish. Accurately following these steps will let you add and configure the settings of your AT&T email account in Outlook 2007.