It is very frustrating when you are trying to access a website and repeatedly being directed to the ‘This webpage is not available’ error page on your Chrome browser.
This problem is not only with those who are visiting the website for the first time, but many people regularly visiting the website also face this problem.
The same concern was faced by my fellow mate, he said, ‘I was in the middle of an online test. I got stuck with one of the questions, then I Googled it. One of the websites that I regularly visit for notes and answers showed up in search results. I clicked on it, but the ‘This webpage is not available’ error page was displayed instead. The scores of the test were a nightmare for me’.
We both searched the whole web for the solution but couldn’t find any reliable information. We applied our own tips and tricks, along with some help from uncountable articles we went through on the internet and got the problem solved.
Despite the fact that we solved the issue, we applied a lot of failed methods, which wasted a significant amount of time. This is where I came upon the idea to write this article that contains only workable solutions to the difficulty of ‘This webpage is not available’ on Google Chrome.
So, without talking much, let’s see what we have got in here.
Solutions Common to all devices
Solution-1: Check if there is a typo in the URL
Having a typo in the URL of the website is the most common reason for you being redirected to the ‘This webpage is not available’ error page. If you are typing the really long link in the URL bar, then the chances of not making the typing mistake are negligible.
When a typo is made in the URL, the webserver is unable to recognize the website address that you are trying to reach and thus, throws the error message.
Therefore, you need to carefully type the domain name as well as the whole URL of the webpage you are trying to get to. And most importantly, why type, just copy and paste the URL in the address bar of the browser, click search, and you will reach your destination.
Solution-2: Ensure proper internet connectivity
A proper internet connection is a predetermined condition to access the internet and any of the websites present on it. If your internet is going on and off, then definitely you are going to face several problems while accessing websites.
In such a scenario, you can switch off your internet data and turn it on again to ensure the establishment of a proper connection between your device and the internet service provider. The same, you can do with your Wi-Fi modem and router.
Solution-3: Clear Your Browsing Data
Believe it or not, clearing the cache of your browser can solve most of your internet or website-related issues, and the same is the case with this one.
The browser stores little information, known as Cache and Cookies, about every website you visit on the internet. Later on, this information is used to load the website fast. However, if this browsing data gets damaged, it causes unpredictable difficulties in accessing some or most of the websites, ‘This webpage is not available’ error being one of them.
Listed here are the steps that will help you clear cookies and cache data from your Google Chrome browser:
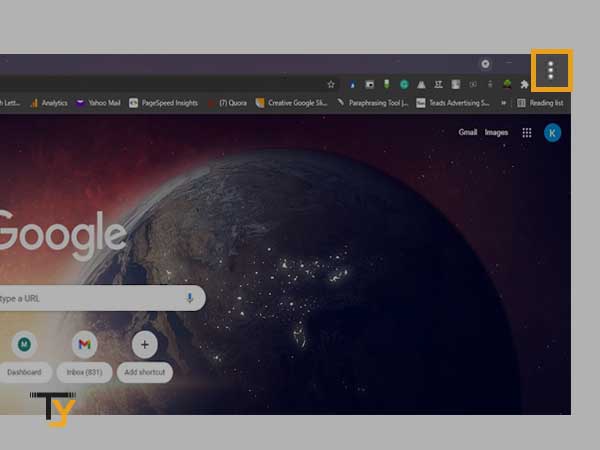
- Open Google Chrome, click on the More menu icon (three dots) present in the extreme top right corner of the browser.
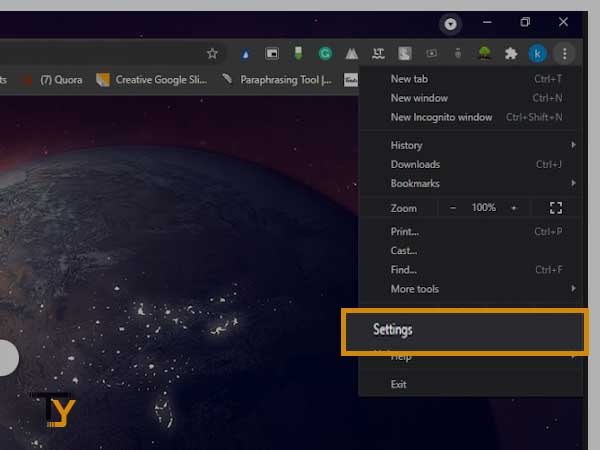
- From the menu that opens, select the Settings option.
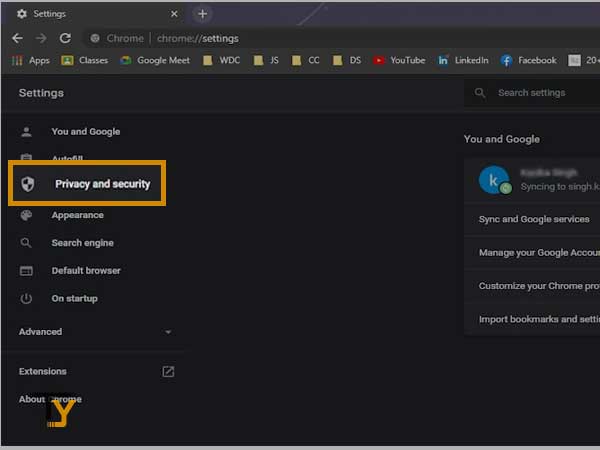
- Thereafter, the Chrome Settings page will open. From the sidebar of it, select the Privacy and Security tab.
- Then, the option under Privacy and Security will become visible, click on the Clear browsing data option.
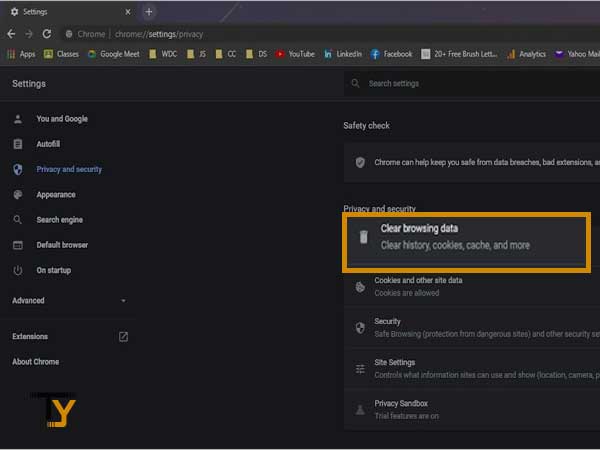
- If you have started facing the issue within a few days or hours, then you can select the time for which you want to clear browsing data from the Time Range option, present within the Clear browsing data window.
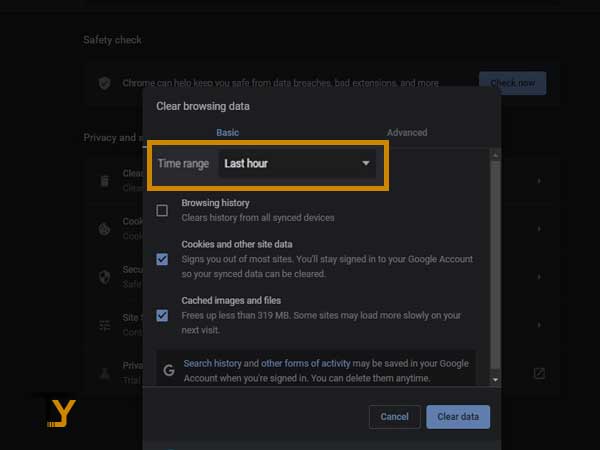
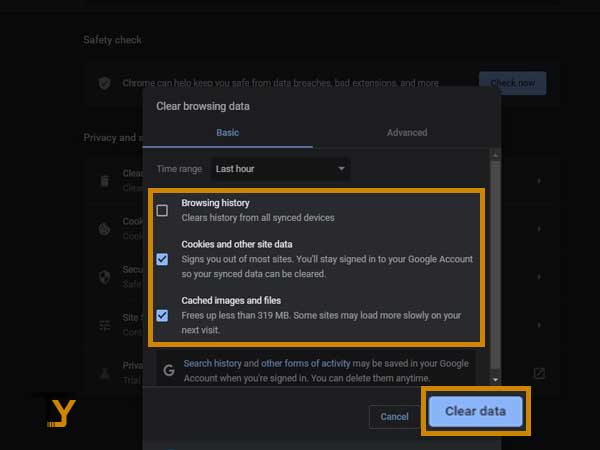
- Now, select all the available options, which are: Browsing history, Cookies, and other site data, and Cached images and files, and click on the Clear Data button.
- Lastly, restart the browser and see if the problem is still there.
Solution-4: Check Your Chrome Proxy Settings
If the Proxy server option is being enabled in your system, then it might be the reason due to which Chrome is showing, ‘This webpage is not available’ error.
You will get to know that this is a Proxy server problem when you will see ‘Resolving proxy’ or ‘ERR_PROXY_CONNECTION_FAILED’ messages on the webpage. To reverse this setting, the following are the steps:
- On the error page itself, you will see the time in the bottom right corner, select it.
- Then, choose Settings.
- Click on the name of the Network you are using inside the Network section.
- Click on the Proxy option.
- At last, uncheck the Proxy Server option.
Mentioned above were some solutions that were not device-specific. You can apply them to any operating system.
However, just like every operating system is different from others, the same is the case with their troubleshooting methods. The following sections will walk you through different methods to resolve the ‘This Web page is not available’ issue for different types of devices.
Solution For Windows
Solution-1: Flush DNS
‘Webpage is not available’ error also occurs due to the DNS server being altered. By flushing the DNS server, its information will be regenerated whenever you visit a new website and most probably you will be able to reach the website you were trying to access, and your problem will be solved. In order to do so, the following are the steps that you have to undergo:
- First, you have to open the command prompt in your system. For that, type the command prompt in the search bar of your system.
- Now, just not simply open it, select the Run as Administrator option.
- After it has opened, type ipconfig/flushdns and press Enter key from the keyboard.
- You will know that the command you entered works, when you will see the ‘Successfully flushed the DNS Resolver Cache’. Thereafter, close the command prompt window.
- At last, reboot your system in order to make sure that all the changes are applied.
Solution-2: Use a Custom DNS
If you are not able to solve the issue and still ‘This webpage is not available’ text is plastered to your Chrome browser screen, then changing your DNS to custom settings might help you. This issue may arise due to a problem with your router and ISP DNS, therefore, by following the steps below you will be changing your DNS to Google DNS:
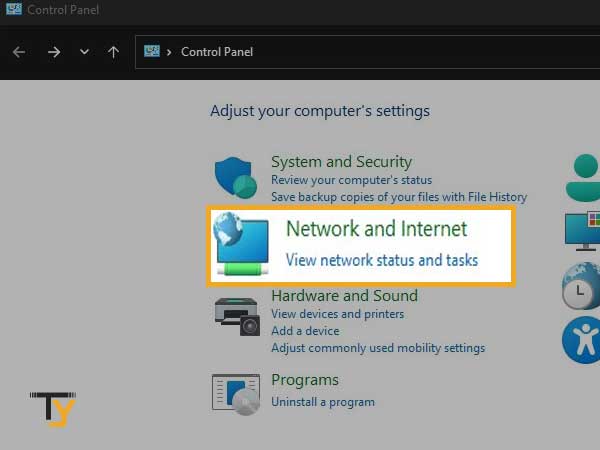
- Type Control Panel in the search bar of your Windows and open it.
- Then, select the Network and Internet option.
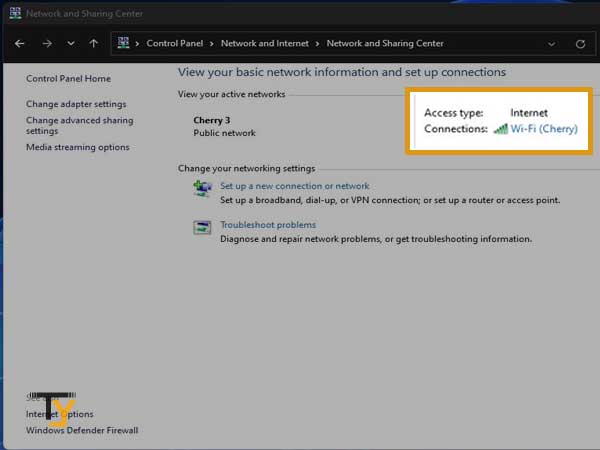
- Inside it, click on the Network and Sharing Center option.

- Thereafter, you will see the Wi-Fi or network name to which you are connected, click on it.
- A small window will open up, click Properties on it.
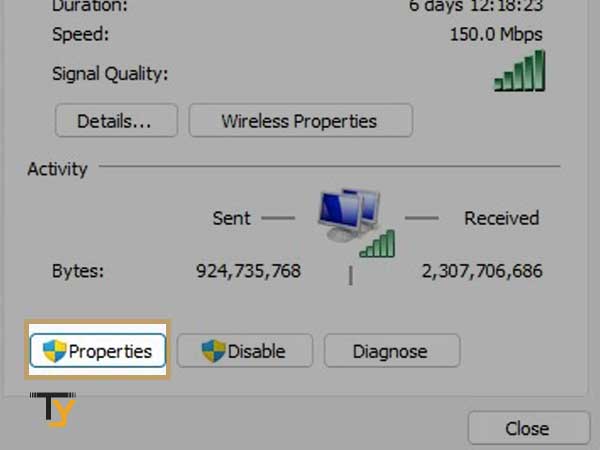
- Then, another small window will pop up, from there, select Internet Protocol Version 4 (TCP/IPv4) and click on the Properties button.
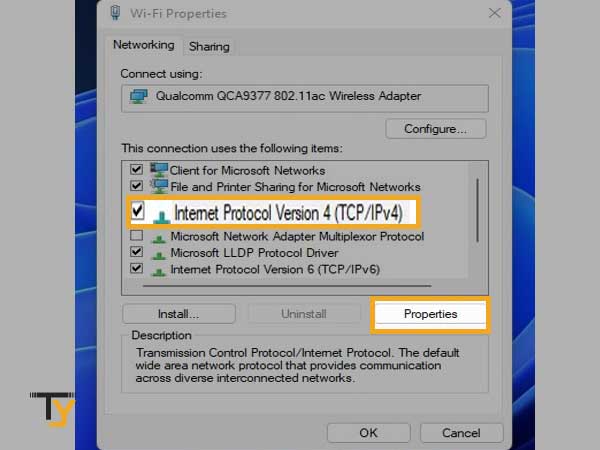
- From the small screen that appears again, select the use the following DNS server addresses option and type the following:
- Preferred DNS Server: 8.8.8.8
- Alternate DNS Server: 8.8.8.4
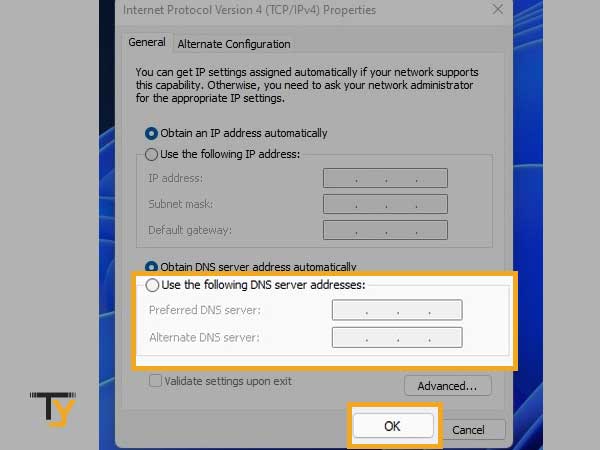
- Click on the OK button and the changes will be applied.
Solution-3: Reset TCP and IP
If any of the above-stated methods were not able to solve this issue of yours, then the last remaining option is to reset Transmission Control Protocol and Internet Protocol (TCSP/IP).
In order to do so, you have to open the command prompt on your system and make sure to run it as administrator (If you do not know how to do that, then refer to Solution-2 of this section).
After running the command prompt as administrator, you will be required to enter the commands mentioned below, one at a time, and hit the Enter key from the keyboard subsequently.
Following are the commands:
- ipconfig/release
- ipconfig/all
- ipconfig/flushdns
- ipconfig/renew
- netsh int ip set dns
- netshwinsock reset
Hopefully, after following these methods, your ‘This webpage is not available’ issue may find an end, and you will be able to freely use your internet and browser.
Solutions for Android/iPhone
Solution-1: Reset DNS Server Settings
Changing your DNS settings to public DNS of Google was also suggested for Windows in the above section, however, the steps for doing so are completely different for both types of devices.
This solution really helped people in getting their way out of the ‘This webpage is not available’ issue, therefore, here are the steps of changing DNS server settings in Android:
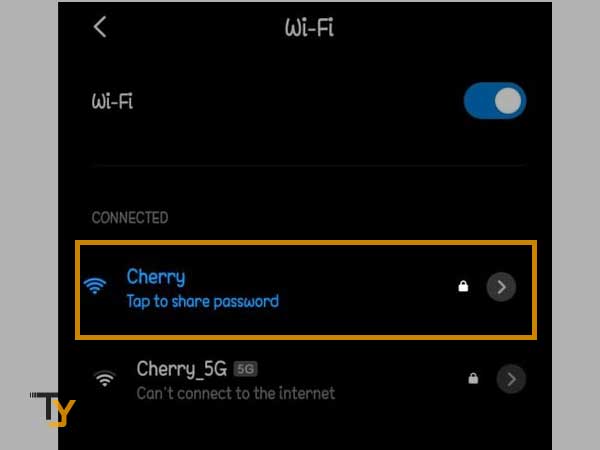
- First, open your phone Settings and go to the Wi-Fi section.
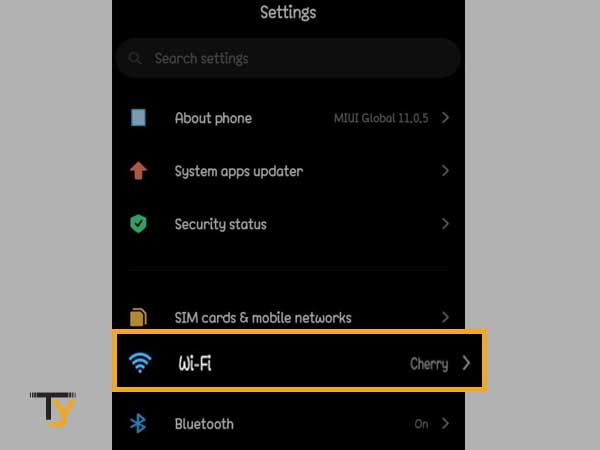
- Then, tap on the arrow in the Wi-Fi name tab.
- On the next page, scroll till the end and tap on IP settings.
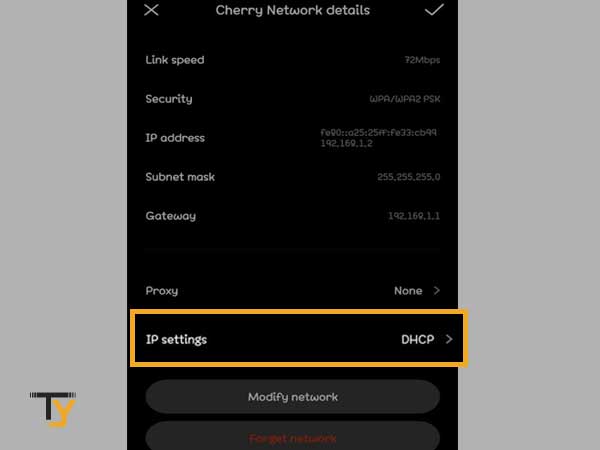
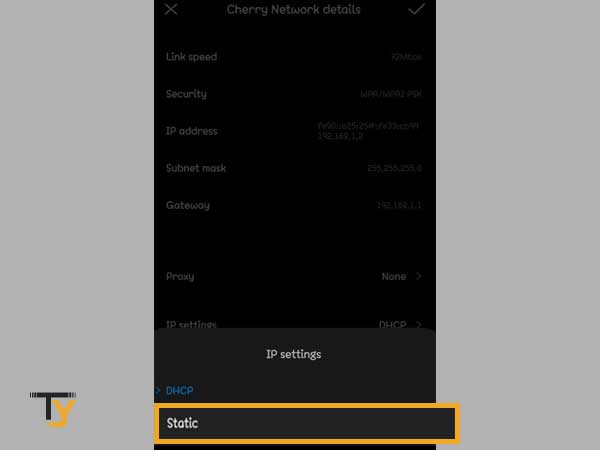
- Select Static from the visible options.
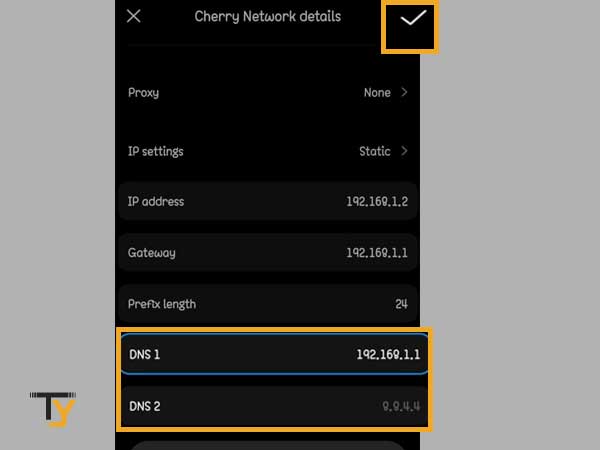
- Then, fill in the following details and tap on the check mark in the top right corner to save the changes:
- DNS 1: 8.8.8.8
- DNS 2: .8.4.4
- Restart your phone and try to visit the website which was earlier showing the error, and see if the problem persists.
Notes
The steps and names of settings may vary with different devices.
Solution-2: Clear Chrome App Cache
Clearing app cache for Chrome app is different from clearing the cache by going inside the Chrome browser. The following points will clear your confusion:
- Chrome App Cache: The information of the Chrome app stored in your phone.
- Browsing Cache inside Chrome: Information of websites stored in the Chrome browser.
In this method, the Chrome app cache is to be cleared (to clear browsing cache inside Chrome, refer to ‘Solutions common to all devices’ section of the article). Following are the steps for doing so:
- Go to your phone Settings and select the Apps option.
- Then, tap on the ‘Manage apps’ option.
- Thereafter, you will see the list of all the apps installed on your phone. Scroll through it, find Chrome, and tap on it.
- Now, select the ‘Clear data’ option.
- Tap Clear Cache and select OK to confirm the action.
Notes
The steps and names of settings may vary with different devices.
Solution-3: Uncheck Preloading Web Pages Option in Chrome
If the preloading web pages option is checked in your chrome, then it is recommended to turn it off, for the time being, visit different websites and see if they are still showing ‘This webpage is not available’.
This solution might help you, as to preload the webpages, browser cache is used. If you haven’t cleared your browser cache, then corrupted cache files might be causing the problem you are facing. Unchecking this option will disable the browser from using cache to load the web pages, and you may be able to access the websites that were earlier giving you the ‘This webpage is not available’ error.
Listed down are the steps for doing so:
- Open Chrome in your phone and tap on three dots, present in the upper right corner.
- Select Settings from the menu that will open up.
- Tap on the Privacy section.
- Now, uncheck the ‘Preload pages for faster browsing and searching’ option.
- Close Chrome, remove it from the background and open it again. Now, visit any website to see if the problem is gone.
Solution for Mac Users
Other than the solutions mentioned in the ‘Solutions Common to all devices’ section, there is only one way left to get rid of this issue for Mac users, and that is to set their DNS server settings to custom. Here are the steps for doing so:
- Go to the System Preferences of your system.
- From there, select the Network option.
- Now, select between Wi-Fi or Ethernet. Make sure to check only the network type that you are currently using.
- Then, go to Advanced and click on the DNS tab to open it up.
Within the DNS tap, click + icon and enter the popular Google DNS: 8.8.8.8, 8.8.4.4 and Open DNS: 208.67.222.222, 208.67.220.220.