The 0x80070017 problem in Windows 10 is one of the most prevalent update difficulties that many folks have faced.
It frequently happens when you try to install the newest updates on your computer or when you want to upgrade your operating system version.
Users have experienced that the installation enters validation mode, stops at some certain percentage, fails to process further, and shows the error.
There are various causes for these troubles, but the most common is that your antivirus or other pre-installed software is interfering with the update process.
In certain cases, even specific drivers or devices might cause issues. Furthermore, file corruption can occur, and if it is so, you may come across several difficulties in installing updates.
These errors aren’t serious, but they will delay you from applying updates, which may result in security concerns, as often security settings are updated with every version release.
Additionally, Windows updates are intended to provide new features to users, thus, if you’re experiencing update issues, you won’t be able to utilize them.
However, you need not worry, because this elaborative guide has got you all covered. So jump right into this sea of information and get your issue fixed.
First-hand Troubleshooting- Run PC In Safe Mode
Safe mode boots Windows in its most minimal configuration, with a restricted selection of files and drivers. If a problem does not occur in safe mode, it implies that the problem is not caused by default settings or basic device drivers. Running Windows in safe mode allows you to narrow down the cause of the issue and can assist you in troubleshooting it on your computer.
Stated here are the steps to enable Safe Mode:
- Press Windows + I button from the keyboard. It will open the Settings screen.
- Click on the Update & Security option, and then select Recovery.
- Thereafter, under Advanced startup, choose the Restart now option.
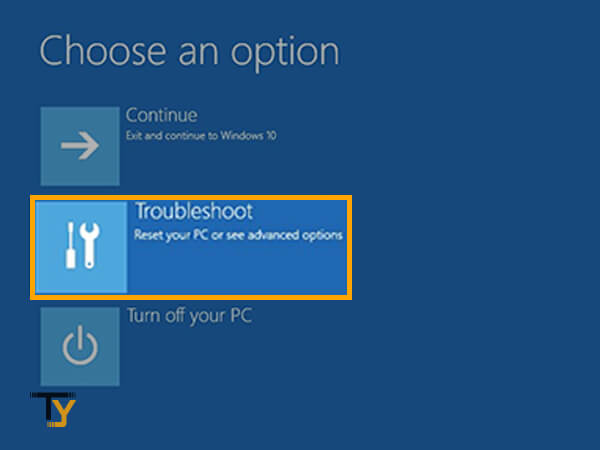
- Then, your PC will restart and take you to the ‘Choose an option’ screen. There, you have to select Troubleshoot.
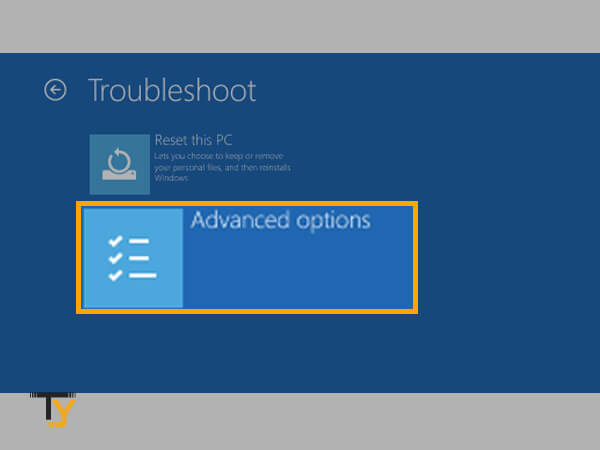
- On the ‘Troubleshoot’ screen, you have to click on Advanced Options.
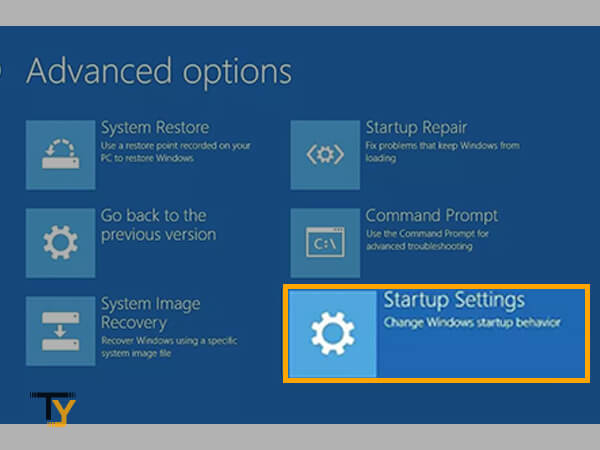
- Then, choose Startup Settings.
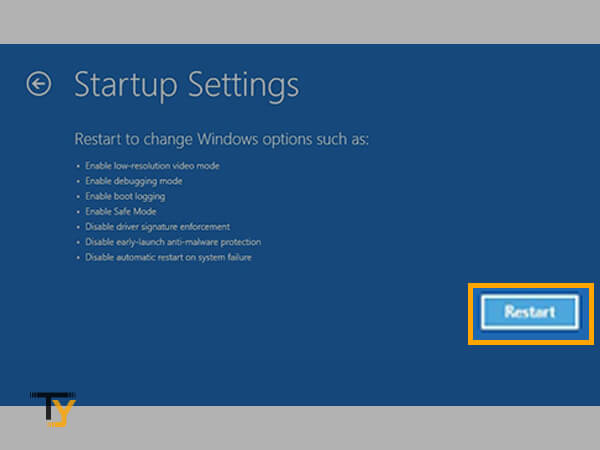
- In the Startup Settings screen, click on the Restart button.
- Once again the system will restart, and you will be shown a list of options, select 4 from there or press F4 from the keyboard to enter in Safe Mode. You can also choose to select 5 or F5, which will open the system in Safe Mode with Networking, which will also check network drivers along with the preinstalled ones.
Now, after entering your system in Safe Mode, try to download and install updates and see if the problem is still there.
If you are able to install the updates and didn’t come across a 0x80070017 error, then the issue was not with your inbuilt system software, drivers, devices, and files.
However, if it is still there, then move on to the next section where several methods to solve this issue await you.
Notes
To exit the Safe Mode, you just have to restart your system. If, somehow, the system doesn’t get out of it, then press Windows key + R > Type MSConfig and click OK > Choose Boot tab > Uncheck Safe boot checkbox inside Boot options and restart your system.
Methods To Fix Windows Error 0x80070017
Method-1: Primary Troubleshooting
The Windows installation error 0x80070017 seems not to be mere, and believe me it’s not. One can face a very hard time fixing this issue, while for other people it can be due to some naive reason that can be solved via basic troubleshooting.
Under this method, stated are some general troubleshooting steps, which you can also consider as some preclusive measures, before moving onto humongous and complicated methods that follow.
So, here we go:
- The first and most important thing that you need to do is, restart your PC and then try to install updates.
- Furthermore, make sure that your computer has enough storage available to install the update. If it is the otherwise case, then you need to free up some space before downloading and installing updates.
- While doing so, make sure that you get rid of all other unnecessary hardware connected to your system.
- Additionally, once you have downloaded all the updates, disconnect from the internet and then carry on with the installation process.
If these steps weren’t able to extend a bit of help, then you should move on to the next method.
Method-2: Turn Off Antivirus
Turning off Antivirus seems a bit odd, but it has aided many in overcoming the Windows update error 0x80070017.
See, the logic behind is, seldom with new updates, security settings are also updated. Thus, when new security features clash with antivirus programs or prevent it from accessing some parameters of the system, the error comes into existence. Thereby, switch off your externally installed (third-party) antivirus program, and not the Windows’ built-in one, temporarily and then try to update the system.
For Windows 10 New Version
The steps listed below will guide you through the process:
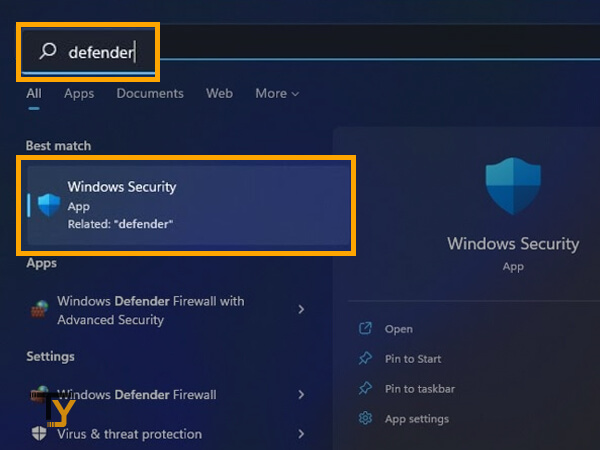
- From your keyboard, press Windows + S key at the same time.
- In the search text box, type ‘defender’ and select Windows Security from the list of options.
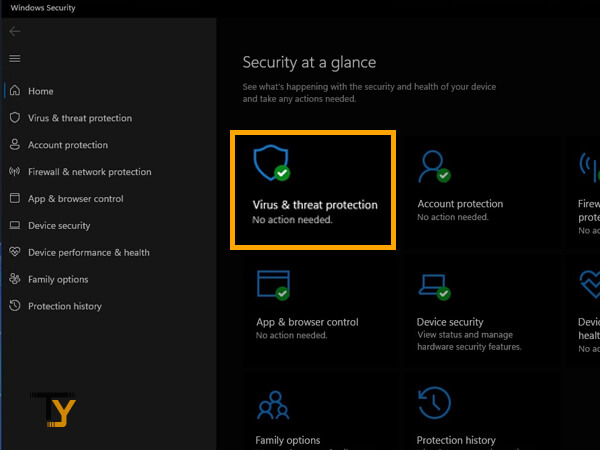
- From the current window, select Virus and Threat Protection from the options available.
- There, you will see the name of the antivirus installed in your system, below which ‘Open App’ option will be present, click on it.
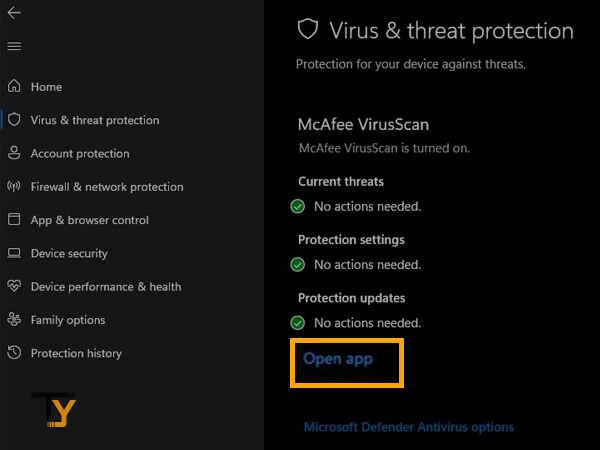
- Then, from the antivirus program dashboard, turn off the security check permission/s.
For Older Versions of Windows 10
If you have an older version of Windows 10, then the steps that you are required to follow will be slightly different from those stated above. However, first three steps will same as before, listed here is the process to follow after 3rd step:
- After reaching the Virus and Threat protection window, you have to click on the Manage Settings option.
- Then, navigate to Real-time protection and turn off that option. It will disable your existing antivirus software.
- Now, restart your PC and see if the problem is still there.
Important: If disabling antivirus was not able to help you, then do not worry, move on to the next step, but before that don’t forget to turn the antivirus program back on.
Method-3: Run Windows’ Inbuilt Troubleshooter For Errors While Updating
If you have got Windows installation error 0x80070017 while installing the updates, then the most effortless way to help your way out is running the Windows update troubleshooter, stated below are the steps:
- Press Windows + I key from the keyboard at the same time to open the system’s settings.
- From the Settings window, select the Update and Security option.
- On the Update and Security page, select Troubleshoot from the left menu and then click on the Additional Troubleshooter option.
- Next, select Windows Update and then click on the Run the troubleshooter option.
- Once the troubleshooting will be completed, click on the Fix button in the troubleshooting window.
- Follow the onscreen instructions and complete the process. Once done, restart the PC and then try to install the updates.
Method-4: Update third-party drivers
If you’ve added hardware to your device, visit the hardware manufacturer’s website for third-party driver updates and installation instructions. Update drivers, then re-run system updates to see if this resolves your issue. If it did not, proceed to the next tip.
The steps that you need to follow to update drivers are as follows:
- Go to the website of your hardware manufacturer.
- Navigate to the drivers’ list and find yours.
- Then, inside the Drivers section, scroll till the end and download the last driver.
- Once the driver file is downloaded, double-click on it and install it in your system.
- Repeat the same process for all the major components of your system.
If the process seems hectic to you, then there are software present on the internet that can automate this process and you need not do it manually. However, beware of fraud and install reliable software by thoroughly going through its reviews.
Method-5: Reset Software Distribution Folder
It is a complex process to perform as it requires you to type commands in Windows Terminal that should be typed as stated without any typo, otherwise, the process will fail, and you will not be able to resolve the Windows error code 0x80070017 issue. Thereby, you are requested to follow along with the steps as stated.
One more thing, once you are finished typing the command, subsequently press the Enter key from the keyboard to execute the typed command. Now, here’s what you need to do:
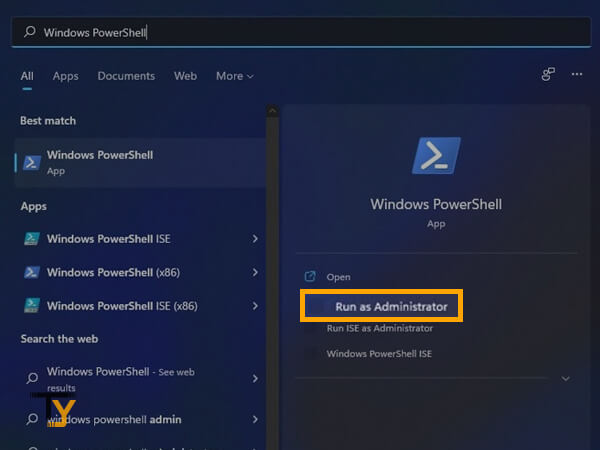
- Click on the Start button on your desktop and type Windows PowerShell in the search box.
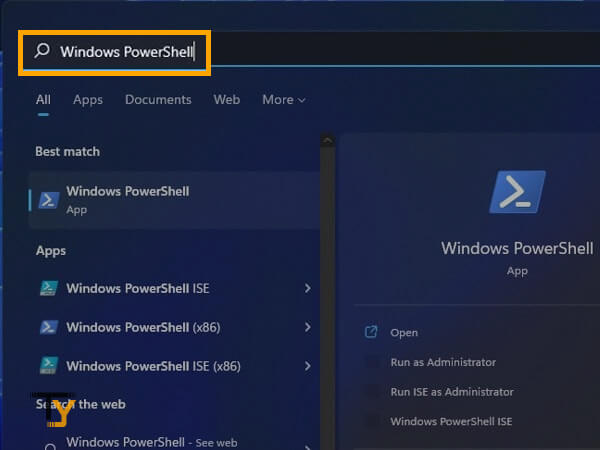
- Then, choose Run as administrator from the options available to open it.
- In the PowerShell window, type the following commands one by one and alternatively press the enter key:
- net stop wuauserv
- net stop cryptSvc
- net stop bits
- net stop msiserver
- Ren C:WindowsSoftwareDistribution SoftwareDistribution.old
- Ren C:WindowsSystem32catroot2 Catroot2.old
- net start wuauserv
- net start cryptSvc
- net start bits
- net start msiserver
Notes
All the commands are case-sensitive, therefore, type them as stated without changing the case of letters or adding any special characters.
Method-6: Manually Install Updates Using Windows Update Catalog
If the error 0x80070017 doesn’t seem to be clearing your way while updating the Windows no matter what you do, then you have to try installing updates, once again 😅.
Yes, again you have to put yourself in the torture, but this time the process is manual. So, please don’t rush away 🥺, stay stick!
Usually, whenever there is an update, it shows up on the PC, that an update is pending. However, while installing that update you are bumped with the error every time, then what to do?
Now, you have to manually download it from Microsoft’s Update Catalog website and then install it on your computer. The following steps just suggest how to do so:
- First, you need to get your Windows update KB number, and for that, there is a separate set of steps which is mentioned below:
- Press Windows + I from the Keyboard. It will open system Settings.
- Select Update and Security from there.
- In the Windows Update screen, you will see an update number starting with KB. Copy it from there.
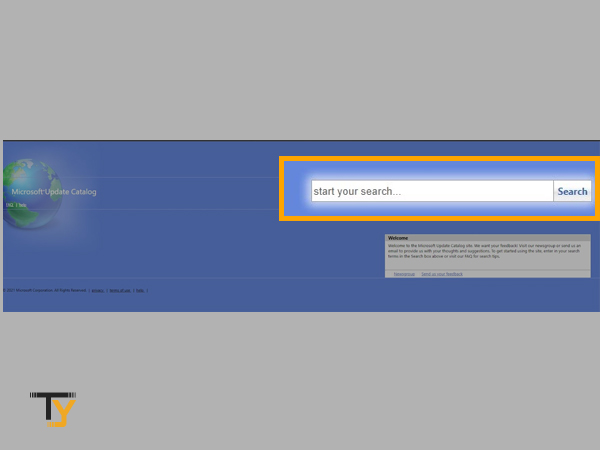
- Once you get the number, move to Microsoft’s Update Catalog website and paste it in the visible text box. Hit the Search button.
- Then, the website will show the available updates for both 64 and 32-bit systems. You can download the suitable update according to your system’s architecture by clicking on the Download button, next to it.
- Once the file is downloaded, open it by double-clicking and allowing permission to install the new version.
Method-7: Re-burn ISO Files to a New Disk
Many times, users have come across the error code 0x80070017 while trying to install windows in their system. The error is usually interpreted to arise from the damage to the computer or its files, however, it may occur due to the issues with the external disks that were used to install Windows.
Thus, if you are having a problem installing Windows 10 via a disk, then you have no other choice but to burn the ISO to a new disk, followed by a clean reinstallation.
However, even after burning the ISO files to a new disk, 0x80070017 error still shows its face, so it might be the case that your ISO files are also corrupted.
In such a scenario, you have to re-download these files and burn them to a new disk. If this also doesn’t work, then hands down to the next method.
Method-8: Run chkdsk scan
Chkdsk checks disk space and use and generates a status report for each file system. The status report displays faults discovered in the file system. However, you need not worry if any damage is detected as chkdsk will also correct them by itself.
Listed here are the steps to perform:
- Click on the Start button on the desktop and type Windows PowerShell in the search box.
- From the options that will show up, choose Run as administrator to open PowerShell.
- Inside the PowerShell window, type the following command: chkdsk /f x:
Notes
Replace x in the above command with the main drive of your computer. In most cases, it is usually C.
- After that, press the Enter key from the keyboard to execute the command.
- Thereafter, you will be prompted with a message asking to schedule a chkdsk scan after the restart of your PC. Now, to accept this, press Y from the keyboard.
- Restart your PC. Wait till the scan is finished and see if the issue is gone by installing updates again.
Method-9: Perform a clean boot
Running your PC in a clean boot will provide you with a fresh canvas to start the installation of new updates, as it will disable all the ongoing programs that may be interfering with the installation process, and thus you get the error every time.
In order to do so, listed below is the process:
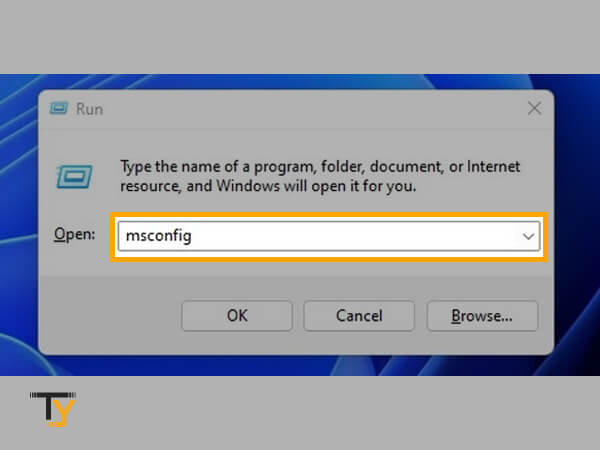
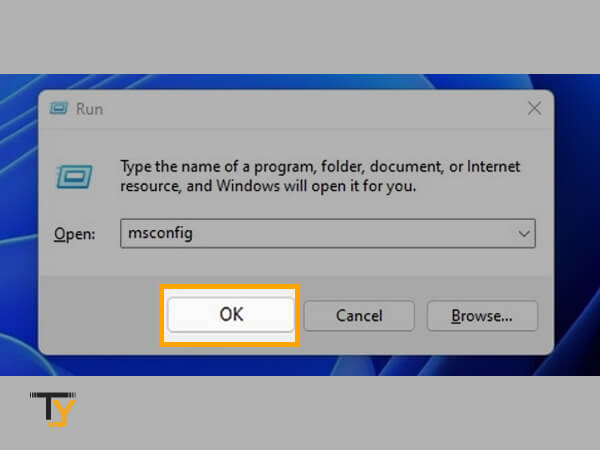
- From the keyboard, press Windows logo key + R at the same time and enter msconfig in the text box.
- Click on the OK button.
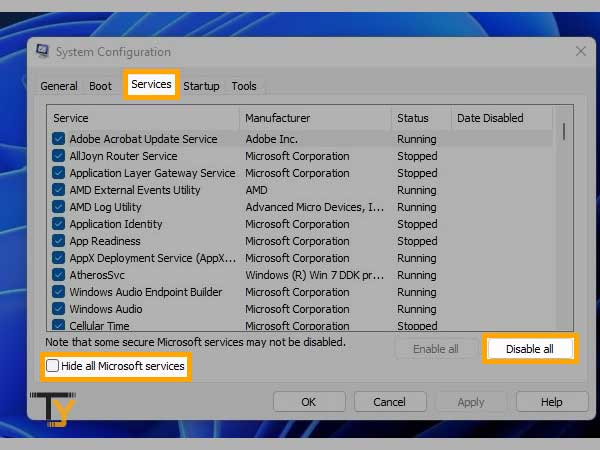
- The System Configuration window will open up. Go to the Services tab of it.
- Inside Services, check the Hide all Microsoft services option and then, click on the Disable all button.
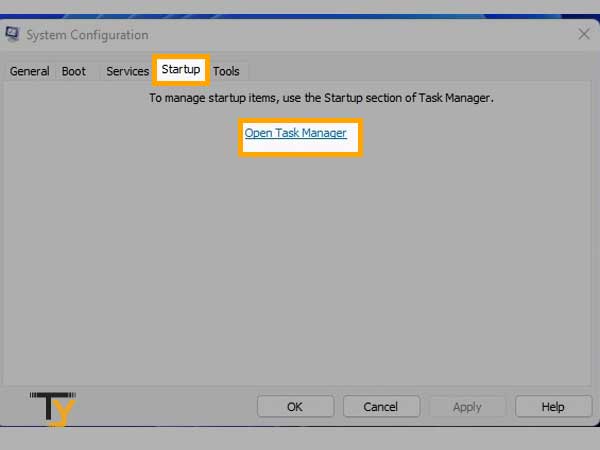
- Now, head over to the Startup tab and click on the Open Task Manager link.
- Inside Task Manager, under the Startup tab, you will see all the apps that automatically get loaded with the booting of the system. You have to disable them all.
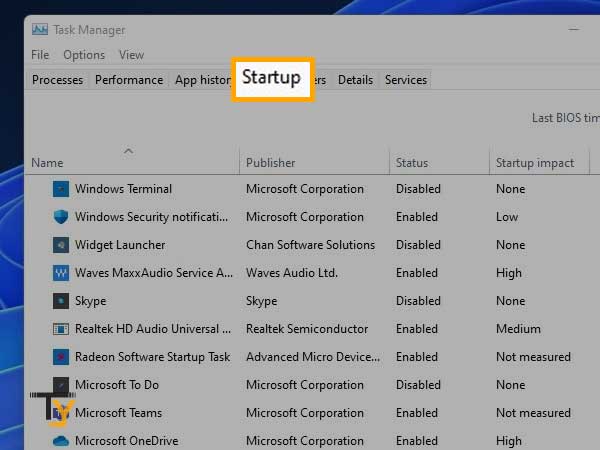
- For doing so, select each Enabled app, right-click on it and select the Disable option from the context menu that appears.
- Once you are done with the above step, move back to the System Configuration window and click Apply and then OK.
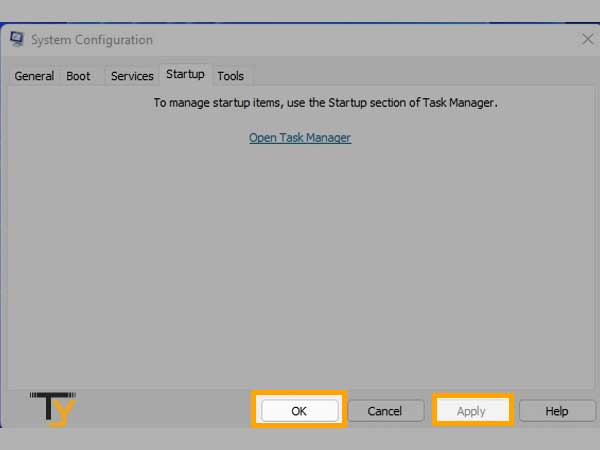
- At last, restart your computer.
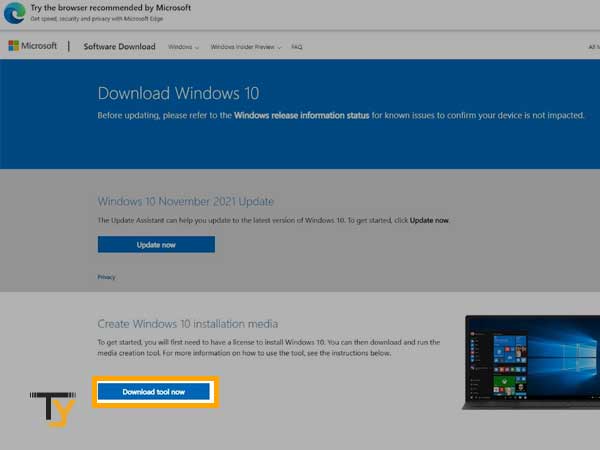
Method-10: Build Windows installation Media
This process will enable you to manually download the full version of the latest Windows 10 release, without the deletion of your existing data.
- Open the browser and visit the Windows 10 Official download page.
- After reaching the website, you have to click on the Download tool now button. You will find this button within the Create Windows 10 installation media section.
- After the download of the tool is complete, double-click on it to open it up.
- A screen will appear, which will take a bit of your time to load the necessary files. Click the Next button, once its initial processing is finished.
- Then, on the next screen, select the Upgrade this PC now option and hit the Next button.
- Wait for a few seconds till the set-up is complete, then select the Download and install the update (recommended) option and click Next.
- Thereafter, follow a few instructions that will appear, till you make it to the Ready to install screen.
- Choose Change what to keep option.
- Select Keep personal files and apps, and click on the Next button.
- Once again, some instructions will appear, follow them as directed till the process is concluded.
If it’s completed without any error, then you will be running the new Windows 10 version.
Method-11: Install Updates Using a Bootable USB Flash Stick
If you are repeatedly getting the 0x80070017 while trying to install windows using a DVD, then chances are high that the problem lies with it only. Thus, to avoid error, you can use a USB Flash stick instead, and store all the system update files in it and carry on with the installation process using those files only.
If you have the genuine version of Windows 8.1 or 10, then you can use Windows Media Creation Tool to create a bootable USB, and the need for DVD will be abolished.
To follow along with this method, you are required to have a steady internet connection, enough storage on your system, and a USB drive of a minimum 8 GB size.
If prerequisites are satisfied on your part, then listed below are the steps to take:
- To begin with, visit the Microsoft Windows Download page, and click on the Download Tool Now button.
- Run the tool after the download is complete and Accept the terms to get started with the process.
- From the next screen, select the Create installation media for another PC option and click on the Next button.
- Now, select the Language Edition of your Windows and Architecture (32 bit or 64 bit). You can automate the selection, by checking the Use the recommended option for this PC. It will automatically fetch the details of your system. Click Next.
- From the next screen, select the USB Flash Drive as your media to download the installation files, and click on the Next button.
- Thereafter, insert your USB drive into your system. On the screen, you may see the drive name at once, or you may have to hit the Refresh drive list option several times to get your drive name on the screen. Once it appears, select it and click the Next button.
Notes
Once the downloading of the files starts on the USB drive, all of its content will be deleted. Therefore, it is advised to remove all the important data from it beforehand, if it contains any.
- The downloading will begin and your USB will become bootable.
- Follow some on-screen instructions till the end of the process. Now, you can use the USB to re-install the latest version of Windows, and hopefully, if it works, you will not again have to see the 0x80070017 error.
Method-12: Run System File Check
Damaged system files can also be the reason for the 0x80070017 error while installing the updates on your system. In order to check if the concern lies in the system files, you can use the System File Checker program to make sure that the system files are fine. Moreover, it will also correct the damage, if detected.
Here are the steps for doing so:
- In the search bar on the desktop, type the command prompt and run it as administrator.
- Within the command prompt, type sfc/scannow and hit Enter from the keyboard.
- Wait till the scan is complete. At the end of the process, it will show the files with damages and will repair them by itself.
- At last, restart the computer and now try to install updates.
Method-13: Check Device Manager For Errors
If any of your PC’s devices is going on with some issue, then it can also be the reason for your failure to install the latest updates for Windows 10 and the exposure to the 0x80070017 error.
In order to resolve the issue with devices, the following are the steps that you are required to follow:
- Click on the search icon on the taskbar and type Device Manager in it.
- From the appearing option, select Device Manager.
- Its window will open, where all the devices in your system will be listed. Look for any device with a yellow exclamation mark. It means that the device is having some problems.
- Select the device name.
- Click on the Action button, present at the top of the screen.
- Then, choose either Update driver or Uninstall to get rid of this issue.
Important: If you go by my opinion, you should decide on the Update driver, because by selecting Uninstall, you will no longer be able to use that device.
Last Resort
If any of the above-mentioned approaches don’t help you, then the last thing you can try is to contact Microsoft support itself or get help from their automated help system.
Getting Microsoft Help
- In the search bar of your PC, type get help.
- Select the Get Help option from the list of results.
- Next, its window will open. There, type in the issue you are facing in the text box.
- This will show you the auto-generated solutions for the problem.
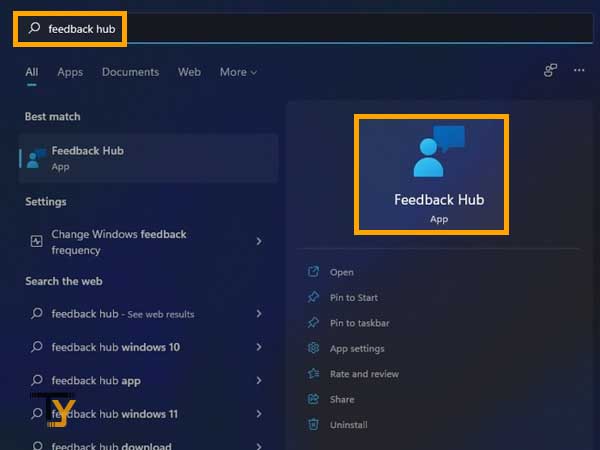
Go To Microsoft Feedback Hub
Inside Microsoft Feedback Hub, you can not only give the feedback but can also get in touch with a customer support executive and get your difficulties solved. Here’s how to access it:
- In the search bar of your system, type feedback hub.
- Select Feedback Hub from the search results.
- Inside its window, look for the ‘Get support and ask questions’ option. Click on it.
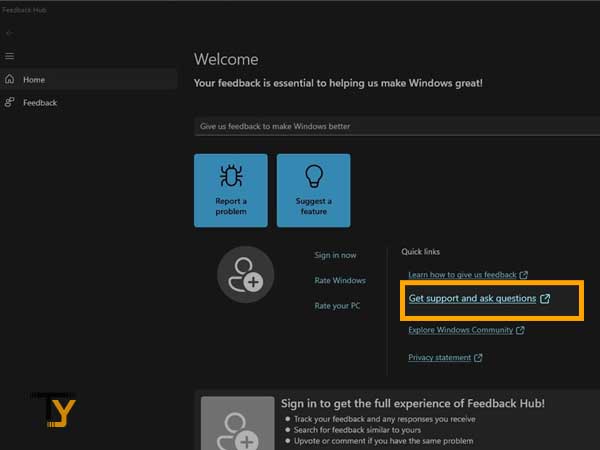
- Now, you will be directed to Microsoft support, where you can brief your issue and get it solved.