Have you come across ‘Access Denied: You don’t have permission to access ‘website’ on this server?’
Of course, you have, otherwise, you won’t be searching for a troubleshooting article out of curiosity.
Jokes apart, ‘Access Denied: You don’t have permission to access on this server’ is a serious error that has disrupted the sleep of many. This error is confused with the ‘This webpage is not available’ error, but both are different! Both errors are completely different. In the case of the “Access Denied” error, it usually happens that you are able to access a particular website on a device but are denied to use it when opening via a different gadget. While the ‘Webpage not available’ error remains the same for all devices.
Generally, when your browser utilizes a different proxy configuration or VPN than what is set on your device, the “Access Denied” warning displays. When a website senses that anything is problematic with your browser cookies or network, it prevents you from using it, which is why you can’t access it.
Nevertheless, now that you have reached this blog, you do not need to worry about this problem anymore. The article provides you with the solutions to resolve all the browser cookies, VPN, and proxy server-related issues which in turn can solve the ‘You don’t have permission to access this server’ issue on your Windows, Mac, and iPhone.
Method-1: Turn Off Proxy Server on Your System
If you are using a proxy server to browse through the internet, then you can come across many instances where you will not have permission to access a server of the website. This ultimately means that the site, you requested, cannot be viewed by you.
It happens because the proxy server acts as a firewall between you and the internet and filters out all the bad requests. The websites that proxy deems harmful, cannot be viewed if you have it in working.
Therefore, you can try accessing those websites by temporarily turning off the proxy on your system. Following are the steps to take:
On Windows:
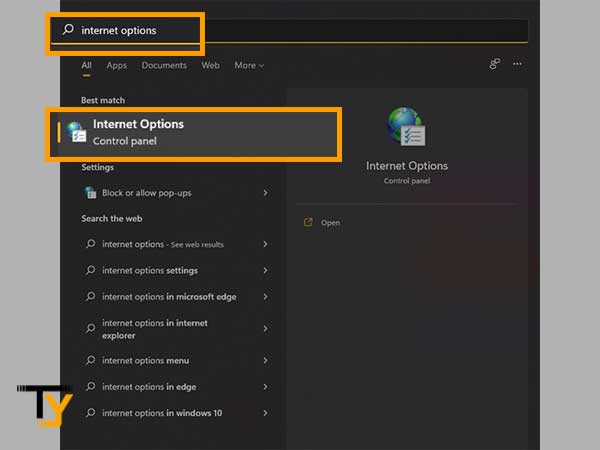
- To begin with, on your system, press the Windows logo key + S at the same time. This will open up your system’s search bar.
- In the search box, type Internet Options, and select the same from the search list.
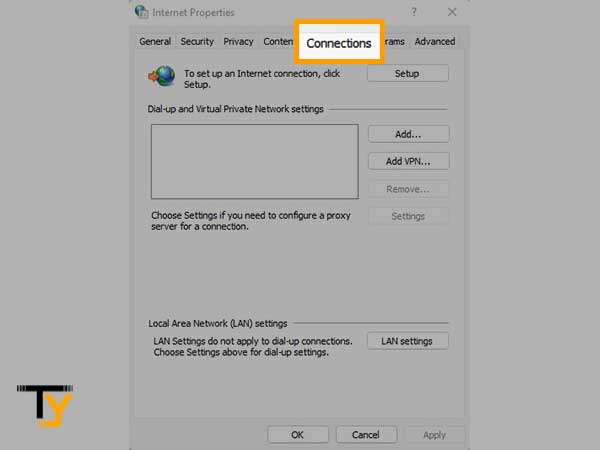
- The Internet Properties window will open, in which you have to switch to the Connections tab.
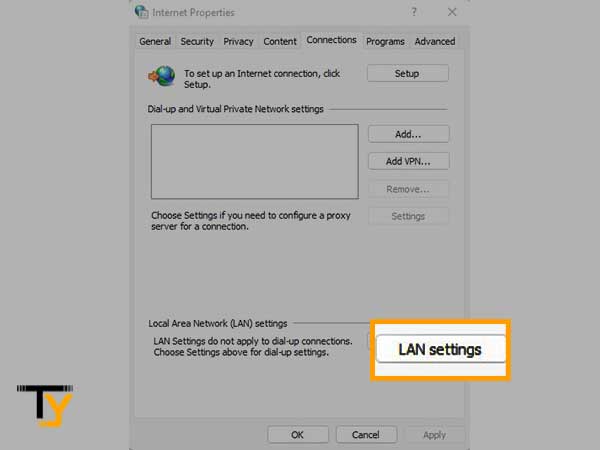
- Then, click on the LAN Settings button.
- A LAN Settings window will pop up, where you have to deselect the Use a Proxy Server for Your LAN option under the Proxy Server section. However, if the Proxy Server setting is already unchecked, it means the proxy server is not in use, and your problem is not related to it.
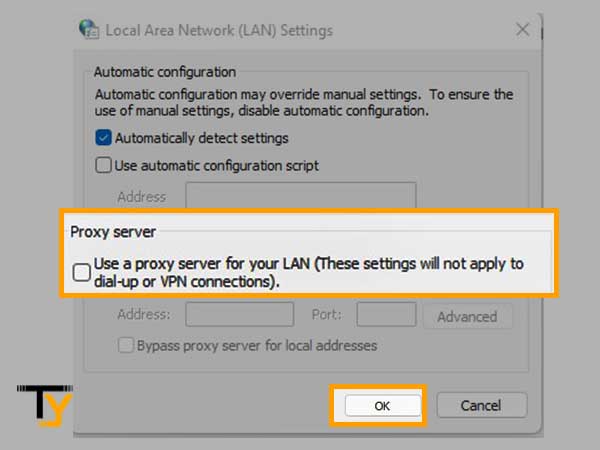
- After unchecking the option, click on the OK button, and now visit the website and see if you still don’t have access to the website on its server or if it’s opening fine.
The method stated above should turn off the proxy server on your Windows. However, if it doesn’t work, you can try this alternative method to disable your network proxy settings:
- Right-click on the network icon in the right corner of the taskbar.
- Click on the Network and Internet Settings option that appears.
- From the page that appears, select the Proxy tab.
- Turn off the Automatically Detect Settings option by clicking on the toggle button, and also turn off Use a Proxy Server option.
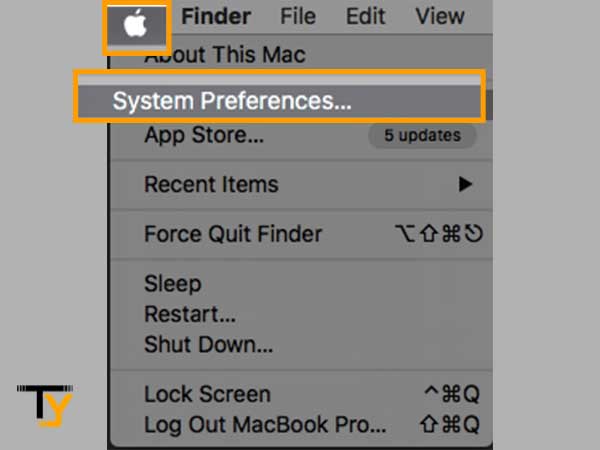
On Mac:
- Click on the Apple Menu (Apple icon) from the top of your system’s screen.
- Select the System Preferences option from the expanded menu.
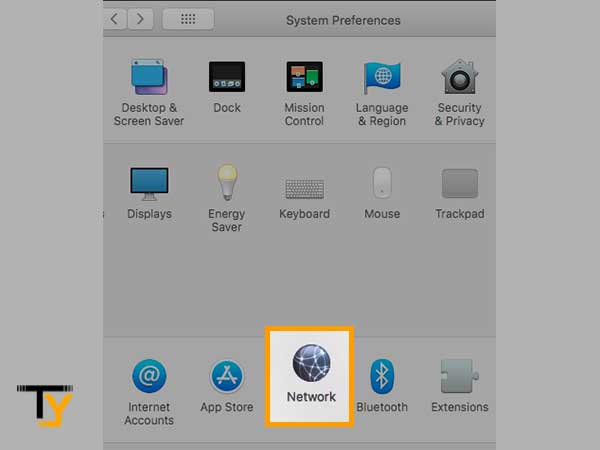
- Next, from the System Preferences window, click on the Network option given at the bottom.
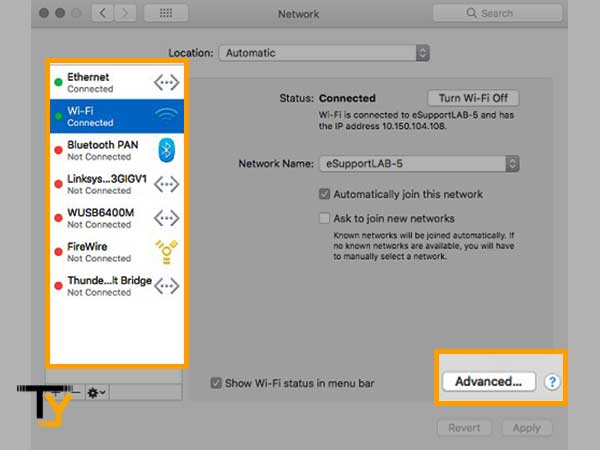
- Now, you will be directed to the Network page, where you have to select the Network Service you are using, like Wi-Fi, Ethernet, etc. from the left pane, and click on the Advanced button present at the bottom of the screen.
- Thereafter, switch to the Proxies tab, and deselect all the options under the Select a Protocol to Configure. Alternatively, if you want to keep the Proxy settings intact, then you can opt for either of the following options:
- Exclude Simple Hostnames: For network destinations with simple hostnames (for example, https://server), bypass proxies.
- Bypass Proxy Settings for these Hosts and Domains: Enter the hosts and domains you want to exclude with proxy settings intact. Use commas to separate several elements.
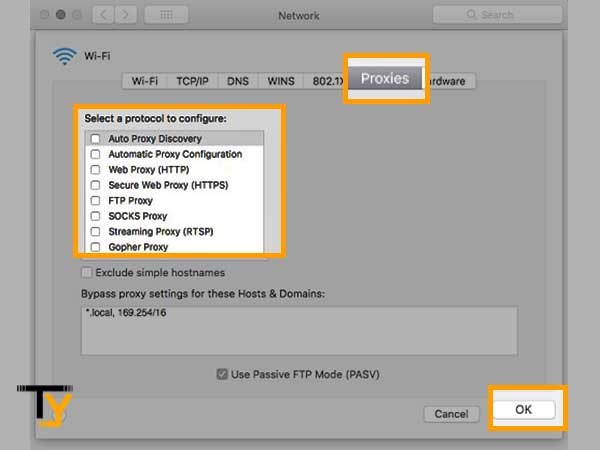
- At last, click on the OK button to save the changes, and go to the website that was earlier showing you ‘You don’t have permission to access this server’ error on your Mac, and see if you can access it now.
Method-2: Clear Cookies of Particular Website Only
You can try clearing the cookies of the website for which you are not given permission on the server to access it. Clearing the cookies can eliminate the website damaged file stored in your browser, and thus may help you to overcome the issue.
Listed further are the steps that you can take to delete cookies from different browsers:
For Chrome:
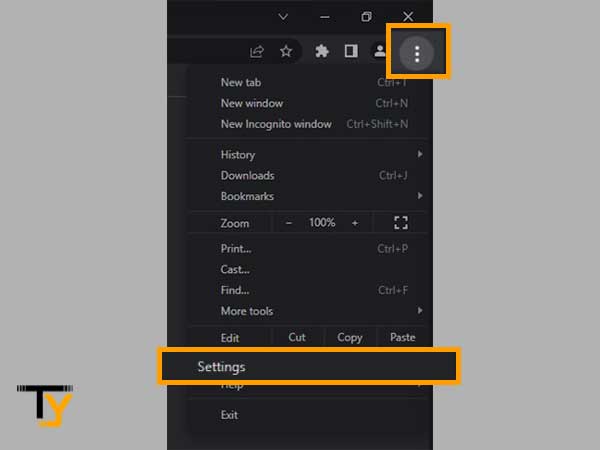
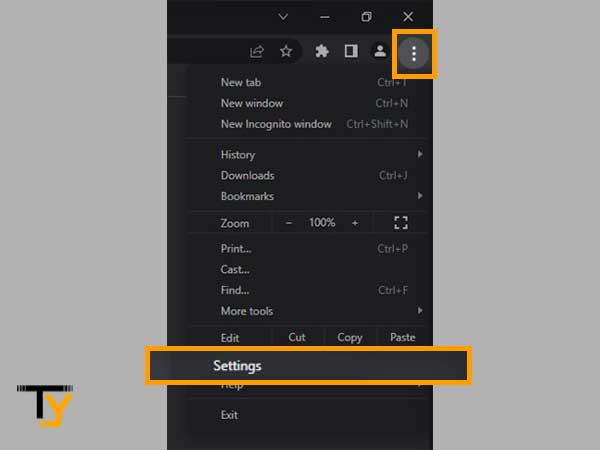
- Open Chrome on your computer, click on the three dots in the upper right corner to open the menu, and select Settings.
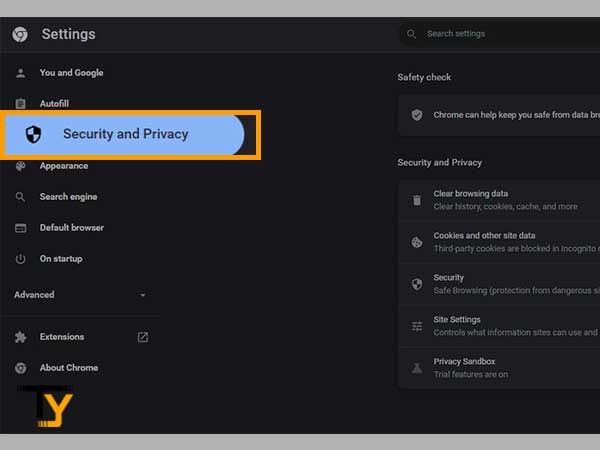
- Click on the Privacy and Security option from the left sidebar of the Settings page.
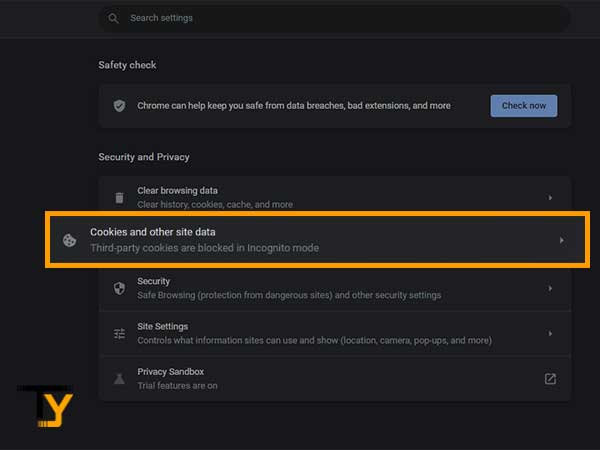
- Select the Cookies and Other Site Data section.
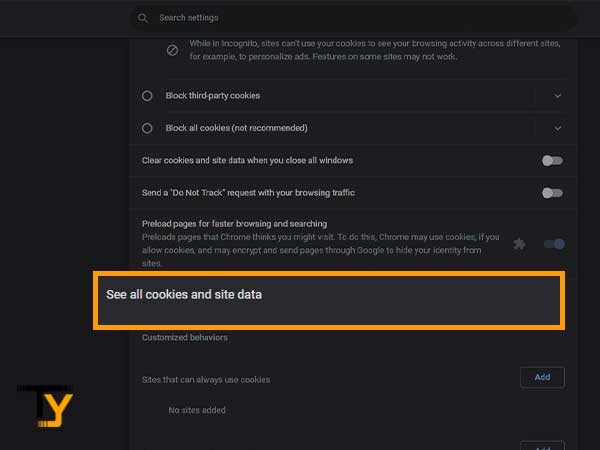
- From the next page, click on the See All Site Data and Permission button.
- Now, all the cookies stored in your browser will appear. Type the name of the website in the search bar in the upper right corner of the page and search.
- All the cookies of that website will appear. Click on the Delete button next to each of them.
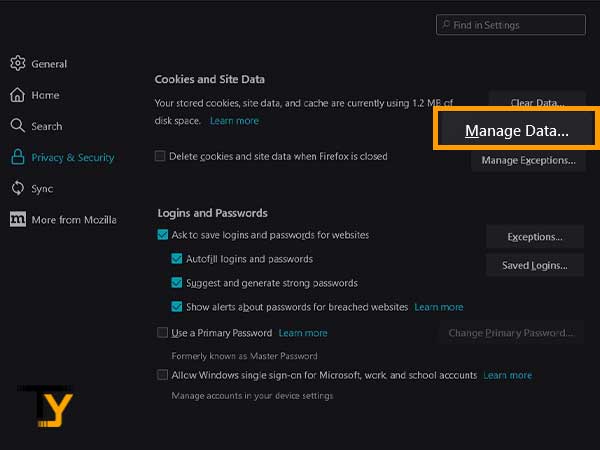
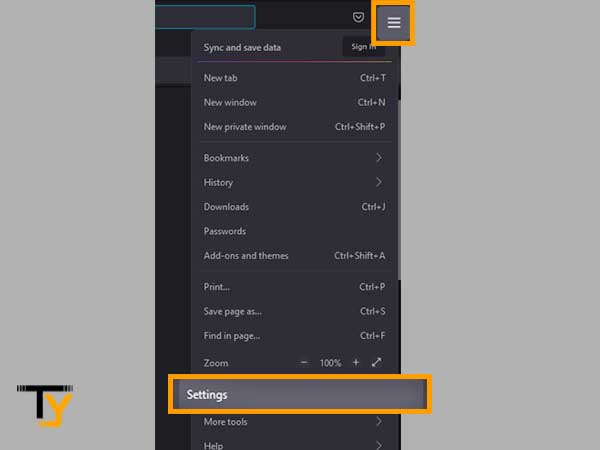
For Mozilla Firefox:
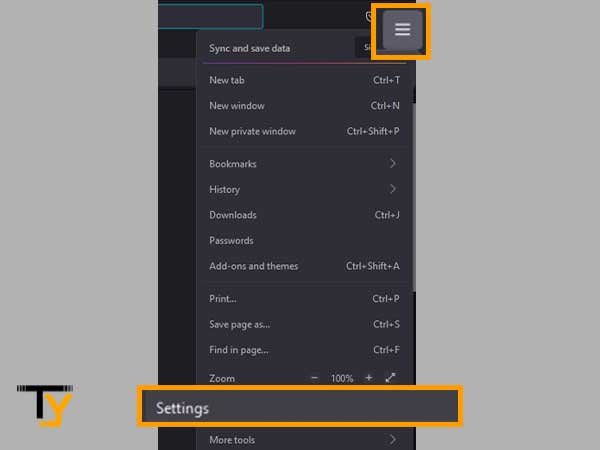
- Click on the menu button in the upper right corner of the Firefox browser.
- Select Settings from the options visible.
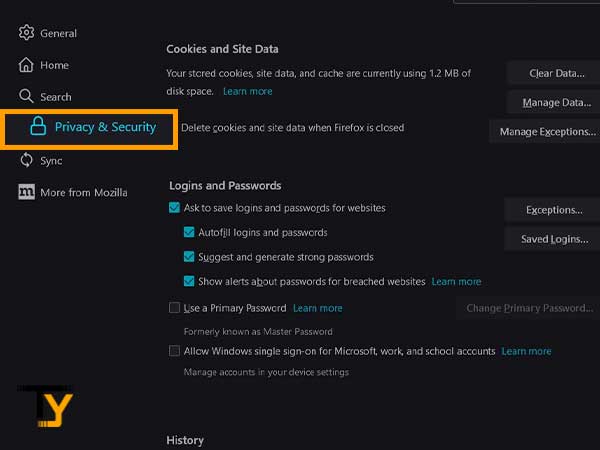
- On the left side pane of the Settings page, click on the Privacy and Security option, and then go to the Cookies and Site Data section.
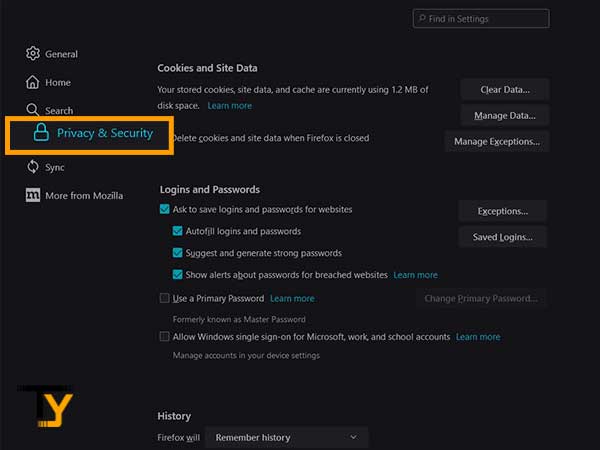
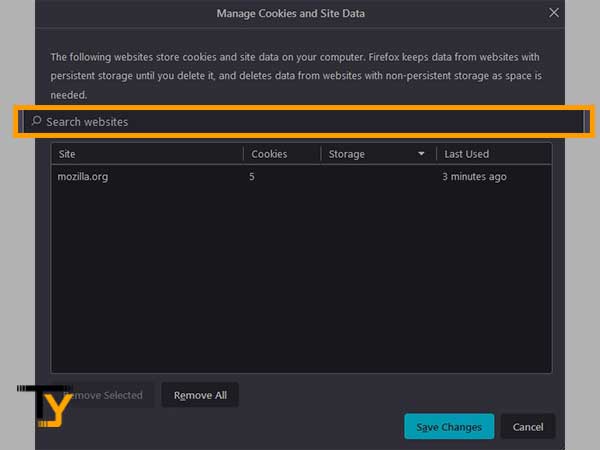
- Now, click on the Manage Data button from the next page.
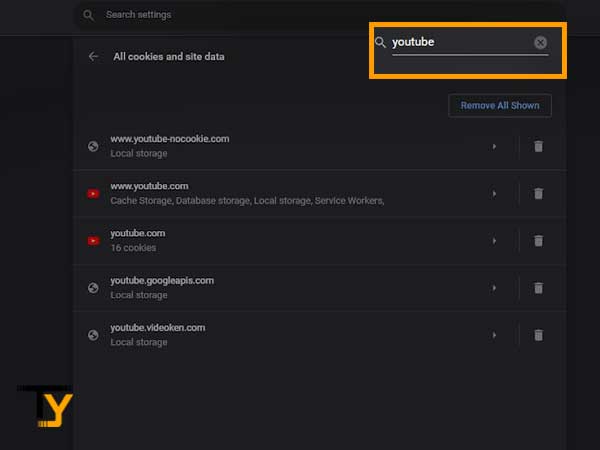
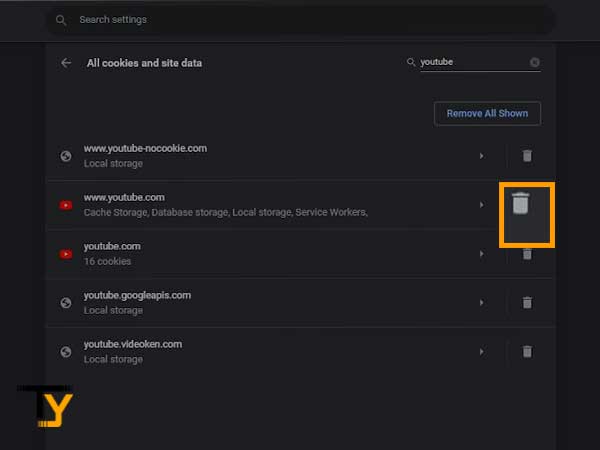
- The Manage Cookies and Site Data window will appear. There, write the name of the website in the search bar for which you are shown the ‘You are not allowed to access on this server’ error and its cookies will be displayed.
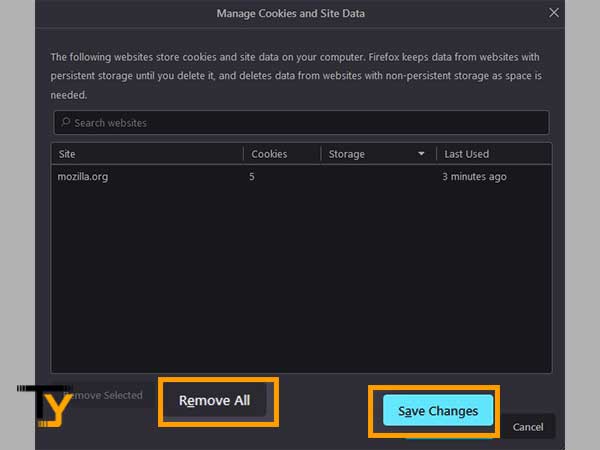
- Click on the Remove All Shown button and then click on Save Changes.
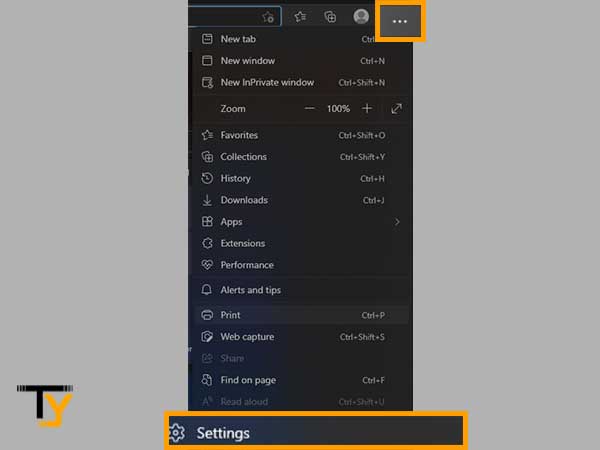
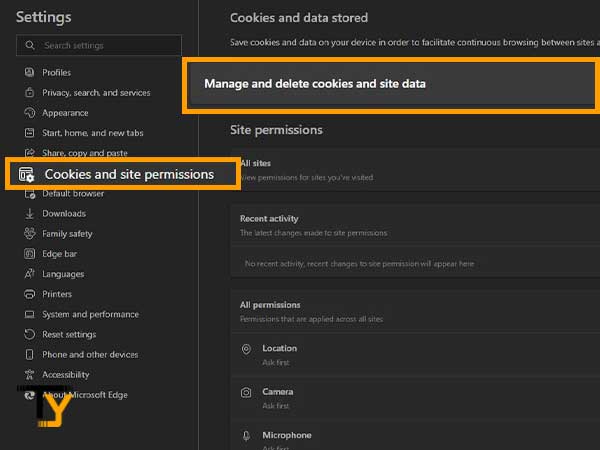
For Microsoft Edge:
- Open Edge on your system, click on the menu icon in the top right corner and select Settings.
- From the Settings page, click on the Cookies and Site Permissions option, and then select Manage and Delete Cookies and Site Data.
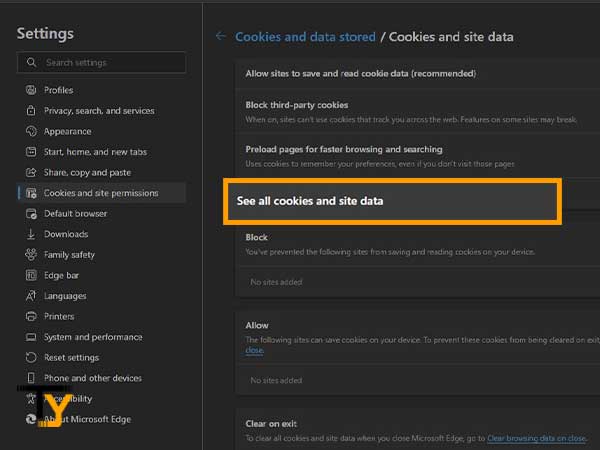
- Select the See All Cookies and Site Data option.
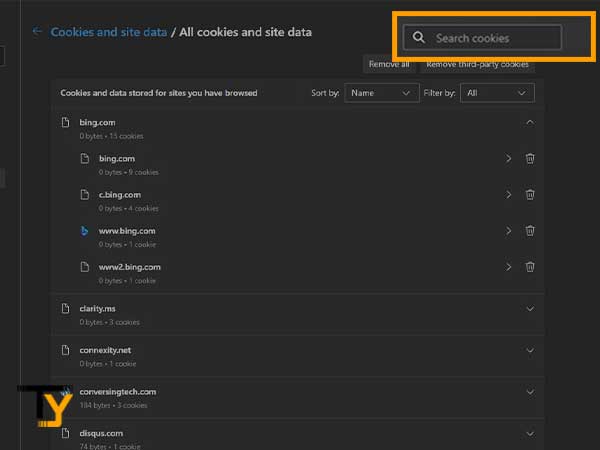
- Type in the name of the website for which you want to remove the cookies in the search bar, and search.
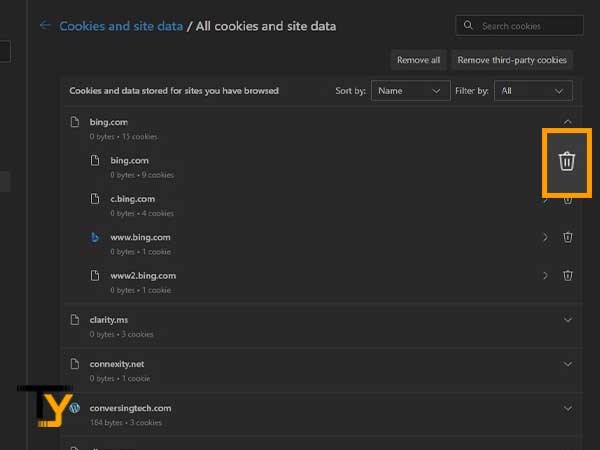
- Delete the cookies that appear by clicking on the Delete icon.
For Safari:
- Open Safari browser on your Mac, and select Safari.
- From the expanded menu, select the Preferences option.
- Click on the Privacy option.
- Then, select the Manage Website Data option.
- Now, look for the website for which you don’t have permission to access on the server, and click on the Remove button.
Method-3: Clear Browsers’ All Cookies and Cache
The next thing you can do to resolve the issue of not getting permission to access the server of a website or websites on your browser is clear all the browsing data of the browser you are using.
Browsing data here means the cached files and cookies that every website saves in your browser so that it can be accessed fast, every time you visit the website. Websites load fast because the browser first looks in the cached data for the website files and retrieves them to show the website. However, if somehow, this cached data got damaged, then the browser faces difficulty in loading the website and therefore can throw errors like ‘You don’t have permission to access this server.’
Thus, your problem can be solved by just clearing the cookies and cache data of the browser. Listed further are the steps that will guide you through the steps to clear this data:
For Google Chrome:
- First, open the Chrome browser on your desktop and click on the three dots in the top right corner of it.
- From the expanded menu, click on the Settings option.
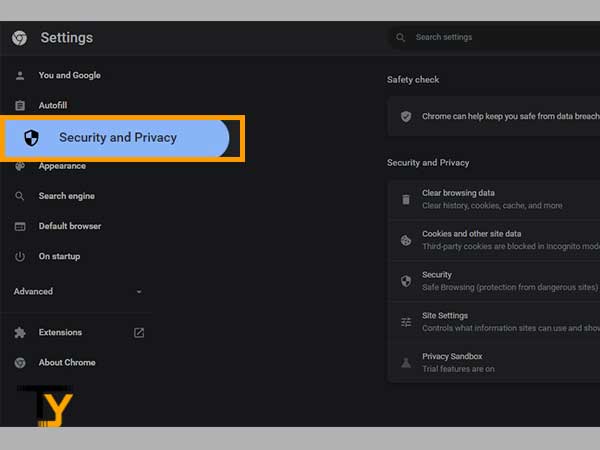
- Now, from the sidebar of the Settings page, select the Security and Privacy option.
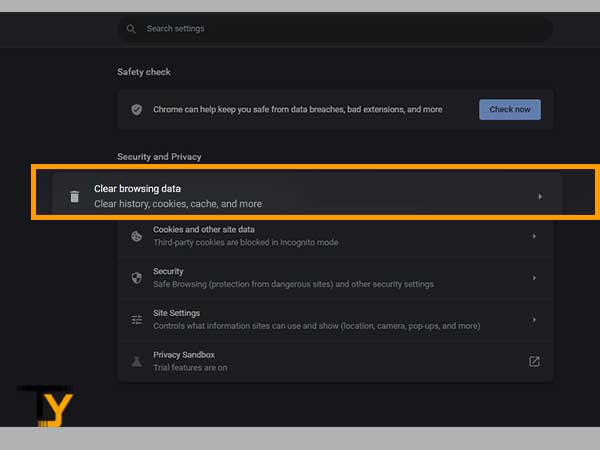
- Thereafter, click on the Clear Browsing Data section on the next page.
- Now, the Clear Browsing Data window will appear, where you have to check the ‘Cookies and other site data’ and ‘Cached images and files’ options.

- Select the Time Range for which you want to clear the browsing data.
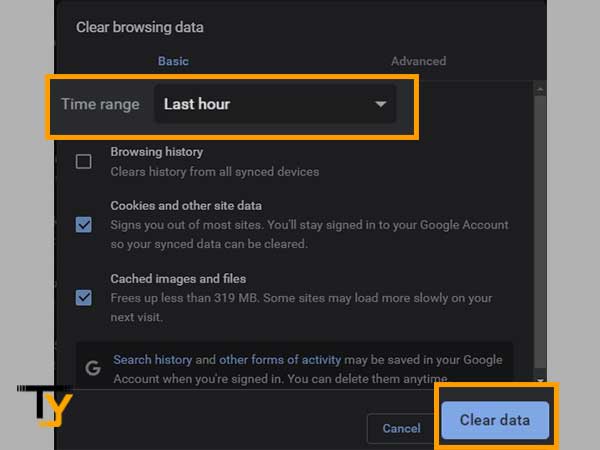
- At last, click on the Clear Data button.
From Mozilla Firefox:
- To begin with, launch the Firefox browser on your system.
- Click on the hamburger menu (three horizontal lines) in the top right corner of the browser and select the Settings option from the expanded menu.
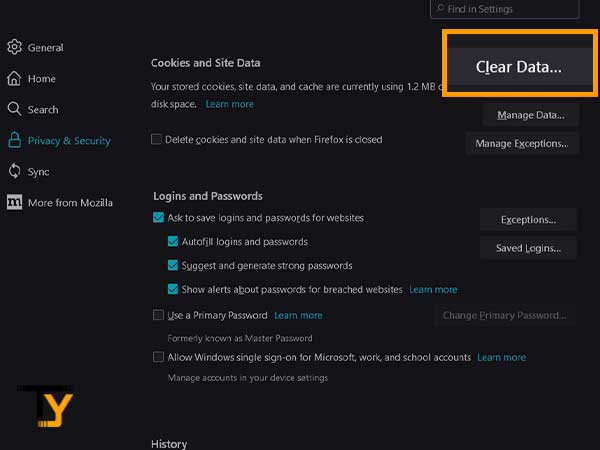
- From the Settings page that appears, select the Privacy and Security option.
- Next, move to the Cookies and Sites Data section and click on the Clear Data button.
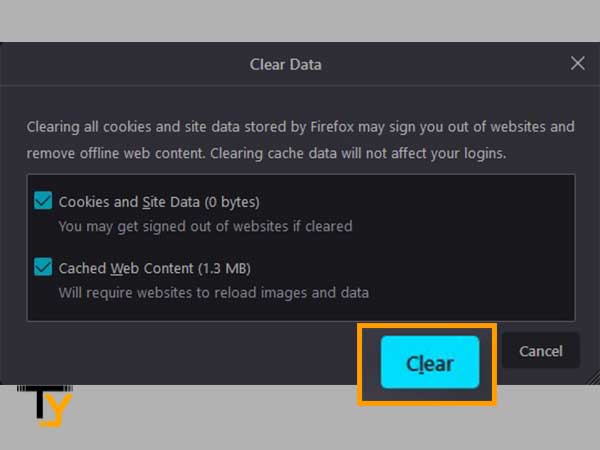
- Thereafter, the Clear Data window will open, where you have to select the ‘Cookies and Site Data’ and ‘Cached Web Content’ options.

- Lastly, click on the Clear button and your browsing data will be cleared.
For Microsoft Edge:
- Open Microsoft Edge on your desktop.
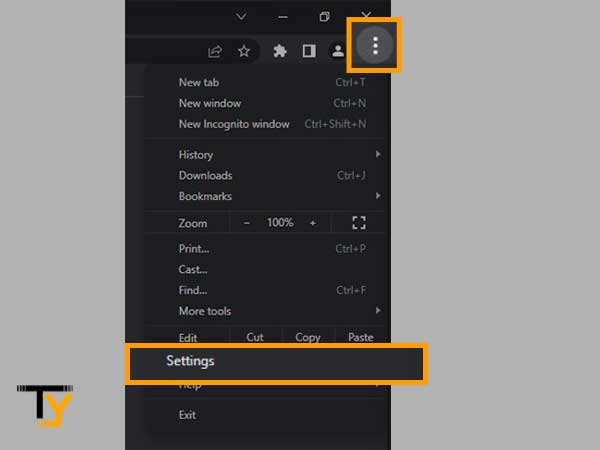
- Click on the menu icon (three dots) in the top right corner of the screen of the browser and select Settings from the menu that appears.

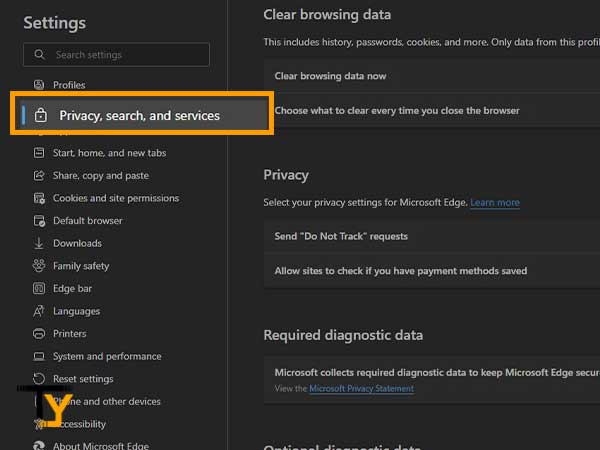
- Next, from the Settings page, click on the Privacy, search & Services section.
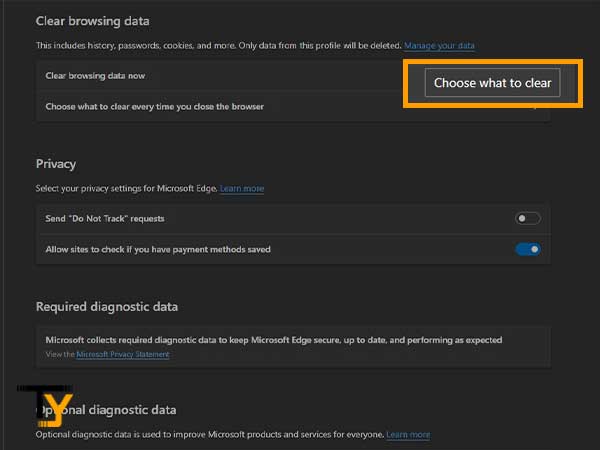
- Then, from the Clear Browsing Data section, select the Choose What to Clear option.
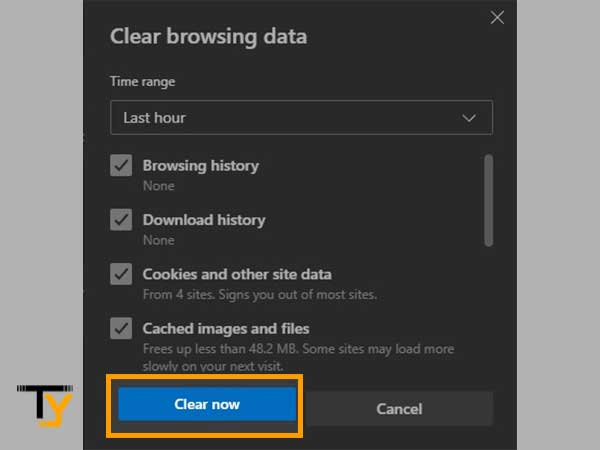
- Check the Cached Images and Files and Cookies and Other Site Data options, and click on the Clear Now button.
For Safari:
- On your Mac, click on the Safari tab present in the upper right corner of your screen.
- From the menu that appears, select the Preferences option.
- Thereafter, a menu will be displayed, from which you have to select the Advanced tab.
- Under the Advanced tab, check the Show Develop menu in the menu bar option present at the bottom of the screen.
- Then, select the Develop tab at the top of the page.
- From the menu that expands, click on the Empty Caches option. This will clear the cache from your Safari browser, and you may not see the ‘You don’t have permission to access this server’ error on your Mac, again.
Clear Safari History
If the above method doesn’t work on your Mac, and you are still shown the ‘You don’t have permission to access on this server’ error, then you can also try clearing Safari’s history. Following are the steps to take:
- Open Safari on your Mac.
- Inside Safari, click on the History option, and then select Clear History.
- Click on the pop-up menu that appears, and select the time range for which you want to clear the history.
Clearing the history from the Safari browser has helped many people to resolve the ‘You don’t have permission to access on this server’ error on Safari on the Mac system, thus it can help you as well.
Method-4: Disable VPN Extension on Your Browser
Despite being incredibly effective in other areas, VPNs might pose some unanticipated problems. Things can go wrong whether you use a VPN on your computer or a VPN plugin on your browser. Temporarily deactivate your VPN to confirm if it isn’t creating the “Access Denied” issue.
Listed here are the steps for disabling VPN extension in different browsers:
In Google Chrome:
- Open Chrome on your desktop and click on the three dots (menu icon) in the top right corner of the browser screen.
- Then, in the expanded menu, move down to the More Tools, and then click on the Extensions option.
- Now, you will be directed to the Extension page. There, look for the VPN extension you have installed on your Chrome.
- Next, you have two choices, either turn VPN off or remove it from your Chrome. If you choose the former, click on the toggle button, and for the latter option, click on the Remove button.
In Microsoft Edge:
- Open the Edge on your desktop, and type edge://extensions/ in the URL bar of it.
- You will be directed to the Extensions’ page of Edge, there, find the VPN extension.
- Now, click on the toggle button to switch off the VPN temporarily or click on the Remove button to uninstall it permanently from your browser.
In Mozilla Firefox:
- Click on the menu icon, the three horizontal lines, present in the top right corner of Firefox’s screen.
- Click on the Add-ons and Themes option from the expanded menu.
- Thereafter, hop to the Extensions tab, and look for the VPN you have installed in Firefox.
- Now, you can either turn it off temporarily by clicking on the toggle button, or permanently remove it from the browser by clicking on the More Actions button, and select Remove.
Method-5: Reset Your Browser’s Settings
You may not have permission to access a website’s server if you have unknowingly changed the browser settings. However, these settings can be reverted to their default state by following the steps listed below:
Notes
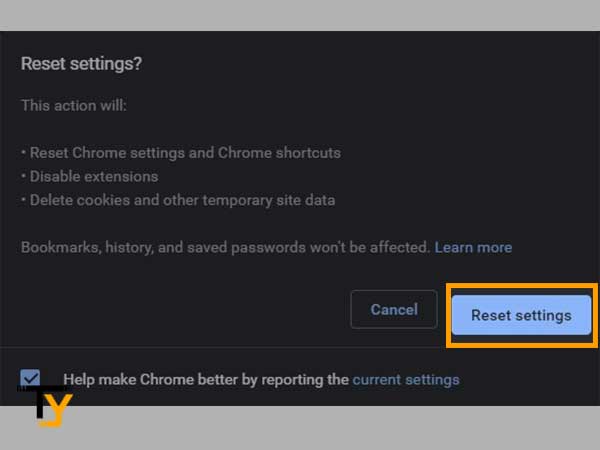
Resetting the browser will have the following irreversible effects: All browser settings and shortcuts will be removed, all extensions will be disabled or removed and all the cookies and other site data will be deleted.
For Google Chrome:
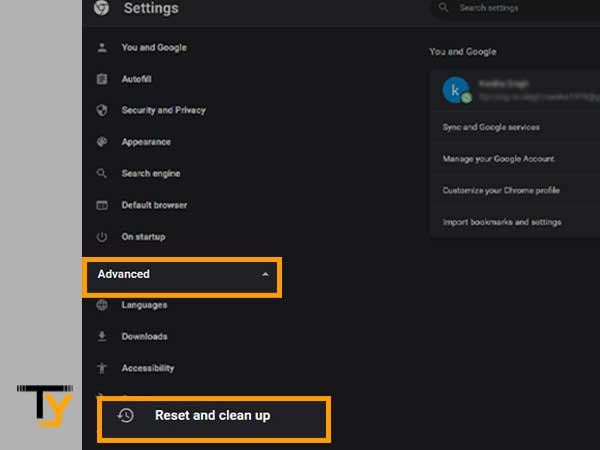
- Open Chrome on your system, click on its menu icon (three dots) from the top right corner and select the Settings option from the menu.
- Click on the Advanced option from the left sidebar of the Settings page, and then select the Reset and Clean Up option.
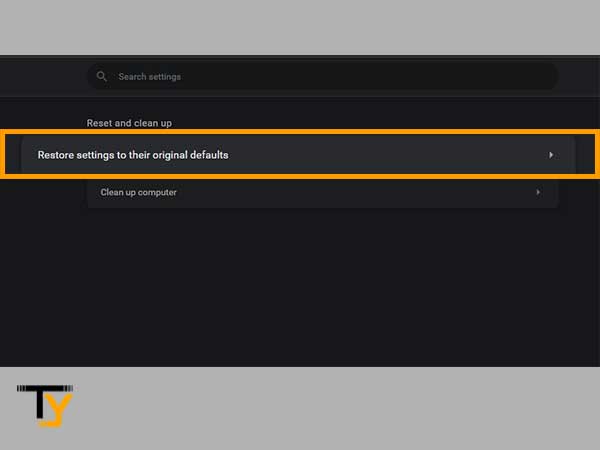
- Now, click on the Restore Settings to their Original Default section.
- At last, click on the Reset Settings button.
For Microsoft Edge:
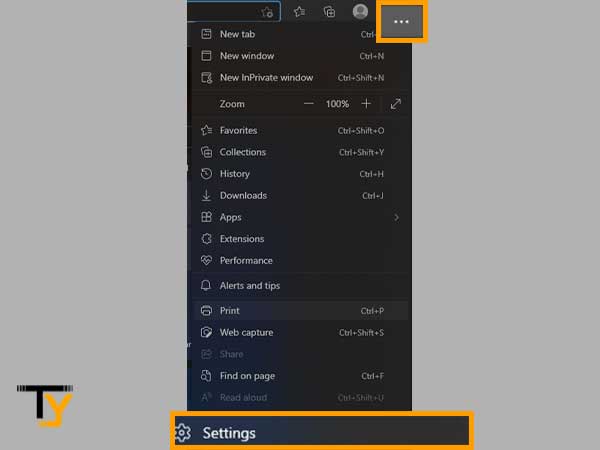
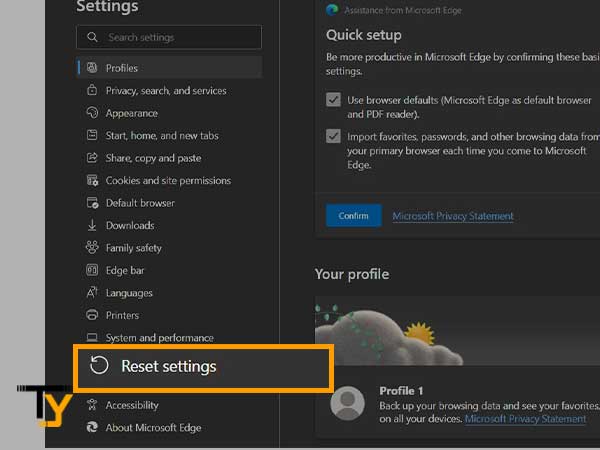
- Launch the Microsoft Edge, and open its menu by clicking on the three dots in the top right corner.
- From the options visible, select Settings.
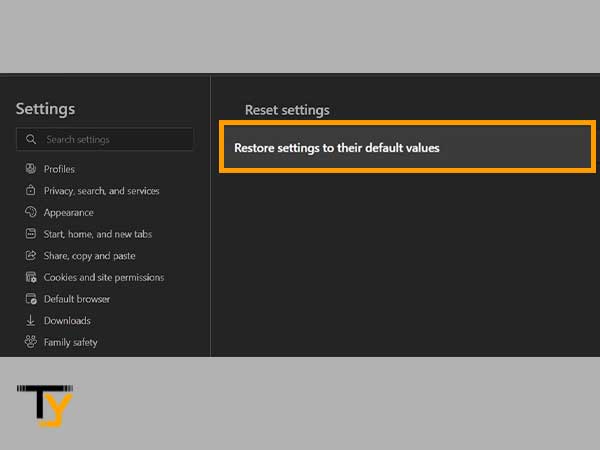
- Now, click on the Reset Settings option from the left sidebar of the Settings page.
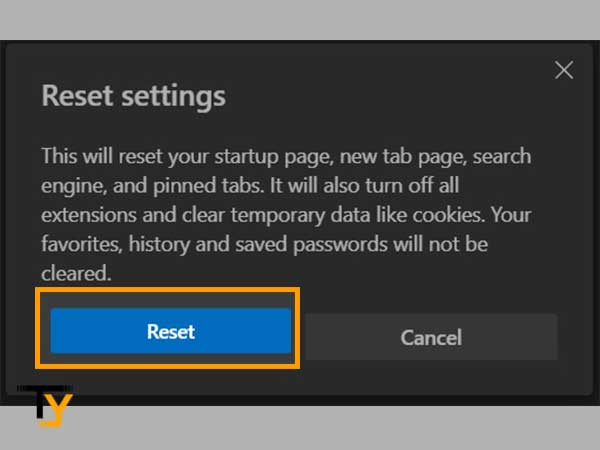
- Then, click on the Restore Settings to their Default Values section.
- Lastly, click on the Reset button.
For Mozilla Firefox:
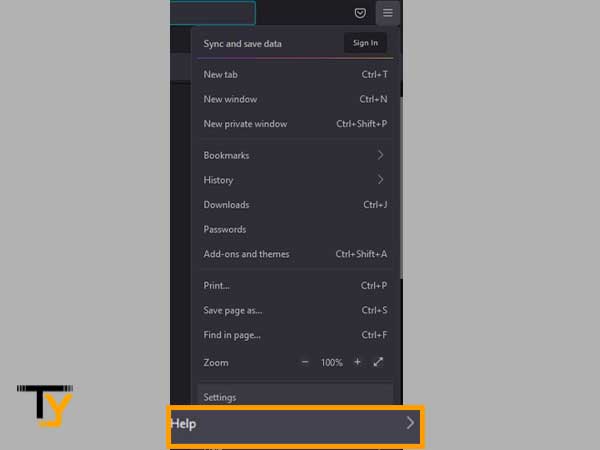
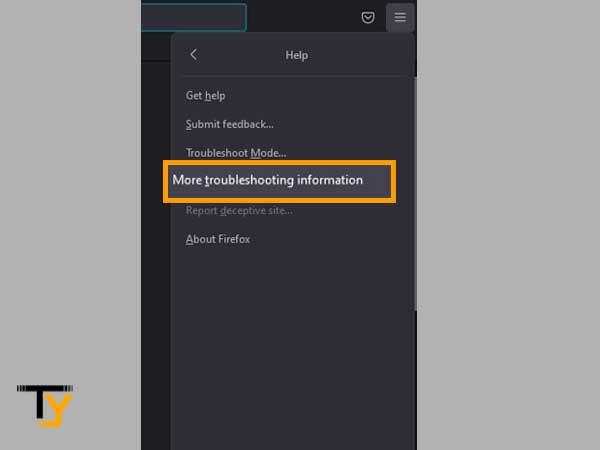
- Open the Firefox browser and click on its menu icon (three horizontal lines) in the top right corner and click Help.
- Then, select the More Troubleshooting Information option.
- Then, from the next page, click on the Refresh Firefox button, and confirm the action by again clicking on the Refresh Firefox option on the pop-up window.
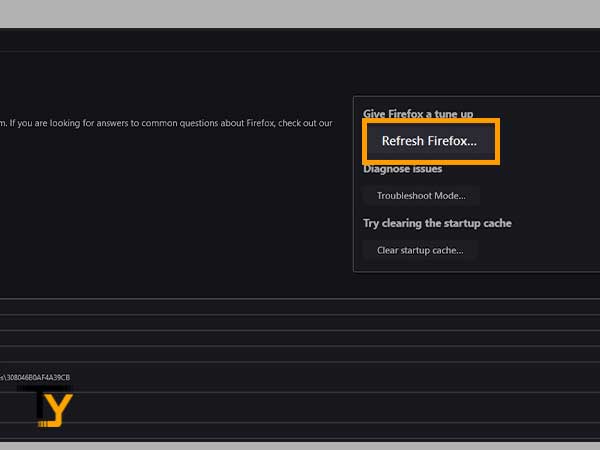
- Once it is done, click on the Finish on the pop-up screen.
- At last, click on the Let’s Go button.
You Don’t Have Permission to Access on this Server – iPhone
Many users have specifically asked to list out the solutions to resolve the ‘You don’t have permission to access on this server’ error on iPhone. Though, most of the solutions listed above can be followed in the phone browser as well (more or less the same steps are followed in the phone browsers) and thus can be used to resolve the issue.
Still, there are some solutions that are specific to the iPhone to resolve this problem, stated further are these:
Method-1: Review Restriction Settings
If you have enabled the restrictions on the type of content you can view on your iPhone, then it is possible that those restrictions are preventing you from viewing a certain website and thus, you are not given permission to access the website on its server.
Here’s how you can check and disable restrictions:
For iOS 11 and Below:
- Open the Settings app on your phone.
- Scroll down in the Settings, and tap on the General section.
- Inside General, locate Restriction, tap on it to view them and turn them off (You may have to enter your phone’s passcode to see the restrictions).
For iOS 12 and Above:
- Tap on the Settings app to open it up.
- Inside settings, tap on the Screen Time tab.
- Then, click on the Content and Privacy option, and find Restrictions inside it.
Method-2: Clear Safari Cookies on iPhone
The steps stated in the above methods for all the browsers except Safari can be followed on respective browser apps on your iPhone. However, for clearing cookies and history of Safari on iPhone, some separate steps are followed which can fix the ‘You don’t have permission to access on this server’ error on your iPhone. Listed below are the steps to take:
- Open your phone Settings app.
- Scroll through it and tap on Safari.
- Inside the Safari page, tap on the Clear History and Website Data, and confirm your action by selecting the suitable option.

If you do not want to remove history but just the website cookies, then go to Settings > Safari > Advanced > Remove All Website Data.
Method-3: Reset Network Settings
If you couldn’t get the ‘You don’t have permission to access this server’ error on your iPhone by working your way around the browser settings, then you can try to reconnect to the internet after resetting your Network Settings. By doing so, all your Wi-Fi and VPN settings will be cleared off and possibly the troublesome setting of the VPN or Wi-Fi that might be causing the issue will also be wiped off, leading to problem resolution.
So, the following are the steps for doing so:
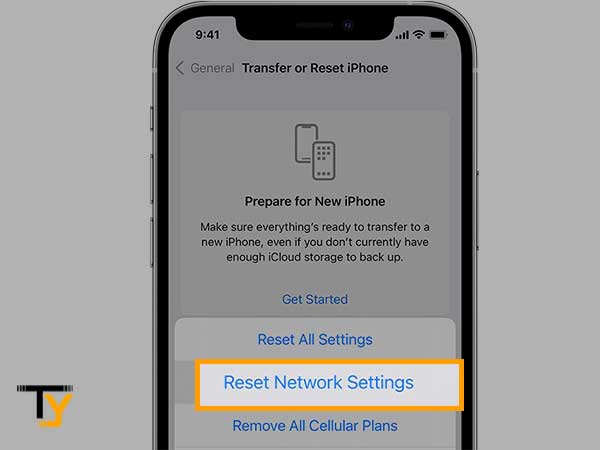
- Open Settings on your iPhone.
- Inside Settings, tap on the General tab, and then select Reset.
- Lastly, tap on the Reset Network Settings, and your job will be done.
After resetting the network settings, you have to connect again to your VPN and Wi-Fi by entering their respective passwords.