- How Permanent Deletion Actually Works
- Before You Do Anything: Critical First Steps
- Free Built-in Windows Methods (No Software Needed)
- Limitations Comparison Table
- Recover Files with Stellar Data Recovery Free
- Recovery by Scenario
- Stellar Free vs Paid: Which One Do You Need?
- What Reduces or Destroys Recovery Chances
- After Recovery: Prevent It from Happening Again
- Conclusion
- FAQs

Accidental data deletion can sting really badly if your deadlines are due tomorrow, and the only copy of the document was in your drive that got erased. It can be very troublesome if you end up overwriting it too, making it unrecoverable.
Time is of the essence here, as most deletions are still recoverable if you act quickly, before new data is written over the disk. This can be performed with the help of free built-in methods of the system or a quick tool that scans the drive for your lost files.
This guide is for Windows users looking to find ways to restore their important data from their hard drives.
How Permanent Deletion Actually Works
Many people assume that deleted files are permanently removed, but that’s not true. In NTFS (Windows) systems, deletion only removes the file’s pointer from the Master File Table (MFT), while the actual data remains, until overwritten.
When documents are removed using Shift + Delete, external drives, or any command-line operations, they bypass the Recycle Bin. In these instances, recovery becomes tricky and usually requires third-party tools.
Additionally, recovery becomes even more difficult on SSDs as the TRIM command permanently erases data blocks, thereby reducing the chances of restoration.
Furthermore, every write operation on your system increases the risk of overwriting your deleted files. This is why speed is key if you want to retrieve your data successfully.
Before You Do Anything: Critical First Steps
Before proceeding with the recovery, follow these key steps:
- Stop writing to the affected drive, and do not install recovery software on the same drive
- Identify the scenario (accidental deletion, emptied Recycle Bin, formatted drive, or an OS crash)
- Check for simple options first, such as the Recycle Bin, Previous Versions, or cloud backup trash
- Assess drive health using S.M.A.R.T data before initiating scanning
- If the drive is failing, create a byte-level disk image and begin recovery from the virtual clone instead of the original drive
Free Built-in Windows Methods (No Software Needed)
You can recover permanently deleted files from hard drive using these built-in methods:
Method 1: Recycle Bin
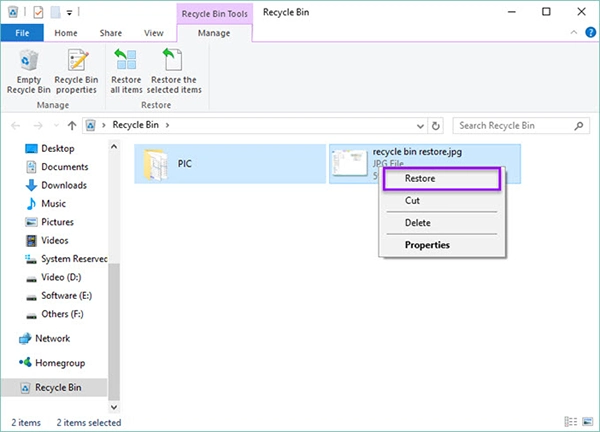
- Open the recycle bin by clicking on the icon
- Search for the files that you want to recover
- Right-click on that particular file
- Select the Restore option from the menu
Method 2: Previous Versions/File History
This method works only when File History or Previous Versions was enabled earlier.
To restore files, open Control Panel > File History, recheck if it is enabled, then search for “Restore your files” in the Start Menu and select the desired file or folder, and click on Restore.
To recover an earlier iteration of the file, right-click the document or folder, select Properties > Previous Versions, choose the required version, and click on Restore.
Method 3: Windows File Recovery (CLI)
Open the Microsoft Store and download the command-line utility called “Windows File Recovery” tool. Remember to run it as an administrator when you first start it up, and keep the source and destination drives different.
There are two modes (Regular and Extensive), both of which require a command syntax to access their functions.
The general format for all modes is:
“winfr source-drive: destination-drive: [/mode] [/switches]”
Method 4: Restore From Cloud Trash
If you have a backup of your system files on your preferred cloud application (OneDrive, Google Drive, or Dropbox), log in with your account and download files from your cloud storage.
You can also check for missing files from the cloud’s trash, located in the application. (Items in the trash are stored for a few days to allow for recovery)
Limitations Comparison Table
| Method | Success Rate | File Type Support | Skill Level Required | Max Recovery Limit |
| Recycle Bin | High (if not emptied) | All file types | Very easy | Until the bin is cleared |
| Prev. Version/ File History | Medium-high (if enabled) | Most file types | Easy | Limited to backup versions |
| Windows File Recovery (CLI) | Medium (depending on the overwrite) | Supports NTFS, FAT, exFAT | Advanced | Depends on disk overwrite |
| Backup/ Cloud Restore | Very high (if backup exists) | All backed-up files | Easy | Limited to backup storage duration |
If none of the above worked, the files are likely still on the drive but need a dedicated scanner to surface them. Here’s the most reliable free option.
Recover Files with Stellar Data Recovery Free
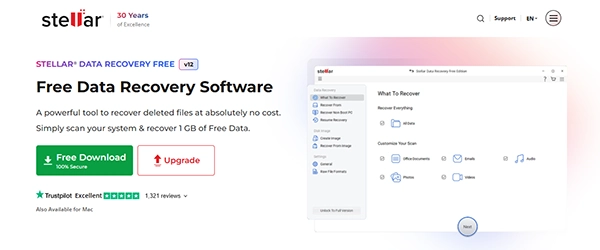
The Stellar recovery tool has over 3M+ users, with 98.6% success rate. It also provides users with the option of a free scan + preview of the recently deleted system files, and it does not require credit card information to use.
- Step 1: Download the free data recovery software on your system and install it on a different drive than the affected one
- Step 2: Select the recovery scope – Everything or custom file types (docs, photos, videos, emails)
- Step 3: Select the affected drive and begin scanning. Choose Quick Scan for recently deleted files, or Deep Scan for severe data loss, as it performs a more detailed search across every directory of the drive.
- Step 4: Preview recoverable files from your drive in File Type view, Tree view, or as a Detailed List
- Step 5: Users with a free plan can recover up to 1GB of lost data for free. Always make sure you restore and save the data to a different physical drive
- Step 6: Use the Pause and Resume options to avoid restarting long scans
Pro Tip
Save your scan results as a “.DAT” file so you can resume from where you left off before needing to rescan the same directories.
Recovery by Scenario
The data is restorable by the recovery tools if:
- Files were deleted with Shift + Delete from the HDD
- Data was lost from a formatted hard drive
- The recycle bin was emptied
- The data was deleted from a RAW or inaccessible drive using Physical Disk Scan
- The documents are blocked by a BitLocker-encrypted drive (enter recovery key + run scan)
- Files were made inaccessible after a virus or malware attack
- The files were lost due to a crashed or non-bootable PC using Stellar’s bootable USB
- Files were deleted from an external hard drive, USB flash drive, or SD card
Stellar Free vs Paid: Which One Do You Need?
| Feature | Free Edition | Professional | Premium |
| Recovery Limit | Up to 1 GB | Unlimited | Unlimited |
| File Formats Supported | All major formats (preview + limited recovery) | All file types (photos, videos, docs, emails, etc.) | Same as professional |
| Deep Scan Access | Yes (scan + preview only) | Yes (full recovery) | Yes (full recovery) |
| SMART Drive Analysis | No | Yes | Yes |
| Bootable USB Recovery | No | Yes | Yes |
| RAW Drive Support | Limited | Yes | Yes |
| Email File Recovery | Limited | Yes | Yes |
| Price | Free | $89.99 | $99.99 |
If the free version isn’t finding everything you need, upgrading can make a significant difference. Deeper scans, additional support for all file types, and no recovery limits ensure that you have a better chance of getting your files back.
What Reduces or Destroys Recovery Chances
The things that reduce your data recovery chances are:
- The continued use of the drive after data deletion has occurred (the most common mistake)
- Deleting data from modern SSDs (due to the TRIM command from the OS)
- Overwriting a drive completely during the reinstallation or formatting of your operating system
- Any kind of physical damage – head crash, water damage, PCB failure
- Trying to access the BitLocker-encrypted drive without a recovery key
- Using secure data erase tools (DoD wipe, Eraser software)
After Recovery: Prevent It from Happening Again

Follow these methods to ensure you don’t encounter this problem again:
- 3-2-1 backup rule: Create three copies of your document, save it as two different file types (PDF, DOCX, MP4, MP3), and make an off-site copy of the same data or save it on the cloud.
- Automated backup: Turn on Windows Backup, enable auto-sync of files on cloud applications, and switch on File History from the control panel of your OS.
- Drive health tracking: Download Stellar’s Drive Monitor to maintain ongoing drive health tracking on your system.
Conclusion
Deletion of files is not always permanent, but the window to recover is limited. This is why time is of the essence, and making use of the built-in features of the OS, combined with the Windows Data Recovery tool, helps users restore their personal data quickly.
Scan and preview options are free to use on the Stellar Windows Data Recovery tool, allowing even a beginner to navigate and recover their files with ease. Run a quick scan to see what files you can recover.
FAQs