
Looking for a Mac version of Bandicam but can’t find a way to download it? Bandicam is a highly effective screen recording tool. Its official website does indeed have a Bandicam for Macintosh page, but when you actually visit it, there’s only a download option for the Windows version. So, the question arises: can Bandicam be used on a Mac?
There are so many questions and queries related to the subject. Therefore, to get answers to all of those questions, follow the article till the end and read all the details.
Does Bandicam Work on Mac?
The straightforward answer to whether Bandicam works on Mac is, unfortunately, no. Bandicam is a screen recording software specifically designed for the Windows operating system and, as of now, there is no version available for Apple users. This absence can be attributed to several reasons.
Firstly, the Apple ecosystem is known for its somewhat closed nature, presenting certain challenges for developers. Additionally, the demand for such software on Apple pc is significantly lower compared to Windows.
However, the lack of a Bandicam version does not spell the end for users wishing to record their screens. The market offers numerous alternatives to Bandcam for Mac, each with unique features and capabilities. You can enjoy almost every feature such as HD or 4K, with a high rate of FPS, refresh rate, etc. (obviously if your device allows that).
In the following sections, we will introduce two reliable solutions for users: FonePaw Screen Recorder and Quicktime Player.
Solution 1. Screen Record on Mac with FonePaw Screen Recorder
For those who have a requirement for such a utility, FonePaw Screen Recorder is an ideal solution. As versatile software, it is able to record anything that takes place on the desktop – from video tutorials, online conferences, and gaming to live events. It is compatible with both Windows 11/10/8/7 and macOS 10.12 or above.
Note: One thing you must notice whenever you’re recording your screen is to turn off the notifications of the device so that any personal information does not get leaked. A few software have built-in features that can stop recording your notifications, however, you should take measures from your side as well to stay on the safer side.
Key features of FonePaw Screen Recorder
- Screen activities can be captured with or without audio and webcam.
- Ability to record 1080p and 60fps high-definition videos without watermarks.
- Equipped with an intuitive interface
- Extra features such as real-time annotations, mouse effects, and scheduled recording are also available. They make it effective and versatile in meeting different needs.
Using FonePaw Screen Recorder on Mac:
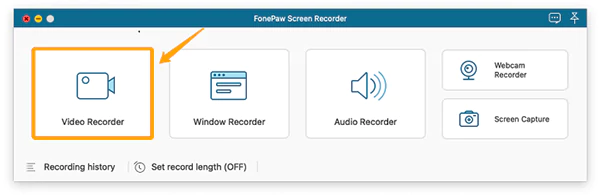
- Step 1: Download and install FonePaw for Mac. Launch FonePaw and choose Video Recording.
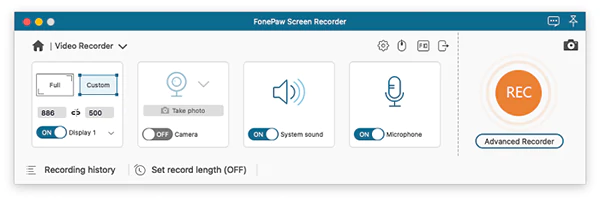
- Step 2: Based on your needs, choose the recording area, and enable webcam/system sound/microphone.
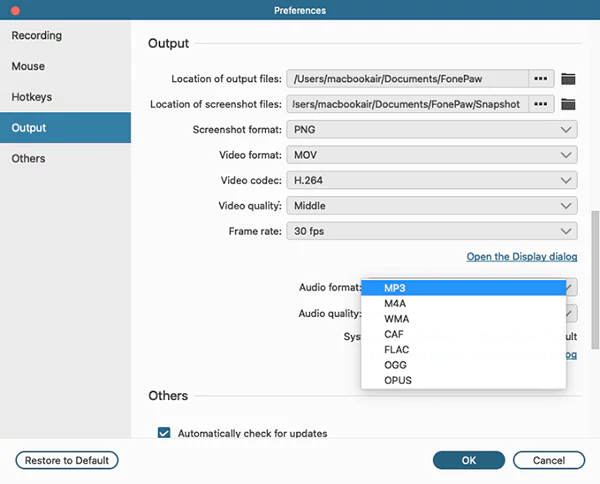
- Step 3: To personalize the output, go to Settings > Preferences. Set output formats/audio formats/mouse effects, and so on.
- Step 4: Click the REC button to start recording. You can add annotations like arrows/lines/images/text during recording. To stop recording, press the red square icon to preview and then save the video.
These were the steps on how you can use Fonepaw and their service to record your Mac screen. Now moving on to the next solution, you can learn to record the screen with Quicktime Player.
Solution 2. Screen Record on Mac with Quicktime Player
For those who would rather not install third-party software, Quicktime Player provides an easy answer. Already pre-installed on all Macs, it exists as both a media player and a satisfactory tool for basic video recording. While it lacks some advanced features that dedicated software has, its accessibility and user-friendly interface make it a favorable choice.
However, Quicktime Player can not capture activity and the internal system audio simultaneously. So, to record video with system audio, you have to install sound capture software.
Use Quicktime Player for Screen Recording:
- Step 1: Find and launch Quicktime Player on your Mac.
- Step 2: From the menu bar, select ‘File’ > ‘New Screen Recording’.
- Step 3: If you have to record audio, choose the microphone before recording and set quality parameters.
- Step 4: Press the ‘Record’ button and choose a part of your display to record.

- Step 5: When done, stop recording and save the file to your specified location.
The simplicity of Quicktime Player is perfect for those who need a straightforward way to capture screen activities.
Conclusion
To conclude, although Bandicam does not support Mac, this limitation doesn’t leave the Apple fan base without any solutions. This article explored two viable alternatives: FonePaw Screen Recorder and Quicktime Player.
FonePaw is a great option for users who want to deal with most situations in an all-in-one solution. Meanwhile, Quicktime Player can be a simple tool that is perfect for basic tasks. If you are looking for a solution for no Bandicam for Mac, you may try out these tools!
Frequently Asked Questions (FAQs)
Ans: Unfortunately, there is no Bandicam application for any Mac user. This software exclusively works on the Windows computer and works well on it. However, there are several alternate software that you can use on your Mac to record your screen instead of Bandicam.
Ans: Yes, you can record your screen on your Mac through the built-in screenshot toolbar and QuickTime Player. Try it on your computer and record your screen.
Ans: it completely depends on your needs. If you require an easy-to-use and simple tool, Bandicam is a good choice for you.